
Course
Designing Agentic Systems with LangChain
3 hr
12.1K
Let’s start by discussing the fundamental building blocks of LangGraph. These elements allow us to build structured, stateful, and scalable workflows for building advanced AI agents.
The state is a shared memory object that flows through the graph. It stores all the relevant information such as messages, variables, intermediate results, and decision history. LangGraph manages the state automatically, making development more efficient.
To complement the State, there are more advanced supporting features like checkpointing, thread-local memory, and cross-session persistence. Throughout the execution, the state is continuously executed, as shown in the diagram below: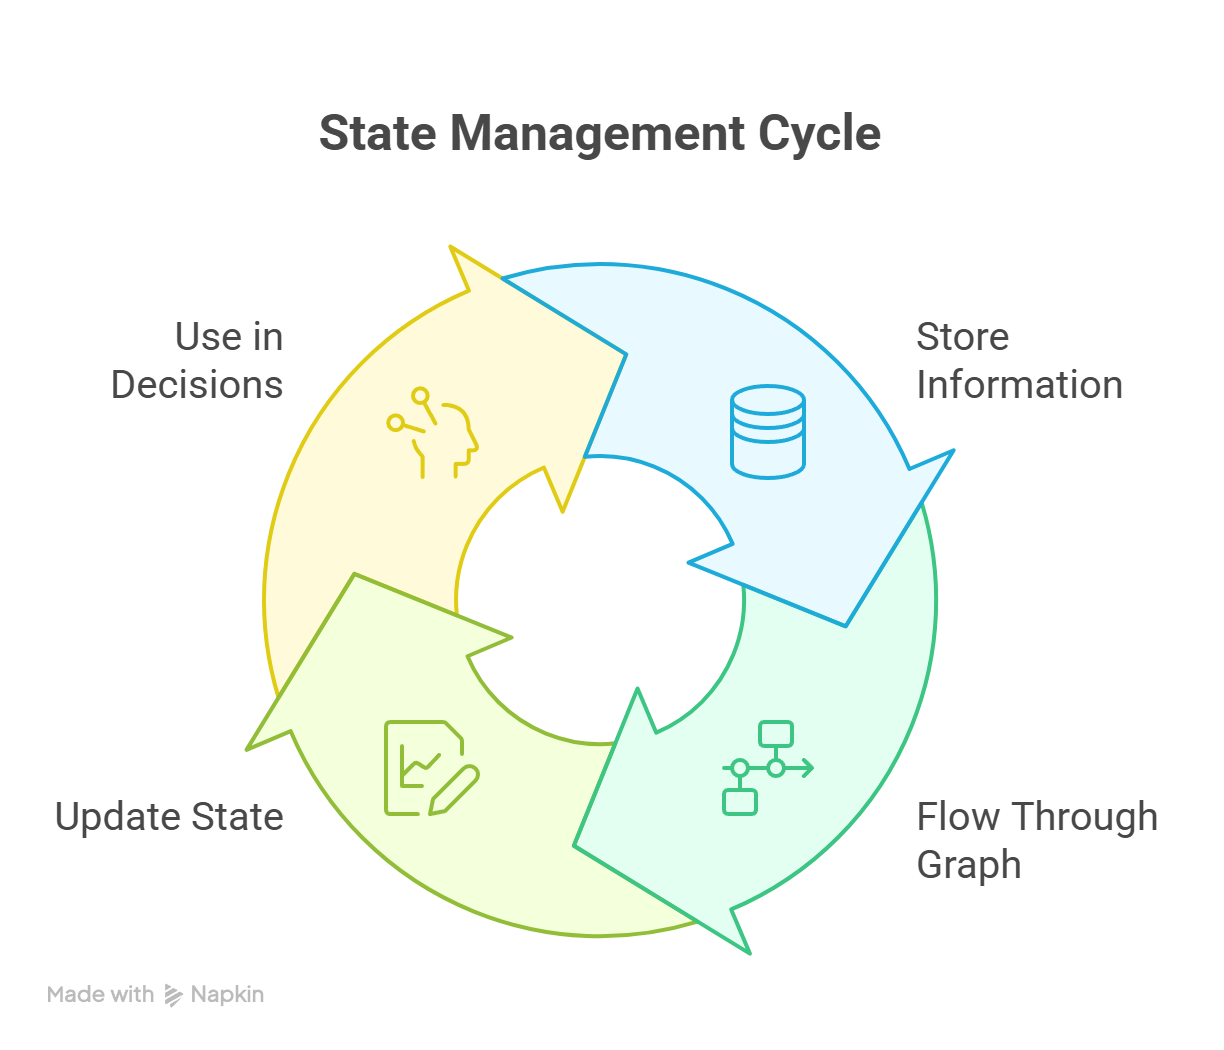
State management cycle in LangGraph showing continuous updates across nodes
A node is a single functional unit in the workflow. It can perform a variety of actions, such as:
Each node takes in the current state and returns an updated state.
Edges define the transitions between nodes. They determine the control flow of the graph and can support:
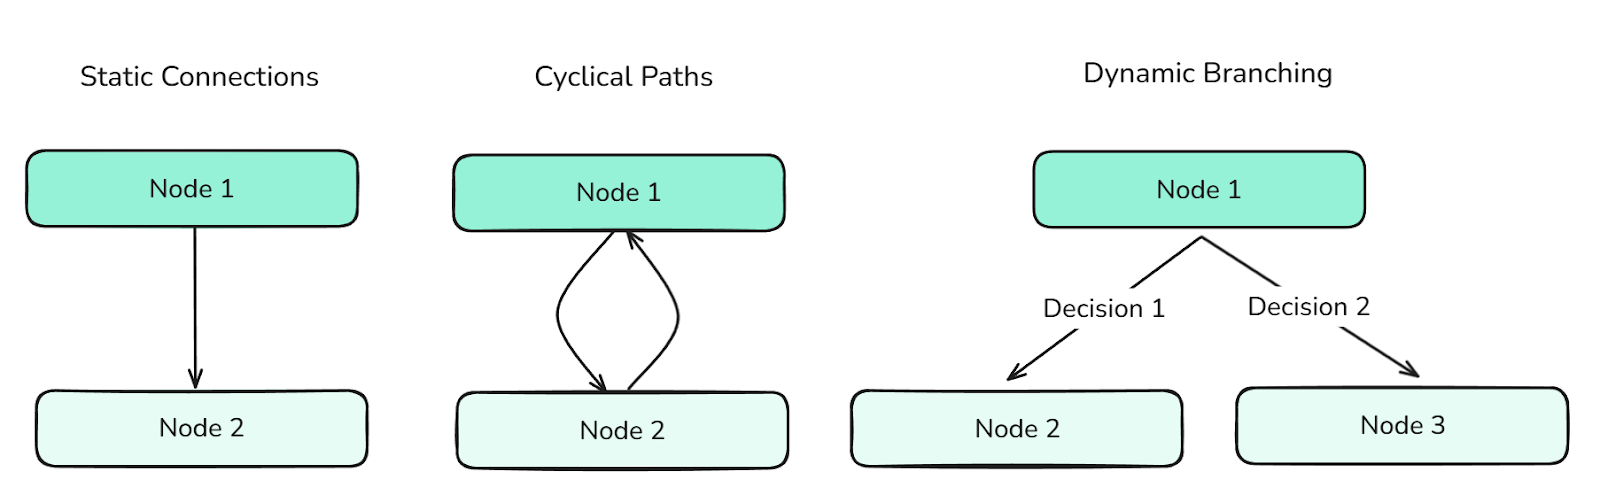
Different types of Edges define the flow between nodes and control the information through the graph.
Edges are essential for orchestrating complex agent behaviors.
A graph in LangGraph defines the structure of the agentic workflow, and it consists of nodes connected by edges.
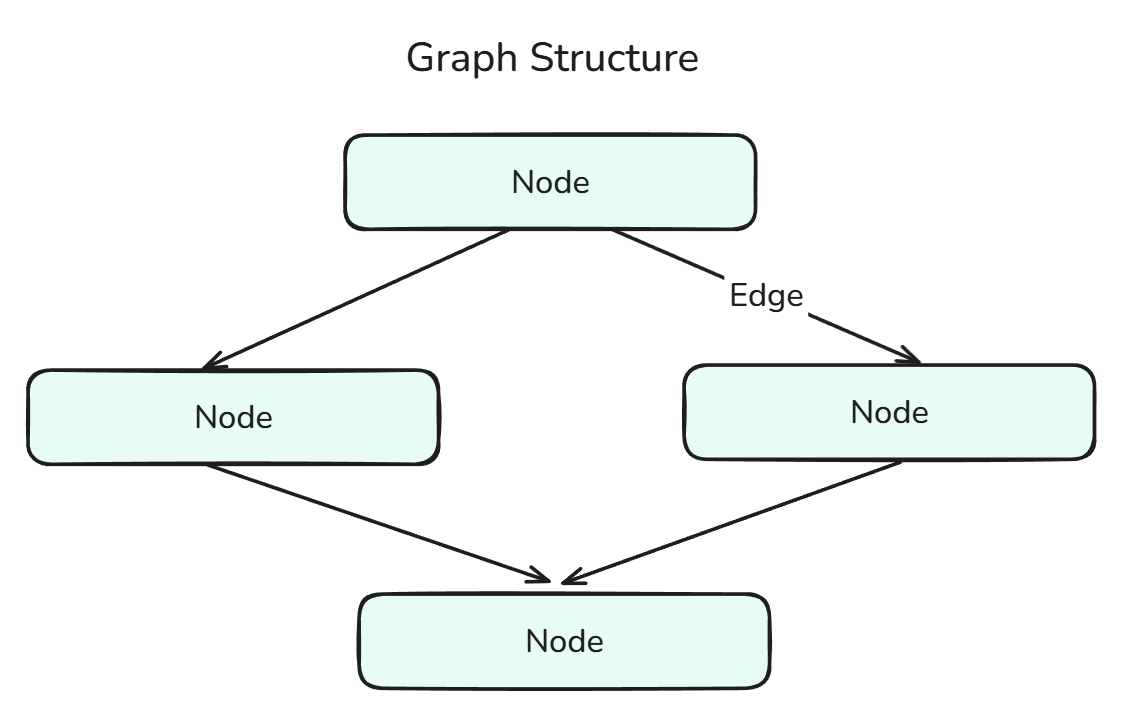
Graph Structure is a combination of Nodes and Edges.
The StateGraph is a specialized graph that maintains and updates a shared state throughout execution. It enables context-aware decision-making and persistent memory across steps. We can think of this as the fusion of State and Graph.
A tool is any external or internal function an agent can call, such as a web search, calculator, or custom utility. There are two types of Tools:
A ToolNode is a dedicated node type for executing tools within the graph. It allows us developers to integrate tools without writing additional wrapper logic. We can think of this as the fusion of Tool and Node.
Messages are structured data elements (such as the user input, system output, intermediate responses, etc.) that move through the graph and are stored in the state. They allow for traceability, memory, and context for agent decisions, which helps in making more informed decisions.
There are multiple MessageTypes in LangGraph:
HumanMessage, AIMessage, or SystemMessage — inherits from BaseMessage.Now we will be coding these Agents in LangGraph, focusing on understanding the different methods and steps involved when coding as well as visualizing these agents.
Let’s start by creating a single agent with no tools or memory. Let's start off with the imports:
from typing import TypedDict, List
from langchain_core.messages import HumanMessage
from langchain_openai import ChatOpenAI
from langgraph.graph import StateGraph, START, END
from dotenv import load_dotenv
The first line states TypedDict, which is a Type-Annotation that is defined like this in Python:
from typing import TypedDict
class Student(TypedDict):
name: str
grade: float
s1: Student = {"name": "Sam", "grade": 92.5}
Essentially, a TypedDict is a dictionary that has robust Type-Safety measures, crucial for AI Agent Development.
HumanMessage should be familiar to you now, as we discussed this earlier.
ChatOpenAI, however, is new. Let's take a slight detour to explain this.
Through Langchain, we can use the Chat family, which essentially allows us to use models from many different LLM providers, such as OpenAI, Anthropic, Ollama, etc. through their respective libraries such as ChatOpenAI, ChatAnthropic, ChatOllama, etc.
Fundamentally, their parameters and usage are similar, allowing for modularity in our code. More detailed steps can be found in the LangChain Documentation.
Lastly, the StateGraph we have covered earlier, and the Start and End are the start and end points of our graph.
Let's proceed onwards:
load_dotenv() # Obtaining over secret keys
# Creation of the state using a Typed Dictionary
class AgentState(TypedDict):
messages: List[HumanMessage] # We are going to be storing Human Messages (the user input) as a list of messages
llm = ChatOpenAI(model="gpt-4o") # Our model choice
# This is an action - the underlying function of our node
def process(state: AgentState) -> AgentState:
response = llm.invoke(state["messages"])
    print(f"\nAI: {response.content}")
    return state
graph = StateGraph(AgentState) # Initialization of a Graph
graph.add_node("process_node", process) # Adding nodes
graph.add_edge(START, "process_node") # Adding edges
graph.add_edge("process_node", END)
agent = graph.compile() # Compiling the graph
Let's discuss the .add_node() and .add_edge() methods in more detail.
add.node(): There are two main parameters you need to focus on; the name of the node and the underlying action. The underlying action, in our case - process() is the main logic behind the node, i.e., what actions are completed when we get to this stage. The name of the node can be anything, even the same as the function, although that could be quite confusing when debugging!add_edge.(): There are again two main parameters you need to focus on, and these are the start and the end nodes of the Edge. Note that the name of the node is what gets inputted, not the underlying action.Let’s look at a practical example:
user_input = input("Enter: ")
while user_input != "exit":
agent.invoke({"messages": [HumanMessage(content=user_input)]})
user_input = input("Enter: ")
The above piece of code allows us to call the Agent multiple times. Visually speaking, the AI Agent we have constructed looks like this:
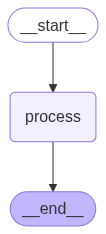
A Sequential Agent completes tasks step-by-step in a predefined order, without branching or reasoning.
To obtain such a visualization, we can use the following code (Note: we use the compiled graph):
from IPython.display import Image, display
display(Image(agent.get_graph().draw_mermaid_png()))ReAct Agents, Reasoning and Acting Agents, are extremely common in industry, due to their ease of creation but robustness. Since they are so common, LangGraph has an inbuilt method we can leverage to create such Agents.
Fortunately, we only need two additional imports:
from langgraph.prebuilt import create_react_agent
from langchain_google_community import GmailToolkit
The create_react_agent method is what will create the ReAct agents for us.
tools = [GmailToolkit()] # We are using the Inbuilt Gmail tool
llm = ChatOllama(model="qwen2.5:latest") # Leveraging Ollama Models
agent = create_react_agent(
    model = llm, # Choice of the LLM
    tools = tools, # Tools we want our LLM to have
    name = "email_agent", # Name of our agent
    prompt = "You are my AI assistant that has access to certain tools. Use the tools to help me with my tasks.", # System Prompt
)
The best part about using this is that we can create multiple agents and create more complex architectures.
We can also create our own custom tools.
@tool
def send_email(email_address: str, email_content: str) -> str:
    """
Sends an email to a specified recipient with the given content.
Args:
email_address (str): The recipient's email address (e.g., '[email protected]')
email_content (str): The body of the email message to be sent
Returns:
str: A confirmation message indicating success or failure
Example:
        >>> send_email('[email protected]', 'Hello John, just checking in!')
'Email successfully sent to [email protected]'
"""
    # Tool Logic goes here
    return "Done!"
As stated above, there are two main things that are important when creating custom tools:
ReAct Agents look like this:
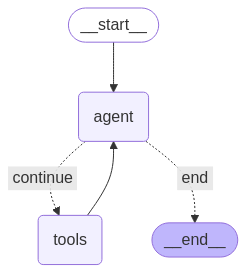
A ReAct Agent alternates between reasoning (thoughts) and actions to solve tasks step-by-step.
When defining the State for more complicated, robust agentic systems, it is a good idea to use Reducer Functions or simply reducers. reducers are data annotations that make sure that each time a node returns a message, it is appended to the existing list in the state, rather than overwriting the previous value. This allows our state to build up the context.
# State with reducer function
class AgentState(TypedDict):
messages: Annotated[list[BaseMessage], operator.add]
This code integrates the reducer function operator.add with the state, ensuring all of the messages are preserved.
In this section we will be focusing on a core component of every agent - Memory. Memory is extremely important to an agent since it provides the context needed to make it more robust and reliable. Let’s explore the different ways we can manage memory in our agents.
The State is the most important element in LangGraph, and naturally, there are multiple ways to store the state externally. Some of the popular external storage are:
All of these libraries can be found in the documentation.
For now, we will look at the SQLite:
from langgraph.checkpoint.sqlite import SqliteSaver
memory = SqliteSaver.from_conn_string(":memory:") # This is for connecting to the SQLite database
graph = graph_builder.compile(checkpointer=memory) # Compiling graph with checkpointer as SQLite backend
Using SQLite is an easy way to add Persistence to our Agents. Persistence is the ability to maintain context across different interactions.
All of this is for storing and updating the state. Now let's look at how to use and manage that state effectively, especially the messages list, which becomes quite large as the conversation continues.
LangGraph provides native support for short-term and long-term memory. Let's explore these.
Short-term memory allows our agents to remember message history during a session, making it useful for multi-turn conversations.
from langgraph.checkpoint.memory import InMemorySaver
from langgraph.graph import StateGraph

checkpointer = InMemorySaver()

builder = StateGraph(...)
graph = builder.compile(checkpointer=checkpointer)


# Invoking the Graph with our message
agent_graph.invoke(
    {"messages": [{"role": "user", "content": "What's the weather today?"}]},
    {"configurable": {"thread_id": "session_42"}},
)
In the above example, the thread_id is used for uniquely identifying a conversation or session.
Long-term memory persists across multiple sessions and is perfect for remembering things like names, goals, or settings - important things which are required across sessions.
from langgraph.store.memory import InMemoryStore
from langgraph.graph import StateGraph

long_term_store = InMemoryStore()
builder = StateGraph(...)
agent = builder.compile(store=long_term_store)
However, since our conversation can get large, we need a way to limit our message history. This is where trimming comes in.
In the below example, we are removing tokens from the beginning of the message history (due to the line: strategy="first") so that after trimming, we are left with at most 150 tokens.
from langchain_core.messages.utils import trim_messages, count_tokens_approximately

trimmed = trim_messages(
        messages=state["messages"],
        strategy="first",  # remove the messages from beginning
        token_counter=count_tokens_approximately,
        max_tokens=150
)Another way to reduce message history is by summarization. This allows for preservation of important information throughout the message history, rather than just cutting out tokens from a part of the conversation.
from langmem.short_term import SummarizationNode
from langchain_core.messages.utils import count_tokens_approximately

summary_node = SummarizationNode(
    model=summary_llm,                       # Our summarization LLM
    max_tokens=300,                          # Total token limit
    max_tokens_before_summary=150,           # when to start summarizing
    max_summary_tokens=150,                  # summary size
    token_counter=count_tokens_approximately
)
It is important to note that the summarization is performed by an underlying LLM, in this case summary_llm, which can be any LLM.
The last main operation needed in Memory Management is Delete. To delete selected messages, we can use this code:
from langchain_core.messages import RemoveMessage

def clean_state(state):
    # Remove all tool-related messages
    to_remove = [RemoveMessage(id=msg.id) for msg in state["messages"] if msg.role == "tool"]
    return {"messages": to_remove}
In the above code, we have deleted all of the tool-related messages, which could be redundant (since realistically, the Tool-Message is for the LLM to craft its answer after using the tool).
However, if we want to delete the entire message history, we can do this:
from langgraph.graph.message import REMOVE_ALL_MESSAGES
from langchain_core.messages import RemoveMessage

def reset_history(state):
    # Remove entire conversation history
return {"messages": [RemoveMessage(id=REMOVE_ALL_MESSAGES)]}Overall, LangGraph is a powerful library that offers a structured and scalable approach to building agentic systems. Modeling logic as a graph of nodes and edges, with shared state and persistent memory, allows us to develop robust agents that can reason, interact, and adapt over time.
As systems grow in complexity, this framework provides the tools needed to manage memory, coordinate tool use, and maintain long-term context — all while remaining modular and extensible.
With the core components now in place, you're equipped to design and deploy robust AI agents capable of handling real-world workflows.
To keep learning, be sure to check out our course, Building Multi-Agent Systems With LangGraph. You can also view our Designing Agentic Systems with LangChain course, and our tutorial on Agentic RAG.
Top DataCamp Courses
Course
Course
Course
Tutorial
Ryan Ong
Tutorial
Abid Ali Awan
Tutorial
Dr Ana Rojo-Echeburúa
Tutorial
Abid Ali Awan
Tutorial
Bex Tuychiev
code-along
Richie Cotton
