Track
Associate AI Engineer for Developers
26 hr
Mistral Medium 3 offers high performance at a significantly lower price than many alternatives. It is currently available through the Mistral AI API, priced at just $0.40 per million input tokens and $2 per million output tokens. This pricing outperforms leading competitors like DeepSeek v3, whether in API or self-deployed systems. In summary, you can achieve up to 90% of the performance of Claude Sonnet 3.7 on various benchmarks while saving considerably on costs.
In this tutorial, we will learn how to set up the Mistral API and use the Python client to access the model. After that, we will use LangGraph to build an agentic application that uses web search and the Python REPL tool to generate answers.
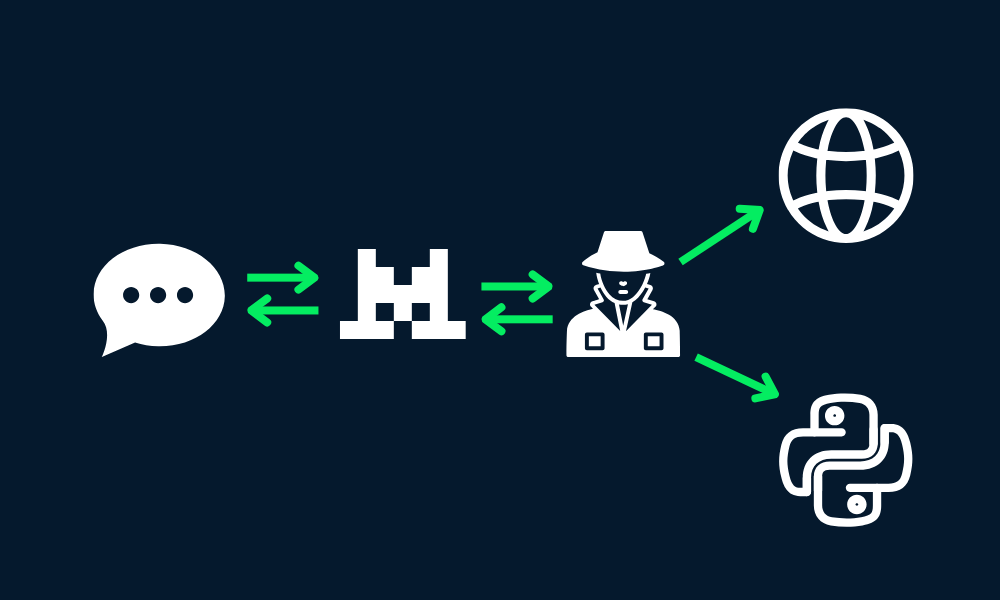
Image by Author
In this section, we will learn how to generate the API key, save it as an environment variable, and then use the Python client to access Mistral Medium 3 for text generation and image understanding.
Sign up for the La Plateforme: Mistral AI and then go to the Billing section and load the $5 credit using the credit/debit card. You only need a few cents for this project. Afterward, go to the API keys tab to generate the new API key.
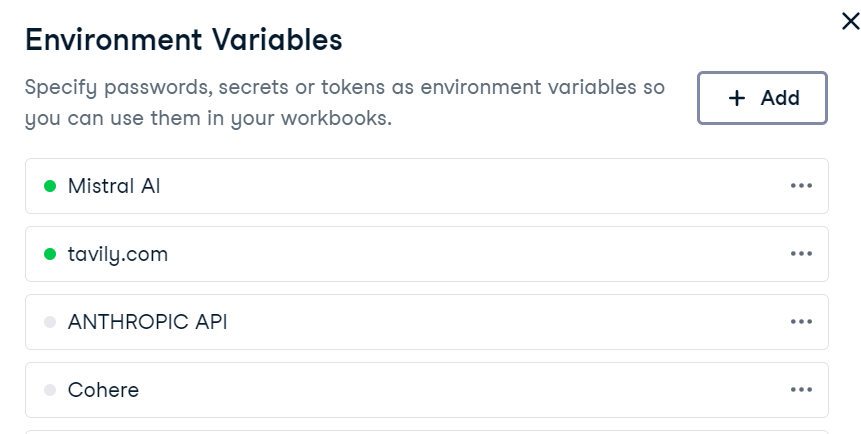
Setting up an environment variable in DataLab is straightforward. Simply go to the "Environment" tab, select the "Environment Variables" option, and add a new variable named "MISTRAL_API_KEY" along with your API key. After saving the changes, make sure to connect it.
In DataLab, create the new Python cell and install the Mistral AI python package.
!pip install -U mistralai Before writing any code, it is essential to locate the Mistral Medium 3 API key endpoint names by visiting the Models Overview page. Based on the documentation, the endpoint appears to be named mistral-medium-latest.
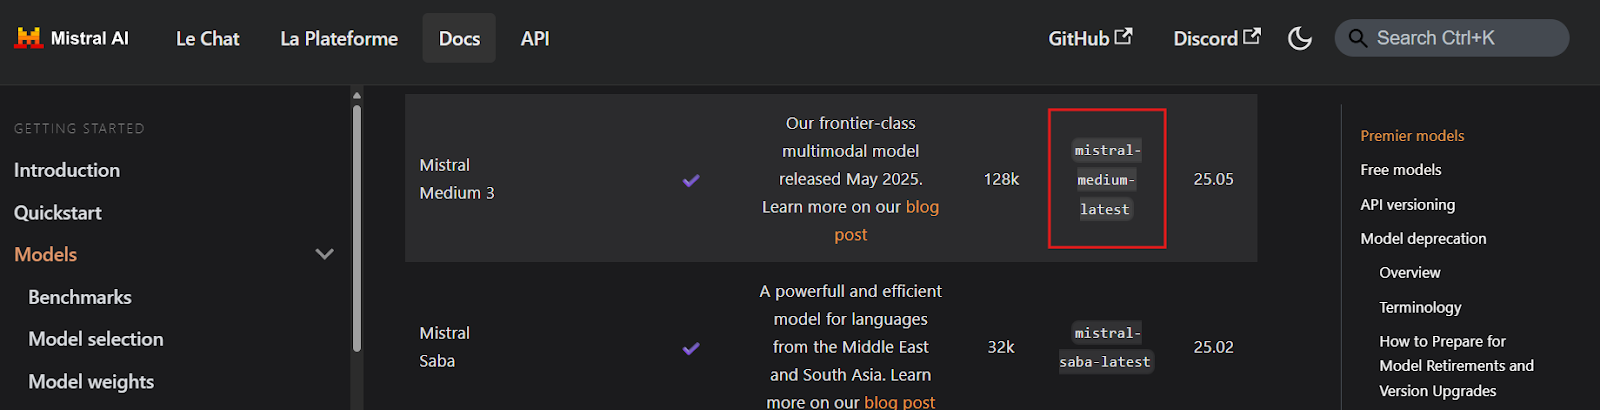
Source: Models Overview | Mistral AI Large Language Models
Next, we will create a Mistral AI client using the API key and generate a streaming response to a user query.
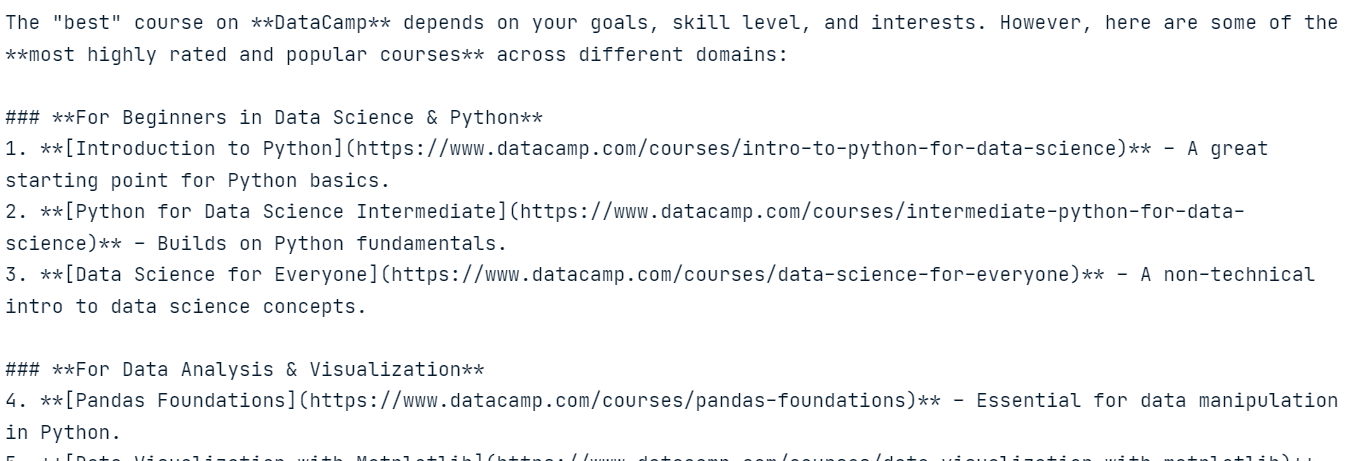
import osfrom mistralai import Mistralapi_key = os.environ["MISTRAL_API_KEY"]model = "mistral-medium-latest"client = Mistral(api_key=api_key)stream_response = client.chat.stream( model = model, messages = [ { "role": "user", "content": "What is the best course to take from DataCamp?", }, ])for chunk in stream_response: print(chunk.data.choices[0].delta.content, end="" )The response is highly accurate and it basically cost us nothing.
To test the model’s multimodal capabilities, we will take a screenshot of the DataCamp blog's front page and provide it to the model along with a user prompt.

Source: Blog | Data Science Articles | DataCamp
Since the model cannot directly access the image file, we need to first load the image and convert it into a Base64-encoded string.
import base64import requestsdef encode_image(image_path): """Encode the image to base64.""" try: with open(image_path, "rb") as image_file: return base64.b64encode(image_file.read()).decode('utf-8') except FileNotFoundError: print(f"Error: The file {image_path} was not found.") return None except Exception as e: # Added general exception handling print(f"Error: {e}") return None# Path to your imageimage_path = "datacamp_fp.png"# Getting the base64 stringbase64_image = encode_image(image_path)We will now send the Base64-encoded image along with a user query to the Mistral AI chat completion client.
# Define the messages for the chatmessages = [ { "role": "user", "content": [ { "type": "text", "text": "Explain the image in a Donald Trump style." }, { "type": "image_url", "image_url": f"data:image/png;base64,{base64_image}" } ] }]stream_response = client.chat.stream( model = model, messages = messages)for chunk in stream_response: print(chunk.data.choices[0].delta.content, end="" )The model successfully interprets the image and generates a response in Donald Trump’s style, demonstrating its multimodal understanding capabilities.

In this project, we will use Mistral Medium 3 with LangGraph to build an agentic application. This application will use Tavily API for web search and Python REPL for executing code based on user prompts.
Are you new to LangGraph? No problem! Follow our LangGraph Tutorial and learn everything you need to know about the framework.
Before diving into the implementation, we need to set up Tavily AI by creating an account and generating an API key. The process is straightforward, and you don’t need to provide payment details or a credit card.
Once you have the API key, save it as an environment variable named TAVILY_API_KEY either locally or in your DataLab setup, as shown in the previous section.
Next, we will install the necessary Python packages to create tools and agents using the LangChain ecosystem.
%%capture!pip install -U \ mistralai \ langchain langchain-mistralai \ langchain-experimental \ langgraph \ tavily-pythonWe will create LangChain’s ChatMistralAI large language models (LLM) client by specifying the model name, temperature, and enabling streaming responses.
from langchain_mistralai import ChatMistralAIllm = ChatMistralAI( model="mistral-medium-latest", temperature=0.2, streaming=True )Now, we will set up the tools for the agent. Instead of manually creating tools, we can use pre-built tools like Tavily Search and Python REPL from the LangChain ecosystem.
from langchain_community.tools import TavilySearchResultsfrom langchain_experimental.tools.python.tool import PythonREPLToolsearch_tool = TavilySearchResults(max_results=5, include_answer=True)code_tool = PythonREPLTool()tools = [search_tool, code_tool]With the LLM client and tools ready, we can now create the React Agent using LangGraph.
from langgraph.prebuilt import create_react_agentagent = create_react_agent( model=llm, tools=tools, ) LangGraph Studio is a visual development environment for the LangGraph framework; follow the LangGraph Studio Guide: Installation, Set Up, Use Cases to learn more about it.
Before executing the agent, we will define a Python function to extract the names of the tools used during the agent’s response generation. This function will help us identify which tools were invoked.
def extract_tool_names(conversation: dict) -> list[str]: """ Given a conversation dict with a 'messages' list (where each message may be a dict or a Pydantic model), extract all unique tool names used in any tool call. """ tool_names = set() for msg in conversation.get('messages', []): # 1) Try direct attribute access (for Pydantic models) calls = [] if hasattr(msg, 'tool_calls'): calls = getattr(msg, 'tool_calls') or [] # 2) If that fails, the message might be a dict elif isinstance(msg, dict): calls = msg.get('tool_calls') # also check nested in additional_kwargs if not calls and isinstance(msg.get('additional_kwargs'), dict): calls = msg['additional_kwargs'].get('tool_calls') # 3) Finally, check additional_kwargs on objects else: ak = getattr(msg, 'additional_kwargs', None) if isinstance(ak, dict): calls = ak.get('tool_calls', []) # Normalize to list calls = calls or [] # Extract names for call in calls: # dict-style tool call if isinstance(call, dict): # top-level 'name' if 'name' in call: tool_names.add(call['name']) # nested under 'function' elif 'function' in call and isinstance(call['function'], dict): fn = call['function'] if 'name' in fn: tool_names.add(fn['name']) return sorted(tool_names)LangGraph Studio is a visual development environment for the LangGraph framework; follow the LangGraph Studio Guide: Installation, Set Up, Use Cases to learn more about it.
Let’s test the agent by asking it a question about breaking news.
question = "What are the top 5 breaking news stories?"def run_agent(question): result = agent.invoke( { "messages": [ {"role": "user", "content": question} ] } ) tool_name = extract_tool_names(result) # The LLM’s final answer is always in the last message raw_answer = result["messages"][-1].content clean_text = "".join(part for part in raw_answer if isinstance(part, str)) return tool_name, clean_texttool_name, clean_text = run_agent(question)print("Tool used ⫸", tool_name, "\n")print(clean_text)The agent has used the Tavily Search tool to generate a response about breaking news.

Next, let’s test the Python REPL tool by asking the agent to generate and execute Python code.
question = "Write a code to display the stars in a triangle. Please execute the code too."tool_name, clean_text = run_agent(question)print("Tool used ⫸", tool_name, "\n")print(clean_text)The agent has used Mistral Medium 3 for code generation and Python REPL for code execution.

Finally, let’s test a query that requires the agent to use both tools in sequence.
question = "Get the latest gold price data for the past 7 days and use it to generate a line plot"tool_name, clean_text = run_agent(question)print("Tool used ⫸", tool_name, "\n")print(clean_text)The agent will use Tavily Search to obtain gold price data, Mistral Medium 3 to generate code for data visualization, and Python REPL to execute that code. The outcome will include a highly accurate chart along with a summary of the tools used.
Tool used ⫸ ['Python_REPL', 'tavily_search_results_json'] The code generates a line plot showing the gold price per gram in USD over the last 7 days, with the x-axis representing dates and the y-axis representing the gold price. The plot includes markers for each data point, a title, labeled axes, a grid, and rotated x-axis labels for better readability.
If you encounter any issues running the code, refer to the Mistral Medium 3 — DataLab Notebook for additional guidance.
You can use the Haystack ecosystem to build an agent application that is more powerful and easy to implement. Follow the tutorials to learn more: Haystack AI Tutorial: Building Agentic Workflows.
After experimenting with Mistral AI API and building agents to test various applications, one of the most remarkable aspects is that it didn’t cost me a single dollar—even after using 161,075 tokens. The model is affordable, fast, accurate, and incredibly easy to set up. It serves as a great alternative to other expensive APIs, such as DeepSeek, while offering comparable functionality.
The AI landscape is clearly moving towards smaller, faster, more accurate, and cost-effective models, which is a promising trend, particularly for startups and small-to-medium enterprises (SMEs). These organizations often rely heavily on LLM providers, and as these models become more affordable, they will greatly benefit from higher profit margins.
Take the Developing Large Language Models skill track to build your own LLMs using PyTorch and Hugging Face and the latest deep learning and NLP techniques.
Top DataCamp Courses
Track
Course
Course
Tutorial
Aashi Dutt
Tutorial
Abid Ali Awan
Tutorial
Bex Tuychiev
Tutorial
Josep Ferrer
Tutorial
François Aubry
code-along
Korey Stegared-Pace