
Track
AI Agent Fundamentals
6 hr
Google just released the second iteration of the image generation model, Nano Banana 2. When Nano Banana was first released, it took the world by storm, quickly becoming the best and fastest AI image generation model.
In this article, we do a deep dive into their new model, explore its new features, and learn how to use it via the API with Python.
If you’re generally interested in image generation, I recommend checking out our guides on the following models:
Nano Banana 2, also known as Gemini 3.1 Flash Image, is Google DeepMind’s latest state-of-the-art image generation and editing AI model. It fuses the advanced world knowledge, quality, and reasoning of Nano Banana Pro with the lightning-fast speed of Gemini Flash, making high‑fidelity creation and rapid iteration possible in the same workflow.
Here’s an overview of the key features of Nano Banana 2:
If you're new to Nano Banana, you may want to first read our previous article about the first iteration of Nano Banana Pro.
In this article, we cover how to use Nano Banana 2 using their API with Python. However, the new models are available across the entire Gemini ecosystem:
In this article, we'll be using Nano Banana 2 with the API, which means we won't need a subscription and will instead pay for each image we generate.
I found the official pricing table a little bit hard to understand. Usually, AI image models just specify a fixed price per image.
To make it simpler, I made calculations estimating the expected price depending on the image size. Note that these aren't exact prices as they can vary slightly.
|
Image size |
Cost per image |
|
512px |
$0.045 |
|
1024px (1K) |
$0.067 |
|
2048px (2K) |
$0.101 |
|
4096px (4K) |
$0.151 |
Nano Banana 2 is able to perform web searches to generate more accurate results. This is a very neat feature, but it also has to be factored into the pricing, since the searches incur an additional cost.
The first 5,000 Google Search queries per month are free when using grounding with Google Search. After that, it costs $14 per 1,000 Google Search queries.
Without further ado, let’s get started with Nano Banana 2.
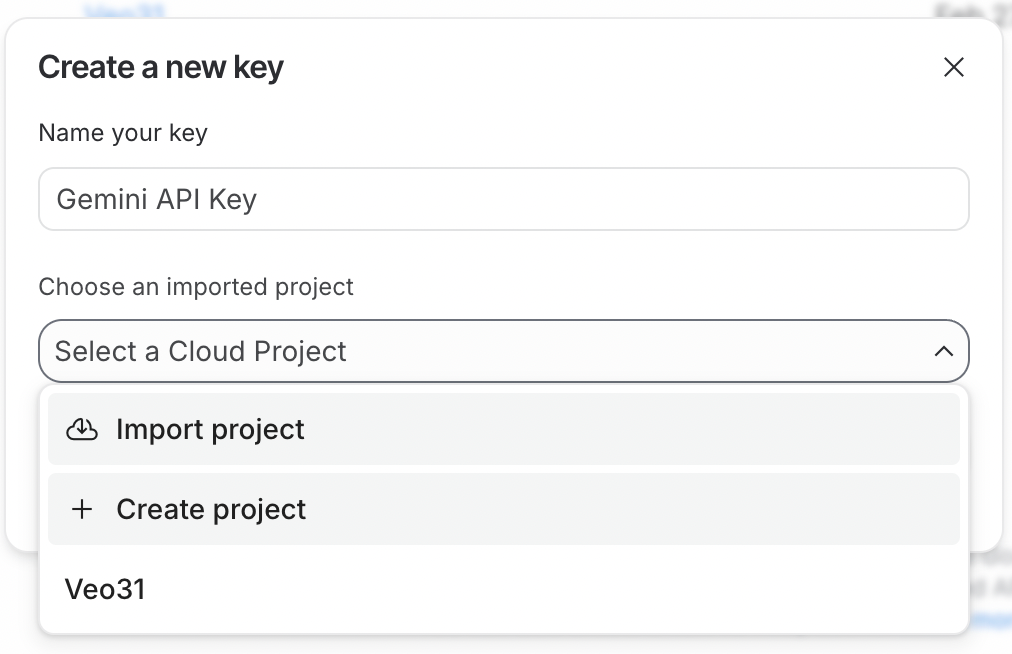
To use the API, we first need to generate an API key. To do so, first sign in to Google AI Studio. Then click the Create API Key button in the top-right corner.
The API key needs to be linked to a Google Cloud project. Google AI Studio makes this easy by allowing us to create a project directly in the API key generation process.
To use the API key, the Google Cloud project it is linked to must have billing enabled. If you just created a new project, you need to enable it by clicking the Set up billing button next to the API key.

Finally, copy the API key and paste it into a file named .env with the following format:
GEMINI_API_KEY=<paste_key_here>This .env file should be created in the same folder where we'll write the Python scripts.
Next, we need to install the Python dependencies required to interact with the Gemini API. To do so, run the following command:
pip install google-genai python-dotenv pillowThis installs the following packages:
google-genai: The official Google generative AI package. This is used to easily create a client to interact with the Gemini API.
python-dotenv: A utility package used to load the API key from the .env file.
pillow: An image library to make it easy to load images to provide as input to Nano Banana 2.
Here's the complete Python code to generate an image:
from google import genai
from dotenv import load_dotenv
from google.genai import types
import time
# Load API key
load_dotenv()
client = genai.Client()
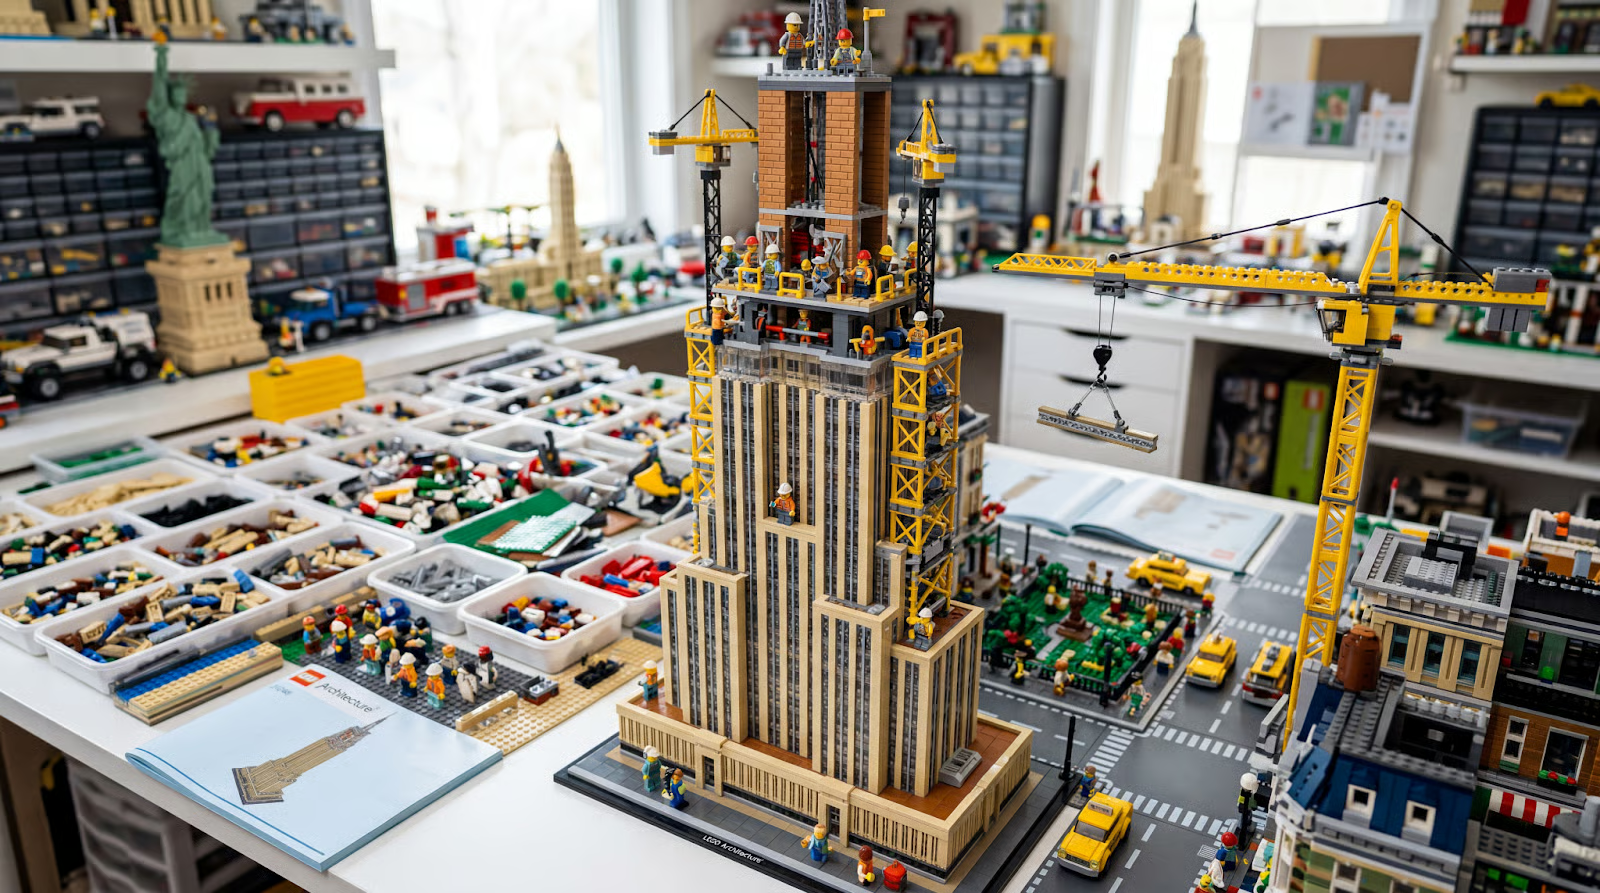
prompt = """
Lego version of the empire state building being built.
"""
# Make API request
response = client.models.generate_content(
model="gemini-3.1-flash-image-preview",
contents=[prompt],
config=types.GenerateContentConfig(
response_modalities=["Image"],
image_config=types.ImageConfig(
aspect_ratio="16:9",
image_size="4K",
),
)
)
# Save the image and display output text if any
for part in response.parts:
if part.text is not None:
print(part.text)
elif part.inline_data is not None:
image = part.as_image()
image.save(f"image_{int(time.time())}.png")Here’s the result:
In the request above, we specified the aspect ratio using the aspect_ratio parameter and the resolution using the image_size parameter.
Nano Banana 2 supports a wide range of aspect ratios and resolutions from 512 pixels to 4K. Here’s a full list of supported values:
aspect_ratio: "1:1","1:4","1:8","2:3","3:2","3:4","4:1","4:3","4:5","5:4","8:1","9:16","16:9","21:9"
image_size (resolution): "512px", "1K", "2K", "4K"
Now that we have set up everything and successfully created our first image, it’s time to put the advertised features to the test.
We can provide images to the model by loading them with PIL (installed from the pillow package) and including them in the contents list.
One of the main features of Nano Banana 2 is its ability to preserve subjects when generating images. When trying other models like the previous iteration of Nano Banana or GPT-Image, I often found that it was hard to generate images based on real-life subjects, as the model would tend to alter the way they look.
From their documentation, they mention that the model is able to support up to five characters and 10 objects for a total of 14 references. They don't explicitly define characters and objects, but intuitively, it means that the model was trained to be able to generate scenes that can place up to 4 main subjects and up to 10 secondary objects that these subjects interact with.
The model doesn't explicitly provide parameters for submitting character images and objects. Instead, this is done in the prompt. I inspected the source code of some of their demos to understand how they structure a prompt to refer to these.
The template I found was the following:
<subject_name> (<Character #number>) = Image <#index>For example, with two characters named "Alice" and "Bob," it would be:
Subjects: Alice (Character 1) = Image 0, Bob (Character 2) = Image 1Below is a full code example that shows how to pose two pets, a dog and a cat, together in a photo.
from google import genai
from dotenv import load_dotenv
from google.genai import types
import time
from PIL import Image
# Load API key
load_dotenv()
client = genai.Client()
prompt = """
Goldie and Wiskers are posing together.
Subjects: Goldie (Character 1) = Image 0, Wiskers (Character 2) = Image 1
Maintain strict subject consistency for characters.
Adjust the subject composition/pose as appropriate for the scene.
"""
dog = Image.open("dog.png")
cat = Image.open("cat.png")
# Make API request
response = client.models.generate_content(
    model="gemini-3.1-flash-image-preview",
    contents=[prompt, dog, cat],
    config=types.GenerateContentConfig(
        response_modalities=["Image"],
        image_config=types.ImageConfig(
            aspect_ratio="9:16",
        ),
    )
)
# Save the image and display output text if any
for part in response.parts:
    if part.text is not None:
        print(part.text)
    elif part.inline_data is not None:
        image = part.as_image()
        image.save(f"image_{int(time.time())}.png")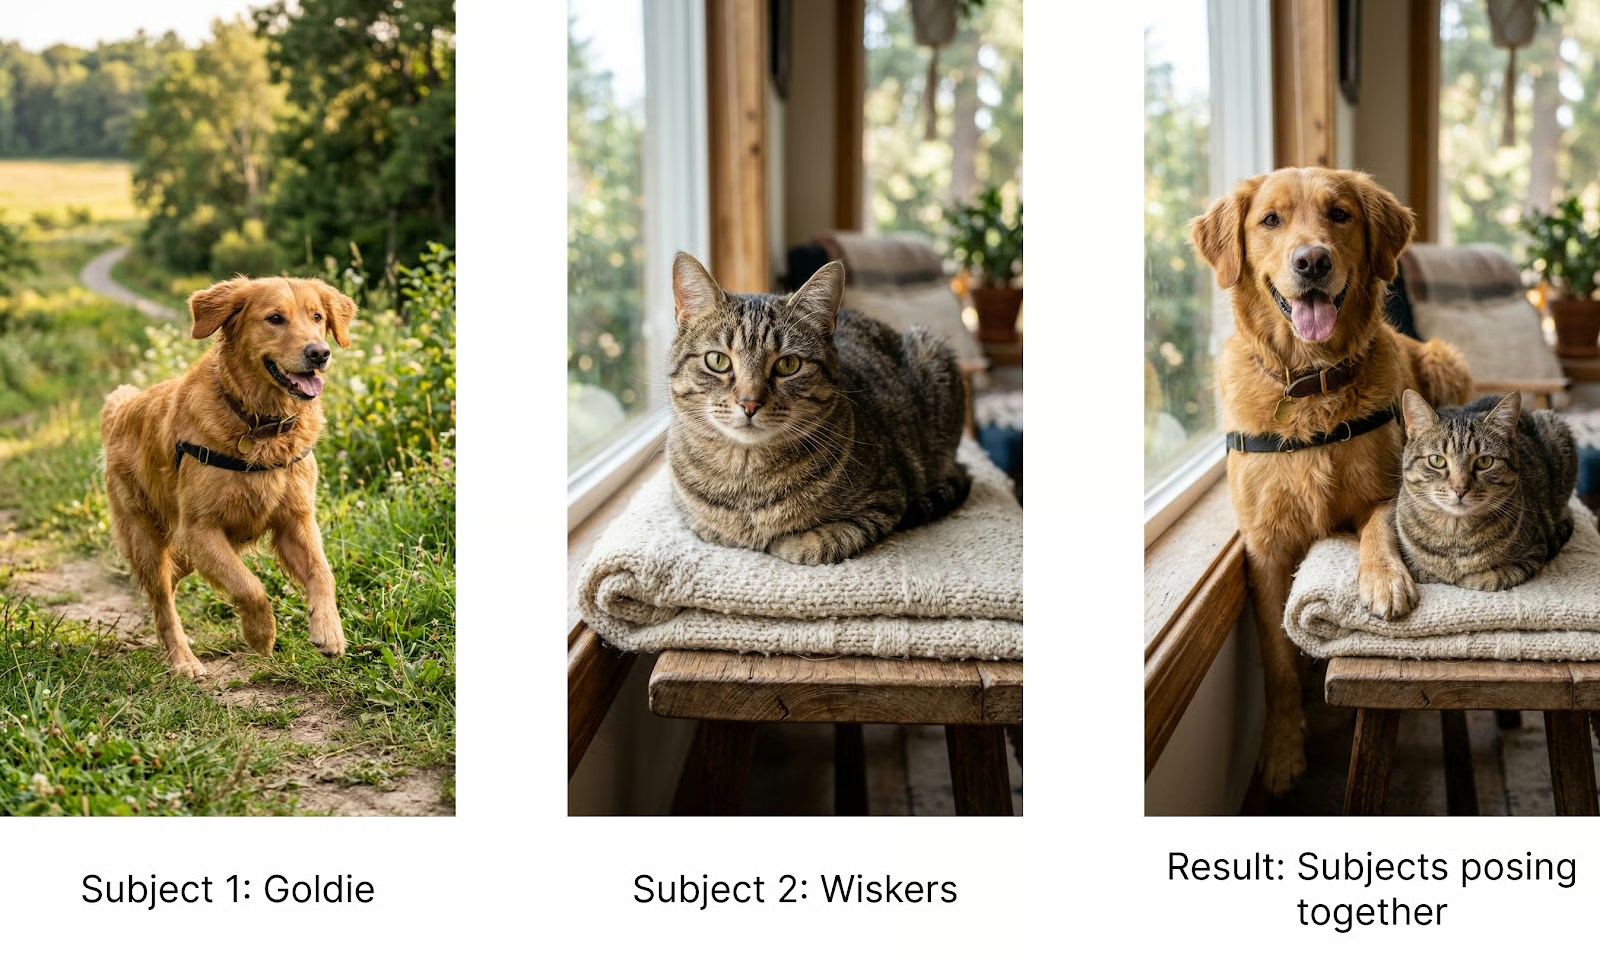
As mentioned above, this template isn't part of the official documentation. The model is probably able to understand each part from the prompt and the images. However, when implementing a real application where we want consistent results, it's best practice to be as precise and consistent as possible in the prompt, so I recommend using this template.
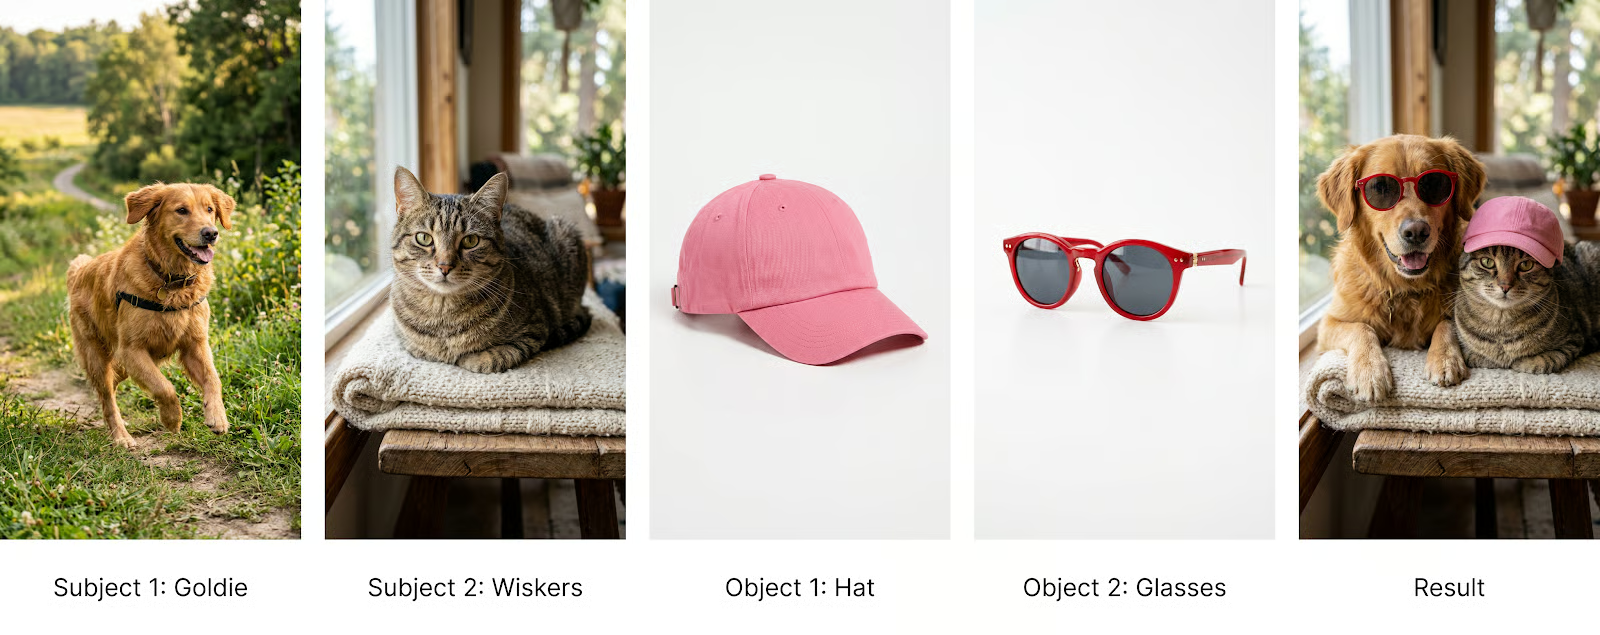
Their example extends the template to object references simply by replacing "Character" with "Object" to let the model know the image refers to an object and not the main subject.
To showcase this, let's make the dog wear specific sunglasses and the cat a hat by providing two object references. This is the prompt I used:
Goldie and Wiskers are posing together. Goldie is wearing the Glasses, and Wiskers is wearing the Hat.
Subjects: Goldie (Pet 1) = Image 0, Wiskers (Pet 2) = Image 1, Glasses (Object 1) = Image 3, Hat (Object 2) = Image 4.
Maintain strict subject consistency for characters and objects.
Adjust the subject composition/pose as appropriate for the scene.
Here's the result:
Nano Banana 2 makes it possible to ground the image generation on search so that the results are more accurate. This is especially useful when generating images that need to be consistent with reality, such as images of a location or a specific species of animal.
I've been living in Taiwan, and recently, there was an organized hike where the organizer used an image generated with Nano Banana to depict the hiking location. However, the image was not accurate at all, and people were disappointed because it looked totally different from the real one.
This got me curious to try to see if Nano Banana 2 can handle this.
We can enable both web search and image search using the tools parameter in the generation request.
Here's a full example:
from google import genai
from dotenv import load_dotenv
from google.genai import types
import time
# Load API key
load_dotenv()
client = genai.Client()
prompt = """
Create an image of the Yinhe Cave (銀河洞) in Taiwan at golden hour.
- Use Image Search to search for an image of the specified place.
- Keep the location and the view as close to the real reference as possible.
"""
# Make API request
response = client.models.generate_content(
model="gemini-3.1-flash-image-preview",
contents=[prompt],
config=types.GenerateContentConfig(
response_modalities=["Image"],
image_config=types.ImageConfig(
aspect_ratio="9:16",
),
tools=[
types.Tool(google_search=types.GoogleSearch(
search_types=types.SearchTypes(
web_search=types.WebSearch(), # Enables web search
image_search=types.ImageSearch() # Enables image search
)
))
]
)
)
# Save the image and display output text if any
for part in response.parts:
if part.text is not None:
print(part.text)
elif part.inline_data is not None:
image = part.as_image()
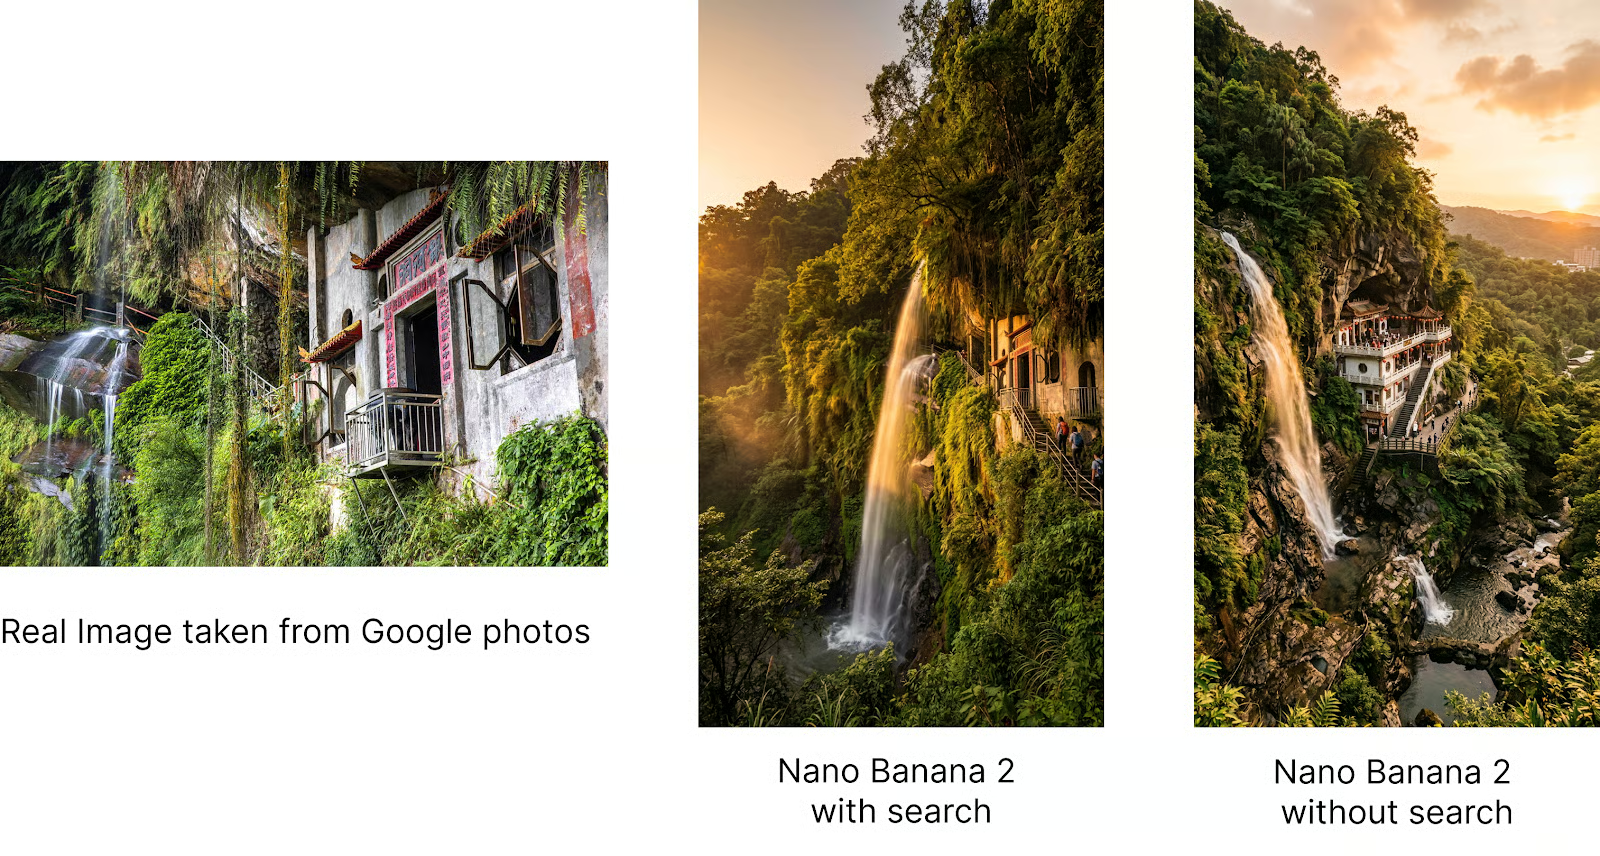
image.save(f"image_{int(time.time())}.png")Below we show the results. First, the real image taken from Google Photos, then the image generated by Nano Banana 2 using search, and finally the image generated without search. We see that search makes the results very accurate.
The Gemini team built a demo called Window View that uses this idea to build a small app that shows specific places through a window. It's a good showcase of the model's ability to understand the real world.
By providing the model with the ability to generate real-world locations with high precision, we can place specific subjects in real-world locations.
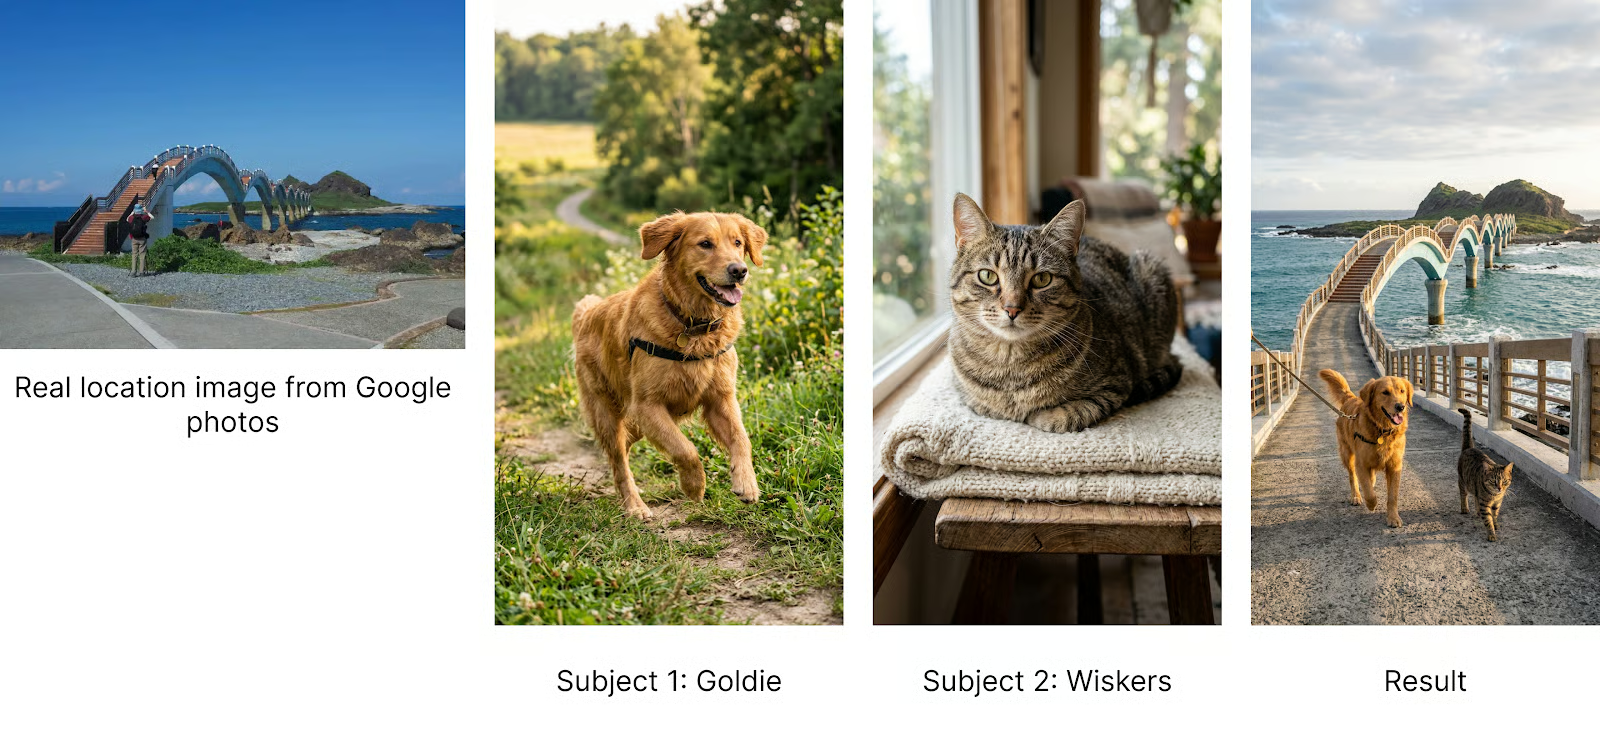
Let's try placing Goldie and Wiskers in a location in Taiwan. I selected this location because I wanted to see if the model could handle locations that aren't world-famous.
This was the prompt:
Goldie and Wiskers are traveling across the Sanxiantai Arch Bridge in Taiwan.
Subjects: Goldie (Pet 1) = Image 0, Wiskers (Pet 2) = Image 1
Use image search to find visual references of the location.
Maintain strict subject consistency for characters and objects.
Adjust the subject composition/pose as appropriate for the scene.
Note that the prompt explicitly asks the model to do an image search. I've found that when using tools, it's always better to explicitly ask the model to use them in the prompt.
Here's an image of our two characters traveling together:
To push it further, I even tried specifying the location by providing the latitude and longitude, and it worked!
Goldie and Wiskers are at the location with a latitude of 17.0621186 and a longitude of -96.7255102.

Subjects: Goldie (Pet 1) = Image 0, Wiskers (Pet 2) = Image 1

Use image search to find visual references of the location.
Maintain strict subject consistency for characters and objects.
Adjust the subject composition/pose as appropriate for the scene.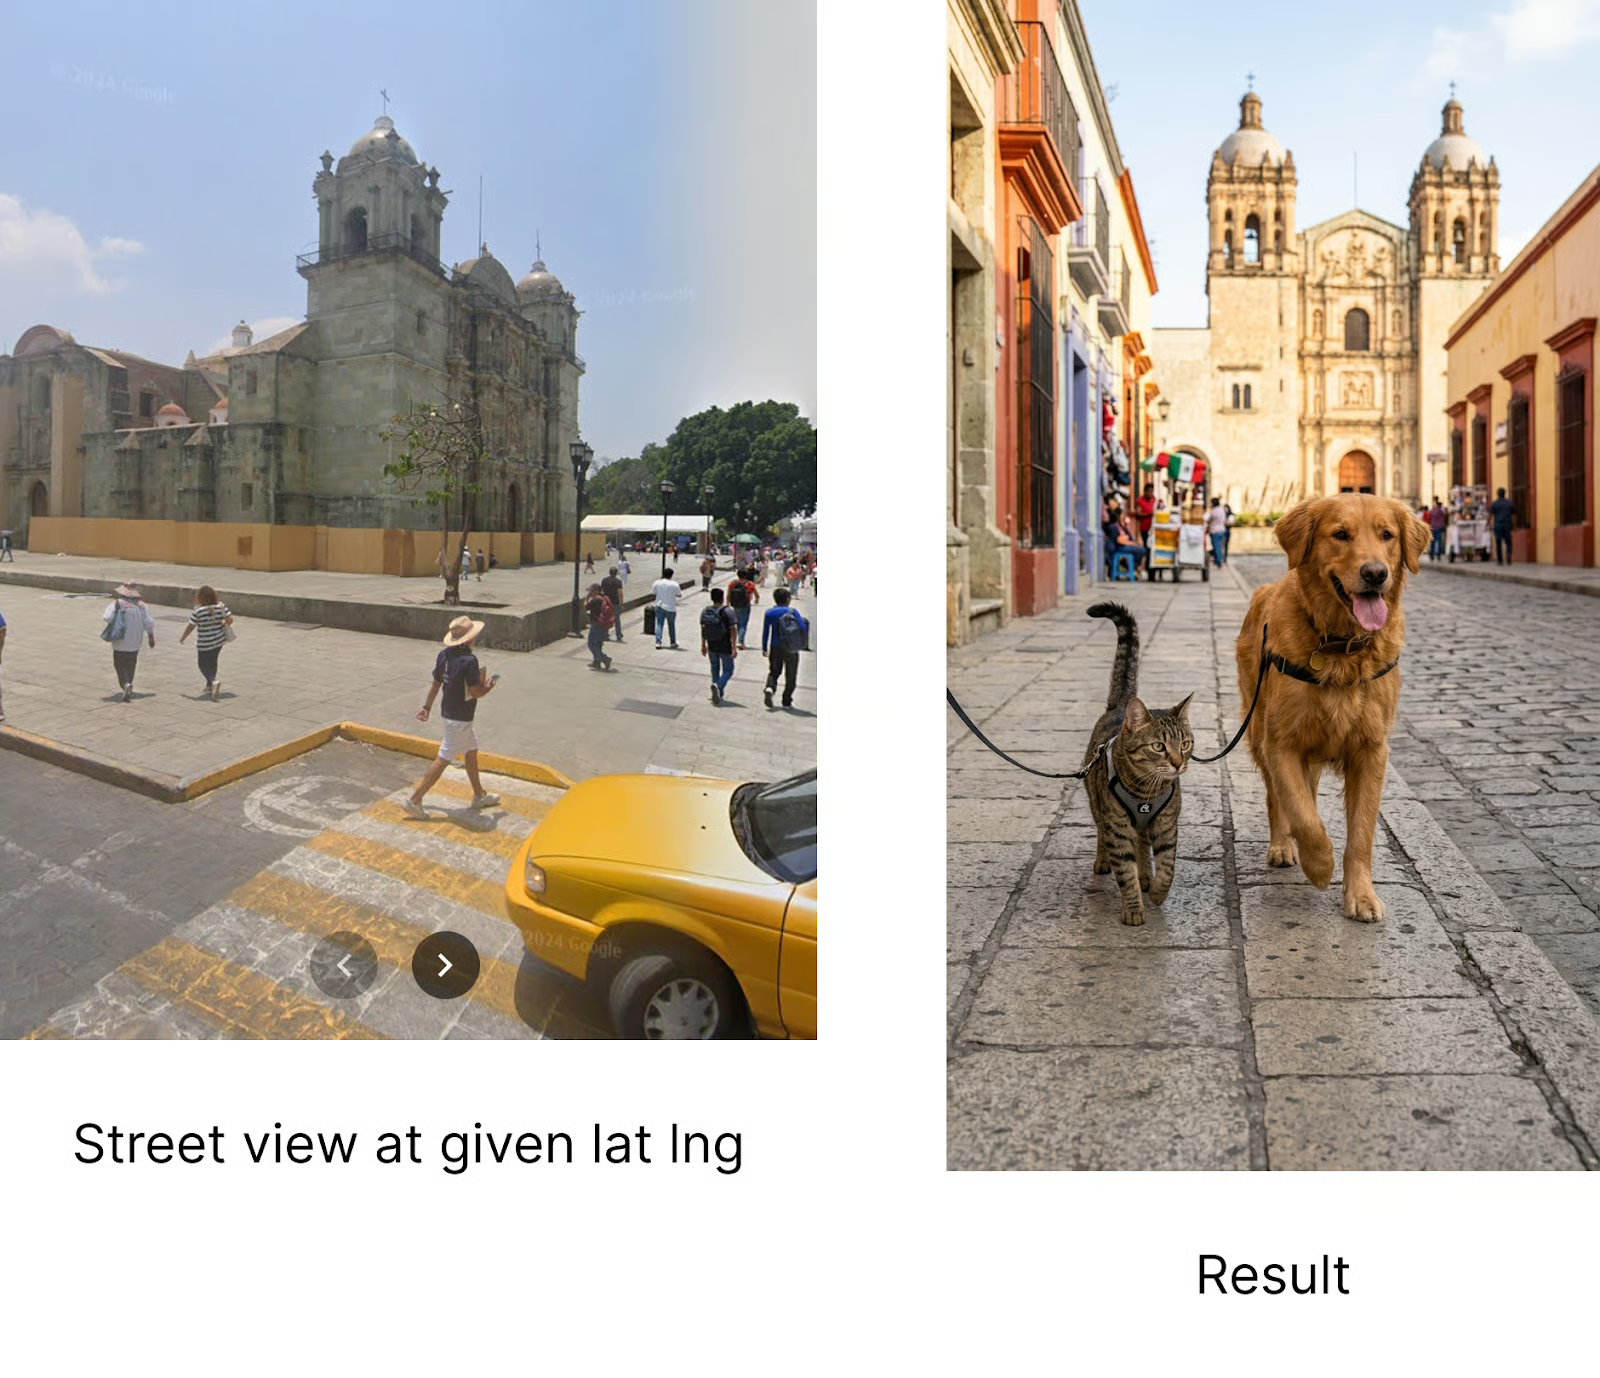
Even if the location isn't exactly the same latitude and longitude, the elements in the image correspond to what we see in that location, which is pretty impressive in my opinion.
Nano Banana 2 improves on earlier Flash-based image models by offering more consistent and dependable text rendering.
Text can now appear as sharp and accurate as the surrounding graphics. Nano Banana 2 also enables in-image localization, making it possible to create or translate text into multiple languages directly within the generated image.
I tested localization by generating a poster for a fictional virtual reality headset brand named "Beyond Reality." Then I simply used a prompt like:
Change the language of the poster to Japanese.Here are the results after changing the language of the poster text to French and then to Japanese:
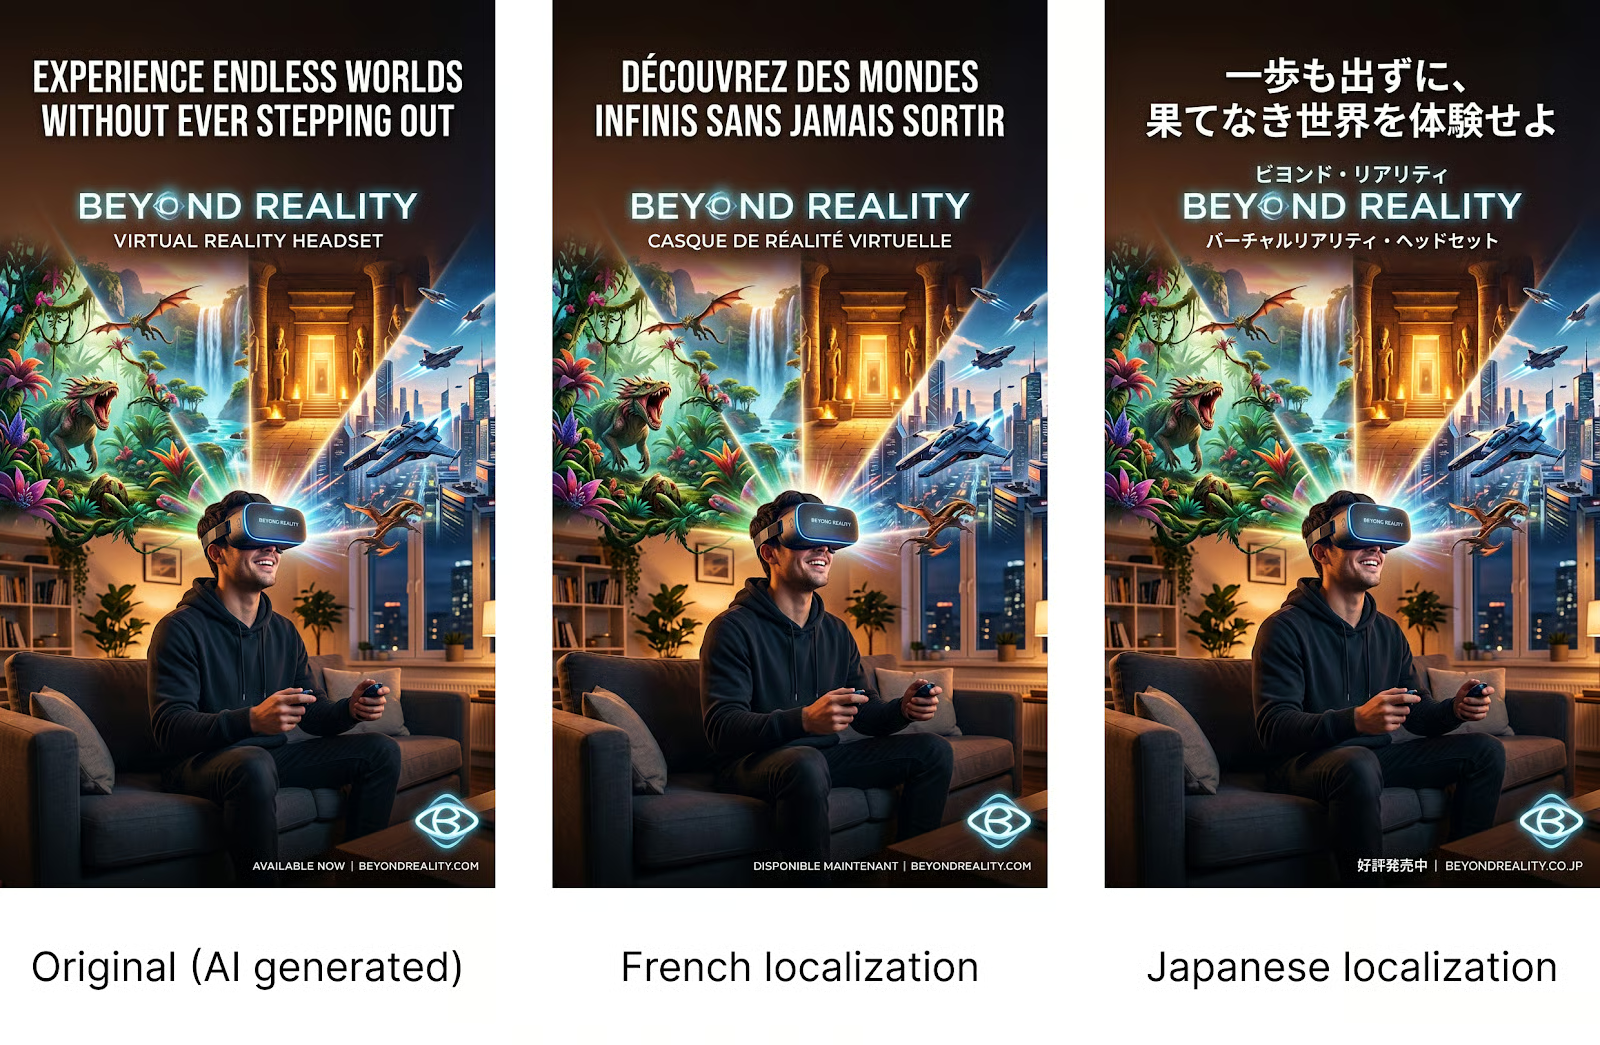
It's interesting that the model was smart enough not to translate the brand name, even though this wasn't specified in the prompt.
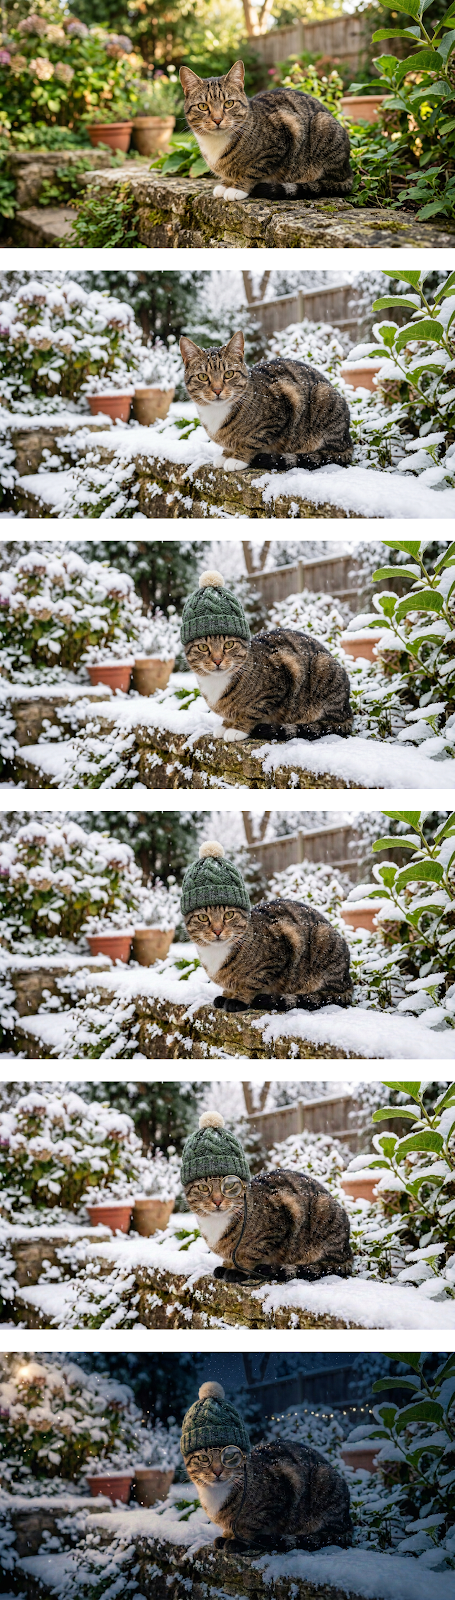
The last feature we explore is conversation mode. The previous examples aren't interactive. We send a request to the API and get a result. If we want to iterate on that result, we need to build a new request with that image and the desired changes.
A better way is to use chat mode. In chat mode, we create a chat using the client.chats.create() function, then send messages back and forth using the client.send_message() function. We can use this to implement a chat editing workflow:
Here's a full script implementing this flow:
from google import genai
from google.genai import types
from dotenv import load_dotenv
from PIL import Image
import time
load_dotenv()
client = genai.Client()
# Initialize the chat session
chat = client.chats.create(
    model="gemini-3.1-flash-image-preview",
    config=types.GenerateContentConfig(
        response_modalities=['TEXT', 'IMAGE'],
        tools=[{"google_search": {}}]
    )
)
# We keep track of the latest image object to send back as context
latest_image = None
while True:
    user_input = input("\nPrompt: ")
if user_input.lower() in ['quit', 'exit', 'q']:
        break
# Construct the message content
    # If we have a previous image, we include it so the model knows what to edit
    content = [user_input]
    if latest_image:
        content.append(latest_image)
    try:
        response = chat.send_message(content)

        for part in response.parts:
            # Handle Text Response
            if part.text:
                print(f"\nAI: {part.text}")

            elif part.inline_data is not None:
                image = part.as_image()
                filename = f"image_{int(time.time())}.png"
                image.save(filename)
                print("Saved image", filename)
                latest_image = Image.open(filename)
                latest_image.show()

    except Exception as e:
        print(f"An error occurred: {e}")
print("Session ended.")
When running this script, we can edit an image iteratively directly in the terminal like this:
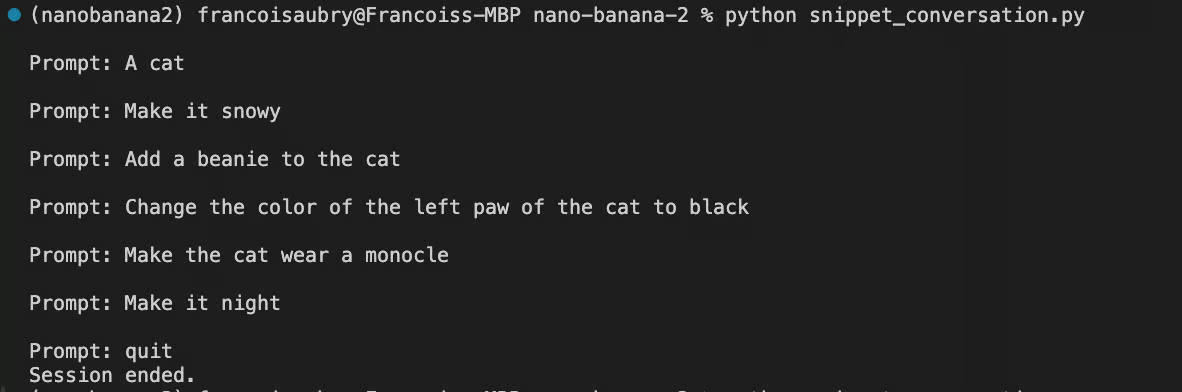
Here are the results from this interaction:
The table below highlights the main differences between the Nano Banana models. As mentioned before, the new version brings significant improvements in accuracy, consistency, and resolution while running only slightly slower than the first iteration.
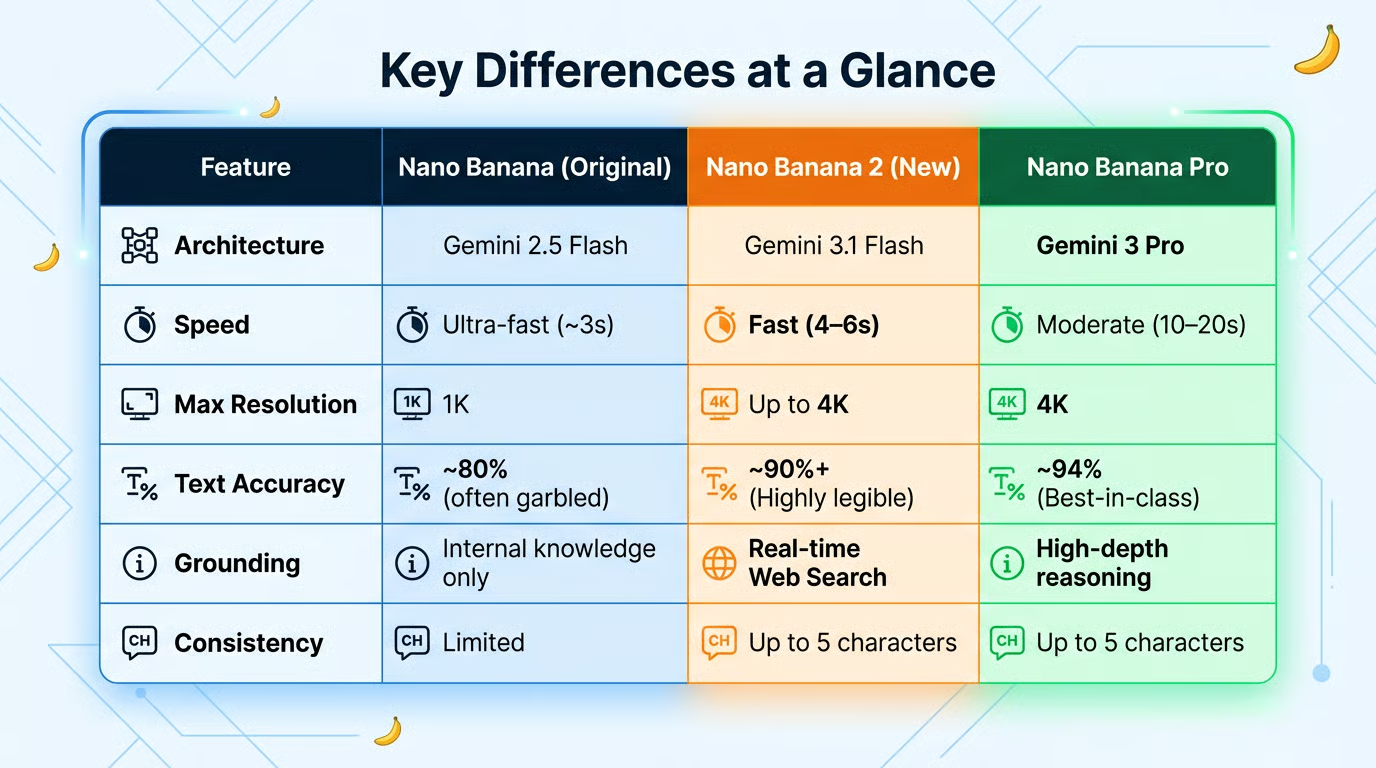
The table was actually generated by Nano Banana 2 by providing it with the data.
While Nano Banana 2 is the new standard, Nano Banana Pro remains available for "Thinking" and specialized tasks. You might still choose Pro for:
Nano Banana 2 feels like a true successor because it dramatically reduces “drift” between iterations, letting you lock in a look and reliably carry it through scenes, formats, and languages.
Between stronger subject persistence, tighter instruction following, search‑grounded realism, and conversational edits that tweak rather than redraw, it’s far easier to keep identity, layout, and style intact while you explore variations.
Production‑grade text rendering helps brand elements stay consistent, and the flexible aspect ratios make scaling a campaign across banners, posters, and mobile stories seamless. For teams building storyboards, product shots, or multi‑locale creatives, it delivers repeatability without sacrificing speed or fidelity.
Nano Banana 2 squarely bridges the gap between Nano Banana and Nano Banana Pro: its speed is effectively at Nano Banana’s near‑instant Flash pace, while its capabilities, visual fidelity, precise instruction following, subject consistency, and search‑grounded realism regularly land close to Nano Banana Pro.
If you want to learn more about the concepts behind tools like Nano Banana 2, I recommend taking our Generative AI Concepts course.
AI Courses
Track
Course
Course
Tutorial
Bex Tuychiev
Tutorial
François Aubry
Tutorial
Bex Tuychiev
Tutorial
Abid Ali Awan
Tutorial
François Aubry
Tutorial
François Aubry