Course
In this tutorial, we will create a water quality classifier application from scratch and deploy it to the cloud using Docker.
We will start by exploring the OpenAI o1 model and understanding its functionality. We will then access the model via API and ChatGPT, experimenting with both the o1-preview and o1-mini versions, before developing effective prompts for building a water quality classifier application.
Once we have the output, we’ll add the code and files provided by the o1 model into the project folder and then load, preprocess, train, and evaluate by executing Python code locally. Finally, we’ll build a FastAPI application and deploy it on Hugging Face using Docker.
If you are new to AI, the AI Fundamentals skill track is a great place to start. It will help you learn about popular AI topics like ChatGPT and large language models.
Image by Author
What is OpenAI’s o1 Reasoning Model?
OpenAI has introduced the o1 model, a new AI designed to perform human-like reasoning tasks, including solving multi-step problems, complicated math equations, and coding questions.
Before responding to a difficult question, o1 uses a chain of thought when attempting to solve a problem. Through reinforcement learning, o1 hones its chain of thought and refines the strategies it uses. It learns to recognize and correct its mistakes.
The o1 model is available in two variants: o1-preview and o1-mini.
The o1-preview is used for deep reasoning questions, while the o1-mini is a faster model ideal for coding and math problems. Both models are available to ChatGPT Plus and Team users. If you are a tier 5 organization, you can also access them via the OpenAI API.
The current version of the model lacks features like web browsing, file uploading, and Python REPL, which OpenAI plans to add in future updates.
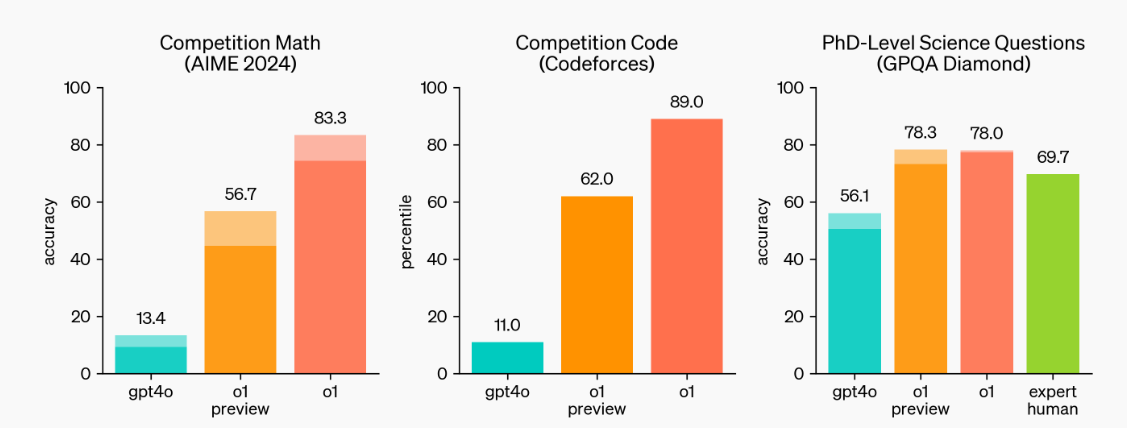
Source: Learning to Reason with LLMs | OpenAI
As we can see, the o1-preview and o1 models are setting new benchmarks. They excelled in math and coding competitions and can handle the science questions of Ph.D. students.
Read the OpenAI o1 Guide: How It Works, Use Cases, API & More for in-depth analysis and to learn how it works and its benchmarks in detail.
Develop AI Applications
Getting Started with o1-preview and o1-mini
There are many easy-to-access o1 models, but the official ones are either through the OpenAI API or using the ChatGPT Plus or Team subscription.
In this section, we will learn how we can use them to solve complex problems.
Accessing the o1 model
If you are familiar with the OpenAI API for chat completion, you have to set the model name to "o1-preview" and provide a detailed prompt. It is that simple.
from openai import OpenAI
client = OpenAI()

response = client.chat.completions.create(
    model="o1-preview",
    messages=[
        {
            "role": "user",
            "content": "Create an SQL database from scratch, including guides on usage and code everything in Python."
        }
    ]
)

print(response.choices[0].message.content)
To access it on ChatGPT, you have to click on the model selection dropdown option and select the “o1-preview” model, as shown below.
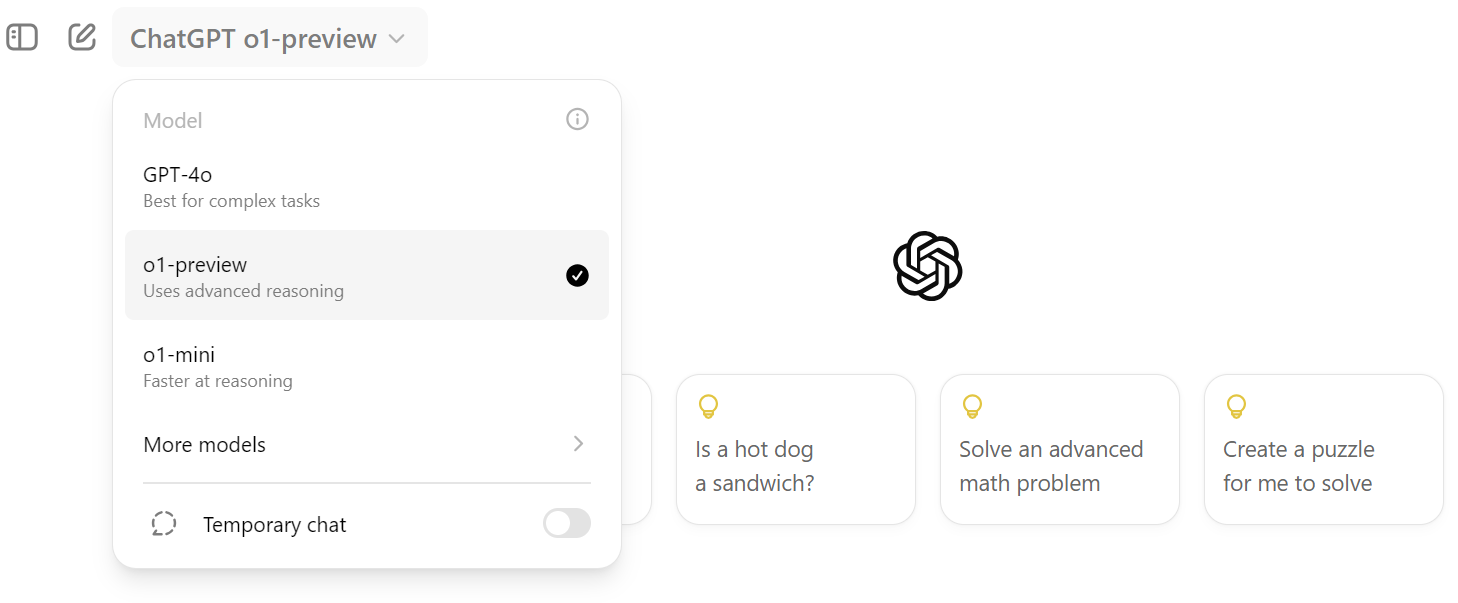
Using o1-preview model in ChatGPT
The o1 model's prompts are different. You have to provide it with multiple instructions or detailed questions to fully realize its power. It can take a long and complex instruction to generate an optimal answer.
Calculating taxes for a freelance business in Europe can be complex. We will use the o1 model to determine our tax liability to the Spanish government.
Prompt: “I am a freelancer in Spain working for a US-based company. Over the past year, I have earned 120,000 USD, and I need to calculate the amount of taxes I owe. Please take into account that I moved to Spain 8 months ago.”
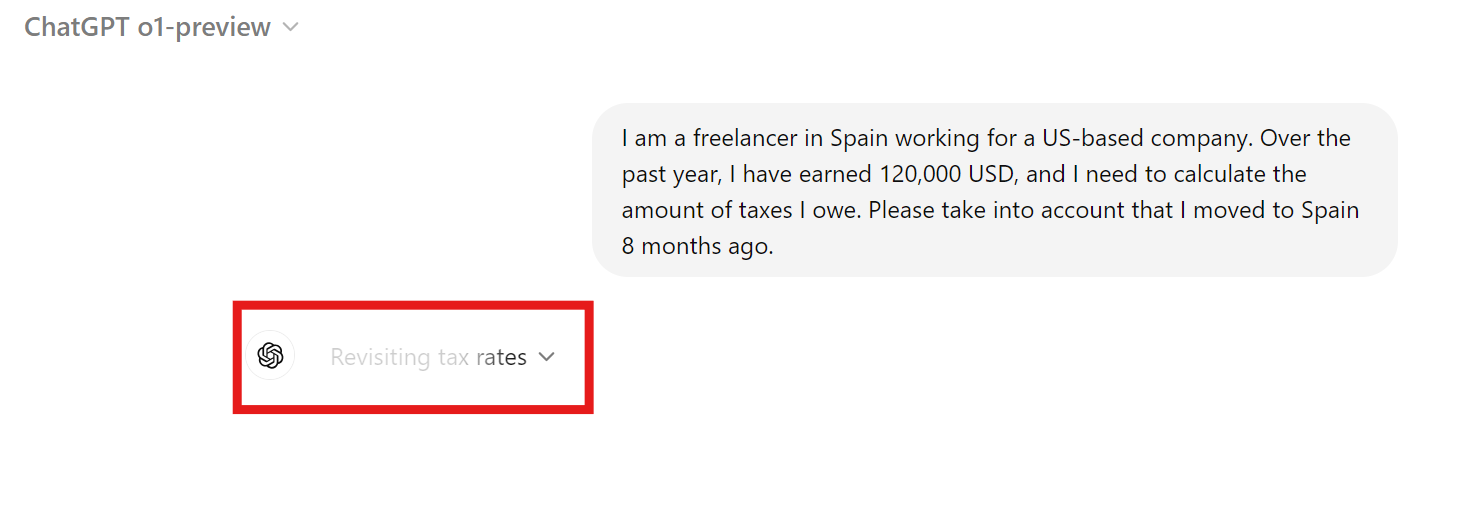
It took almost 30 seconds to respond, but the response was detailed. It included mathematical equations, tax information, and all the necessary details to determine how much we owe the Spanish government.
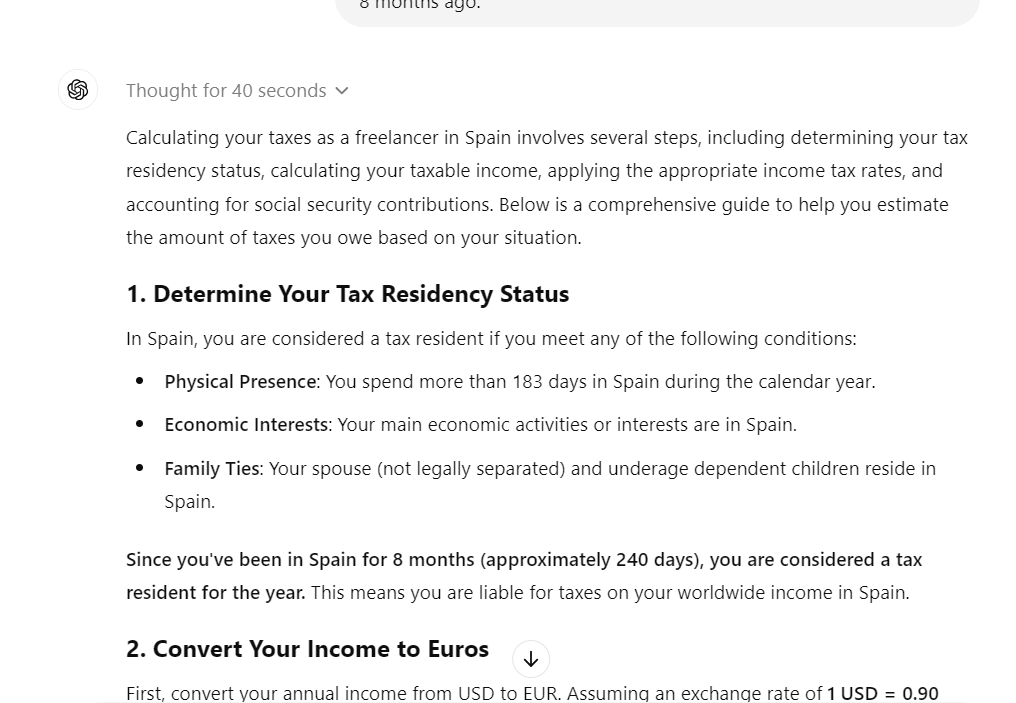
The response was divided into the following parts:
- Determine Your Tax Residency Status
- Convert Your Income to Euros
- Calculate Your Taxable Income
- Calculate Social Security Contributions
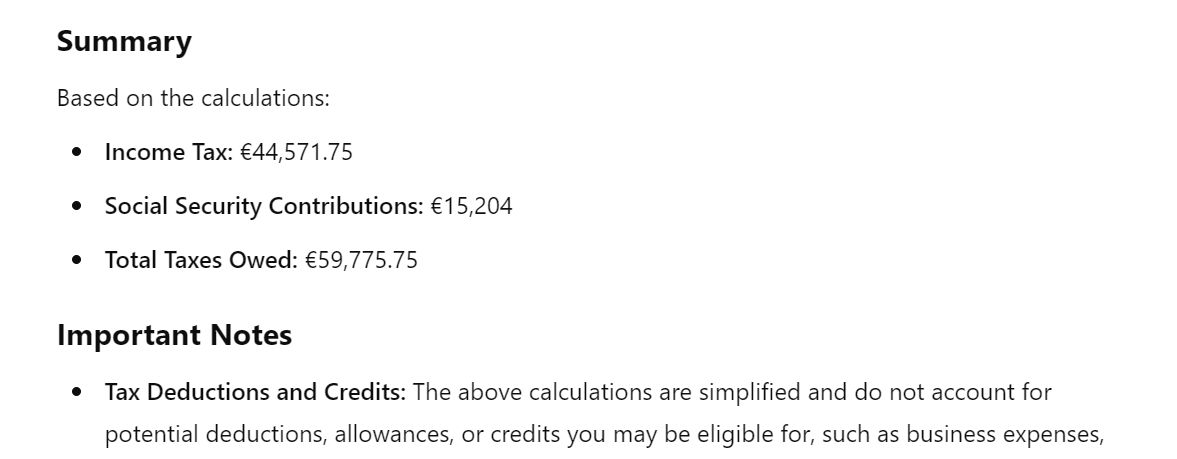
- Total Estimated Taxes Owed
- Important Notes
- Next Steps
Reviewing the summary section provides us with the approximate amount of tax owed to the government, which is quite helpful.
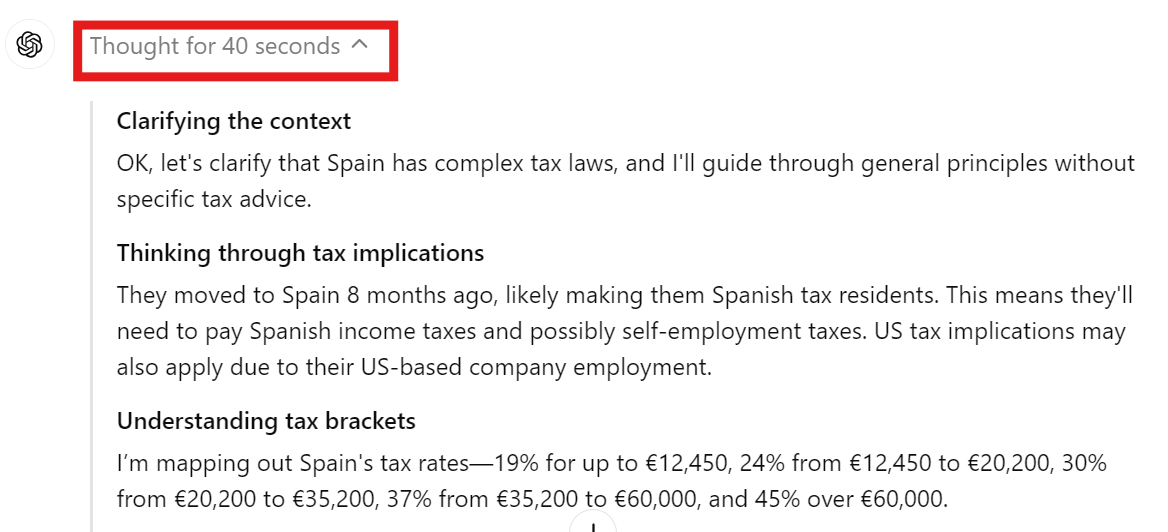
You can click on the drop-down menu in the chat response to view the chain of thought and decision-making.
We can see that the model understands he context, tax implications, and tax bracket before responding to your question.
Using o1-mini model in ChatGPT
The o1-mini model is less accurate but faster than the o1-preview model. In our case, we will use this model to create a static website for data science resumes.
Prompt: “Please create a static website for my data science resume using a Python framework.”
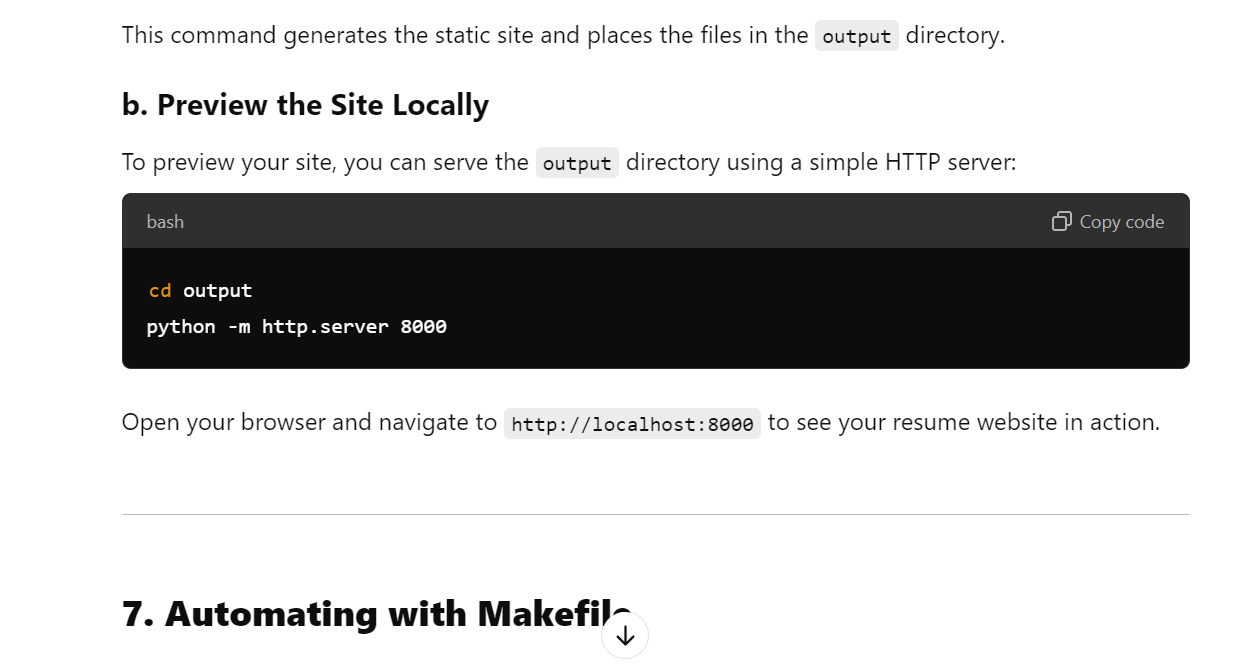
Not only did it create a proper resume website, but it also provided us with guidance on how to publish it on GitHub pages for free.
The response was divided into the following parts:
- Introduction to Pelican
- Prerequisites
- Setting Up Pelican
- Choosing a Theme
- Creating Your Resume Content
- Building the Site
- Automating with Makefile
- Deploying Your Resume Website
- Enhancing Your Resume Website
- Additional Resources
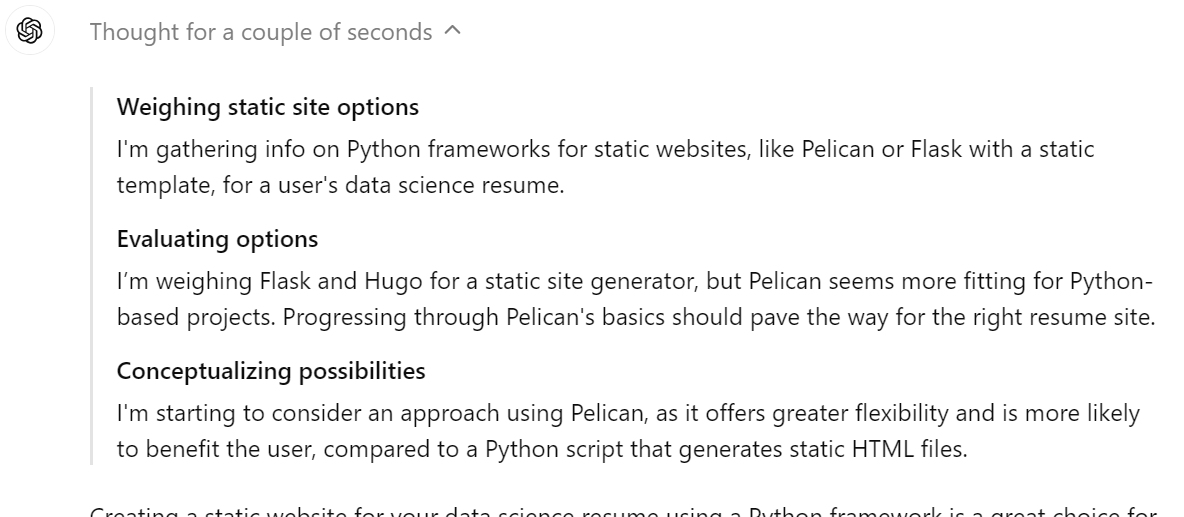
It is a fantastic feature to display the chain of thought in the response. We can clearly see that the model is considering using either Pelican, Flask, or Hugo as a web framework. In the end, it has selected the best possible solution.
OpenAI o1-preview Tutorial: Building a Water Quality Classifier Application
In this project, we will use the o1-preview model to build and deploy a water quality classification application. This is quite a complex project, as we will provide it with a detailed description of what we are looking for.
If you are interested in building a data science project using ChatGPT, check out A Guide to Using ChatGPT for Data Science Projects. You will learn how to use ChatGPT for project planning, data analysis, data preprocessing, model selection, hyperparameter tuning, developing a web app, and deploying it.
1. Prompt engineering
We will spend more time on prompt engineering, as we want to make sure that all the project directives are provided to the model.
The prompt is divided into three parts:
- Project description: A detailed explanation of the project and what we want to build.
- Goals and restrictions: Provide the goal information, such as aiming to achieve 90% accuracy.
- Steps to follow: Provide all the necessary steps you want it to take. For example, data ingestion using Kaggle API, saving metrics in the folder, performing data analysis, training and evaluating the model, and more. Write as many steps as possible.
Read A Beginner's Guide to ChatGPT Prompt Engineering to learn how to write proper prompts in ChatGPT and generate the required results. Prompt engineering is an art, and with the introduction of the o1 model, has become more necessary to learn.
Prompt: “My project manager has tasked us with developing a Water Quality application using the Kaggle dataset available at https://www.kaggle.com/datasets/adityakadiwal/water-potability. Please provide all the necessary information on the files, Python packages, and code so that we can build a highly accurate model.
The goal is to achieve 90% overall accuracy.
Please follow the steps to build the project:
1. Load the dataset from Kaggle using the API and unzip it in the data folder.
2. Preprocess the data and perform some data analysis. Save the analysis figures and files in the metrics folder.
3. Train the model using the scikit-learn framework. Ensure that you track the experiments and save the model files and metadata. Save the model using the skops library.
4. Perform detailed model evaluation and save the results.
5. Create a FastAPI application that takes an image from the user and predicts the quality of water.
6. Make sure to add the user interface using Jinja2 templates.
7. Deploy the app on the Hugging Face hub using the Docker option.”
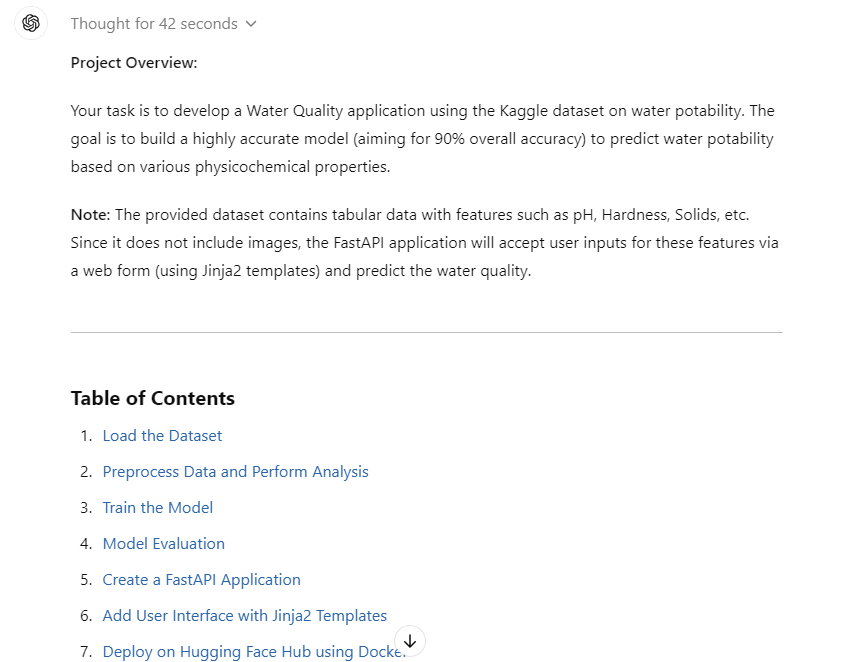
The generated response has provided us with all the information that we need to load the data, preprocess it, train and evaluate the model, create the FastAPI application, create a user interface, and deploy it.
The issue is that it is fragmented and we want it to create Python and HTML files for us to just copy and paste the code.
We will now convert all the code into Python and HTML files, making our lives even easier.
Follow-up prompt: “Please convert the code into the Python files.”
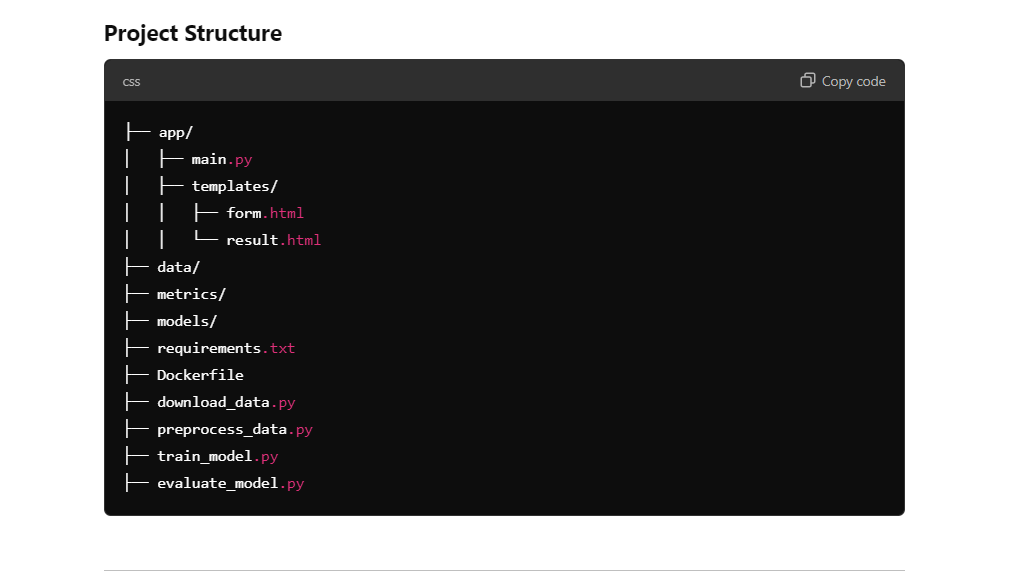
As we can see, we have a project structure with all the files and code in it. All we have to do is create folders and files and copy and paste the code.
2. Setting up
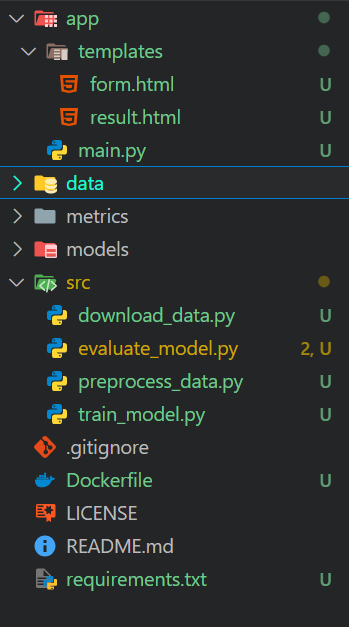
The o1 model provides all the information needed to set up a project directory. We simply need to create folders and files within the project directory using the code editor.
We will create the following folders:
- app: This folder will contain the app file for FastAPI and HTML templates.
- data: This folder will contain the original data and preprocessed data.
- metrics: This folder will contain model evaluation data and data analysis.
- models: This folder will contain saved models and scaler objects.
- src: This folder will contain all the Python files that will help us with loading, processing, training, and evaluation.
Additionally, the main directory will contain the Dockerfile, README, and requirements.txt file.
3. Load the dataset
We will load the Water Quality Kaggle dataset using the Kaggle API and unzip it into the data folder.
data\download_data.py:
import os

# Ensure the data directory exists
os.makedirs("data", exist_ok=True)

# Download the dataset
os.system("kaggle datasets download -d adityakadiwal/water-potability -p data --unzip")
Running the Python file will download the dataset, unzip it, and remove the zip file.
$ python .\src\download_data.py
Dataset URL: https://www.kaggle.com/datasets/adityakadiwal/water-potability
License(s): CC0-1.0
Downloading water-potability.zip to data
100%|████████████████████████████████████████████████████████████████████████████████| 251k/251k [00:00<00:00, 304kB/s]
100%|████████████████████████████████████████████████████████████████████████████████| 251k/251k [00:00<00:00, 303kB/s]
4. Preprocess the data and perform data analysis
The preprocessing Python file will load the data, clean it, handle missing data, scale it, and then save the scaler and preprocessed dataset. It will also perform the data analysis and save the metrics and data visualization.
data\preprocess_data.py:
import os
import pandas as pd
import seaborn as sns
import matplotlib.pyplot as plt
from sklearn.impute import SimpleImputer
from sklearn.preprocessing import StandardScaler
import joblib

# Create directories if they don't exist
os.makedirs("metrics", exist_ok=True)
os.makedirs("models", exist_ok=True)

# Load the dataset
data = pd.read_csv("data/water_potability.csv")

# Check for missing values and save the summary
missing_values = data.isnull().sum()
missing_values.to_csv("metrics/missing_values.csv")

# Statistical summary
stats = data.describe()
stats.to_csv("metrics/data_statistics.csv")

# Pair plot
sns.pairplot(data, hue="Potability")
plt.savefig("metrics/pairplot.png")

# Correlation heatmap
plt.figure(figsize=(10, 8))
sns.heatmap(data.corr(), annot=True)
plt.savefig("metrics/correlation_heatmap.png")

# Handle missing values
imputer = SimpleImputer(strategy="mean")
data_imputed = pd.DataFrame(imputer.fit_transform(data), columns=data.columns)

# Feature scaling
scaler = StandardScaler()
features = data_imputed.drop("Potability", axis=1)
target = data_imputed["Potability"]
features_scaled = scaler.fit_transform(features)

# Save the scaler
joblib.dump(scaler, "models/scaler.joblib")

# Save preprocessed data
preprocessed_data = pd.DataFrame(features_scaled, columns=features.columns)
preprocessed_data["Potability"] = target
preprocessed_data.to_csv("metrics/preprocessed_data.csv", index=False)
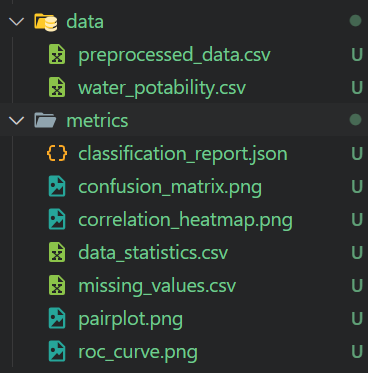
$ python .\src\preprocess_data.py We got preprocessed data and all the data analysis reports with figures.
5. Model building and training
The training script loads the preprocessed data and uses it to train a Random Forest Classifier. Skope is then used to save the model, track the experiment manually, and save the model metadata as a JSON file.
src\train_model.py:
import os
import json
import skops.io as sio
import pandas as pd
from sklearn.model_selection import train_test_split
from sklearn.ensemble import RandomForestClassifier

# Load preprocessed data
data = pd.read_csv("metrics/preprocessed_data.csv")
features = data.drop("Potability", axis=1)
target = data["Potability"]

# Split the data
X_train, X_test, y_train, y_test = train_test_split(
    features, target, test_size=0.2, random_state=42, stratify=target
)

# Train the model
model = RandomForestClassifier(n_estimators=200, random_state=42)
model.fit(X_train, y_train)

# Save the model using skops
os.makedirs("models", exist_ok=True)
sio.dump(model, "models/water_quality_model.skops")

# Track experiments and save metadata
metadata = {
    "model_name": "RandomForestClassifier",
    "parameters": model.get_params(),
    "training_score": model.score(X_train, y_train),
}

with open("models/metadata.json", "w") as f:
    json.dump(metadata, f, indent=4)
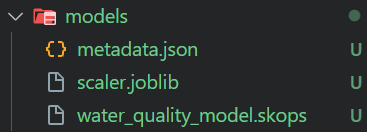
$ python .\src\train_model.py The training script will generate a model file and metadata, as shown below.
6. Model evaluation
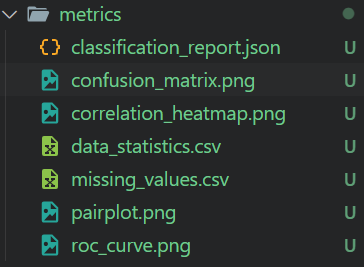
The model evaluation script loads processed data and the saved model to generate a classification report, confusion matrix, ROC curve, AUC, and overall accuracy. All of the metrics and figures are saved in the metrics folder.
src\evaluate_model.py :
import os
import json
import pandas as pd
import numpy as np
import seaborn as sns
import matplotlib.pyplot as plt
from sklearn.metrics import (
    classification_report,
    confusion_matrix,
    roc_auc_score,
    roc_curve,
)
import skops.io as sio
from sklearn.model_selection import train_test_split

# Load preprocessed data
data = pd.read_csv("metrics/preprocessed_data.csv")
features = data.drop("Potability", axis=1)
target = data["Potability"]

# Split the data
X_train, X_test, y_train, y_test = train_test_split(
    features, target, test_size=0.2, random_state=42, stratify=target
)

# Load the model
model = sio.load("models/water_quality_model.skops")

# Predictions
y_pred = model.predict(X_test)
y_pred_proba = model.predict_proba(X_test)[:, 1]

# Classification report
report = classification_report(y_test, y_pred, output_dict=True)
with open("metrics/classification_report.json", "w") as f:
    json.dump(report, f, indent=4)

# Confusion matrix
cm = confusion_matrix(y_test, y_pred)
sns.heatmap(cm, annot=True, fmt="d")
plt.title("Confusion Matrix")
plt.ylabel("Actual Label")
plt.xlabel("Predicted Label")
plt.savefig("metrics/confusion_matrix.png")

# ROC curve and AUC
fpr, tpr, _ = roc_curve(y_test, y_pred_proba)
roc_auc = roc_auc_score(y_test, y_pred_proba)

plt.figure()
plt.plot(fpr, tpr, label="AUC = %0.2f" % roc_auc)
plt.plot([0, 1], [0, 1], "k--")
plt.legend(loc="lower right")
plt.xlabel("False Positive Rate")
plt.ylabel("True Positive Rate")
plt.title("Receiver Operating Characteristic")
plt.savefig("metrics/roc_curve.png")

# Overall accuracy
accuracy = model.score(X_test, y_test)
print(f"Overall Accuracy: {accuracy * 100:.2f}%")
$ python .\src\evaluate_model.py The overall accuracy is not that good. However, we can always ask the o1 model to improve accuracy.
Overall Accuracy: 65.55%The metrics folder contains all saved model evaluation figures and metrics. We can manually review it to understand model performance in detail.
7. Create a FastAPI application
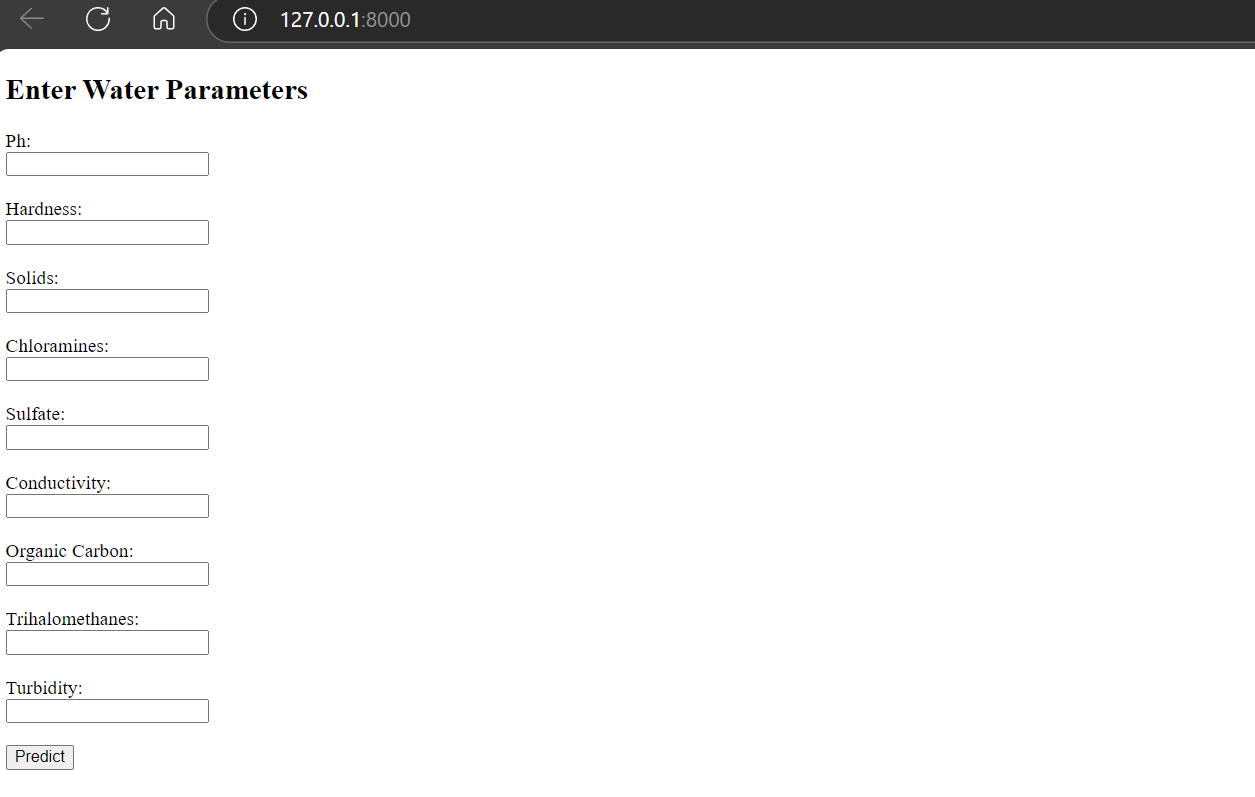
To create a user interface for the FastAPI application, we need to create the index and result pages. This can be done by creating a template folder within the app directory and adding two HTML files: one for the main page and one for the results page.
Check out the FastAPI Tutorial: An Introduction to Using FastAPI to learn in detail about the FastAPI framework and how you can implement it in your project.
If you are not familiar with HTML, don't worry. You just have to copy and paste the code and trust the o1 model.
app\templates\form.html:
<!DOCTYPE html>
<html>
<head>
    <title>Water Quality Prediction</title>
</head>
<body>
    <h2>Enter Water Parameters</h2>
    <form action="/predict" method="post">
        {% for feature in ['ph', 'Hardness', 'Solids', 'Chloramines', 'Sulfate', 'Conductivity', 'Organic_carbon', 'Trihalomethanes', 'Turbidity'] %}
        <label for="{{ feature }}">{{ feature.replace('_', ' ').title() }}:</label><br>
        <input type="number" step="any" id="{{ feature }}" name="{{ feature }}" required><br><br>
        {% endfor %}
        <input type="submit" value="Predict">
    </form>
</body>
</html>
app\templates\result.html:
<!DOCTYPE html>
<html>
<head>
    <title>Prediction Result</title>
</head>
<body>
    <h2>Prediction Result</h2>
    <p>The water is predicted to be: <strong>{{ result }}</strong></p>
    <a href="/">Try Again</a>
</body>
</html>
The main application Python file has two Python functions: home and predict. The "home" function displays the welcome page containing input boxes and a button. The "predict" function transforms user input, runs it through the model, and displays the result indicating whether the water is potable or not.
app\templates\main.py:
from fastapi import FastAPI, Request, Form
from fastapi.responses import HTMLResponse
from fastapi.templating import Jinja2Templates
import numpy as np
import skops.io as sio
import joblib

app = FastAPI()
templates = Jinja2Templates(directory="app/templates")

# Load the saved model and preprocessing pipeline
model = sio.load("models/water_quality_model.skops", trusted=True)
preprocessing_pipeline = joblib.load("models/preprocessing_pipeline.joblib")


@app.get("/", response_class=HTMLResponse)
async def home(request: Request):
    return templates.TemplateResponse("form.html", {"request": request})


@app.post("/predict", response_class=HTMLResponse)
async def predict(
    request: Request,
    ph: float = Form(...),
    Hardness: float = Form(...),
    Solids: float = Form(...),
    Chloramines: float = Form(...),
    Sulfate: float = Form(...),
    Conductivity: float = Form(...),
    Organic_carbon: float = Form(...),
    Trihalomethanes: float = Form(...),
    Turbidity: float = Form(...),
):
    input_data = np.array(
        [
            [
                ph,
                Hardness,
                Solids,
                Chloramines,
                Sulfate,
                Conductivity,
                Organic_carbon,
                Trihalomethanes,
                Turbidity,
            ]
        ]
    )
    # Preprocess input data
    input_preprocessed = preprocessing_pipeline.transform(input_data)
    prediction = model.predict(input_preprocessed)
    result = "Potable" if prediction[0] == 1 else "Not Potable"
    return templates.TemplateResponse(
        "result.html", {"request": request, "result": result}
    )
We will test the app locally first to verify if it's running.
$ uvicorn app.main:app --reload By running the Python file using uvicorn, we obtain the local address that can be copied and pasted into our browser.
Note: All the information on how to run the files is also provided by the o1 model.
INFO:     Will watch for changes in these directories: ['C:\\Repository\\GitHub\\Water-Quality-App']
INFO:     Uvicorn running on http://127.0.0.1:8000 (Press CTRL+C to quit)
INFO:     Started reloader process [34792] using StatReload
As we can see, the app is working fine.
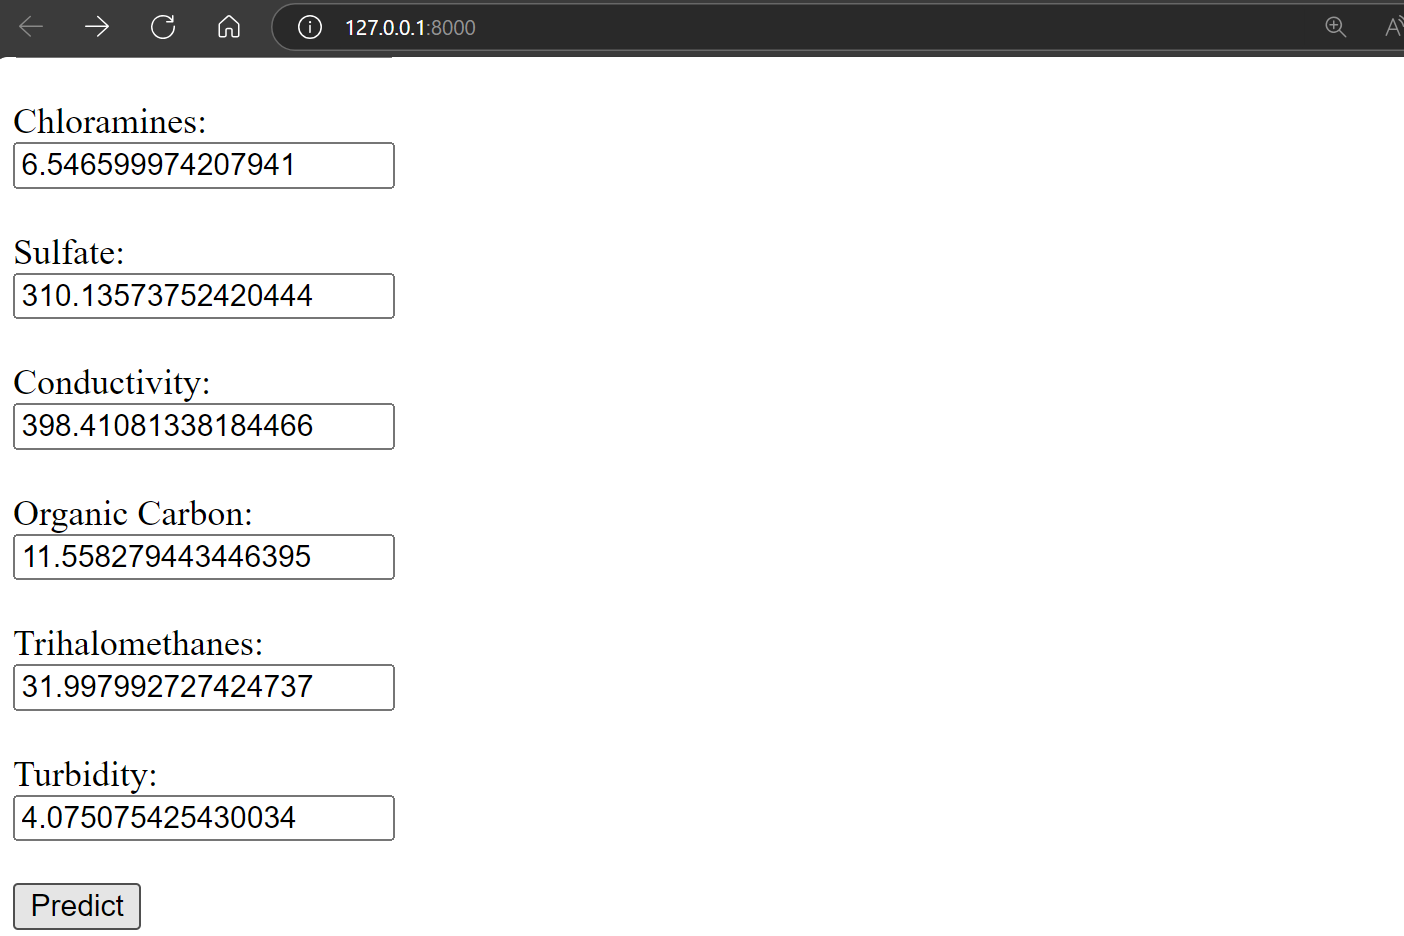
Let’s provide it with the random values to check the water quality and press the predict button.
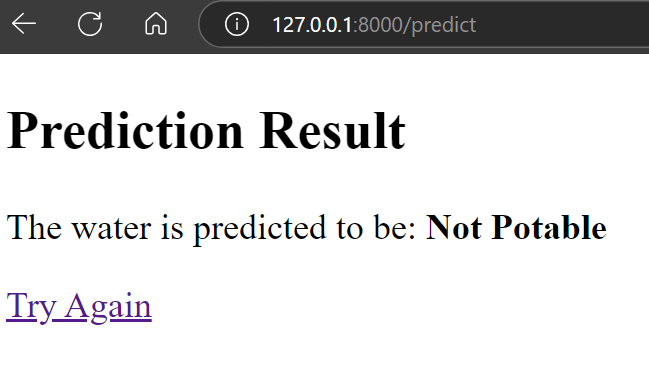
The result is amazing. It shows that water is not drinkable.
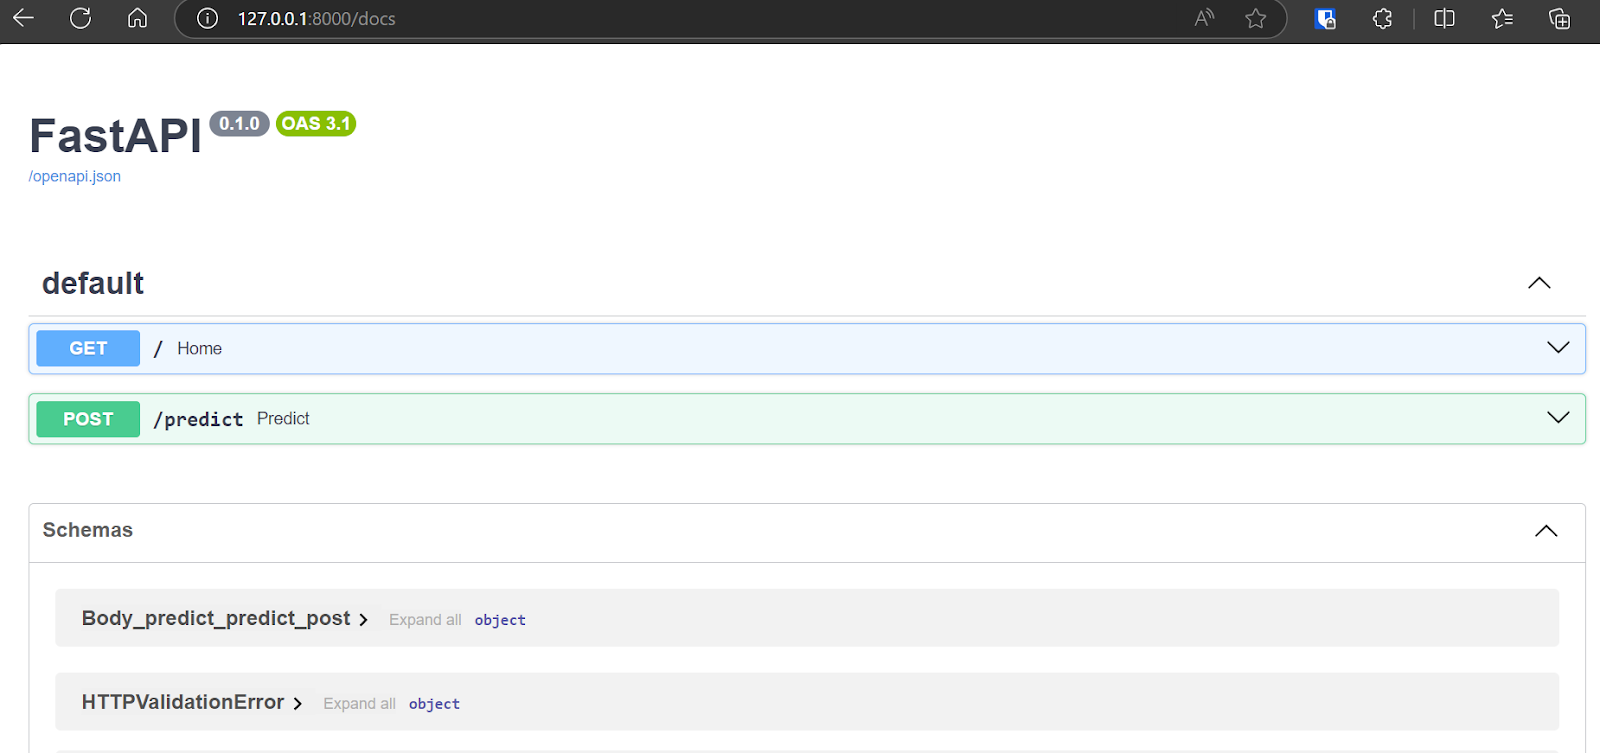
You can even access FastAPI Swagger UI by typing “/docs” after the URL to test the API and generate the results.
8. Deploy the app on Hugging Face Hub using Docker
The OpenAI o1 model has generated the Docker code, a guide, and reference links for us to successfully learn how to deploy the application on Hugging Face.
Read the Docker for Data Science: An Introduction tutorial to learn how Docker works. You will learn how to set up Docker, use Docker commands, dockerize machine learning applications, and follow industry-wide best practices.
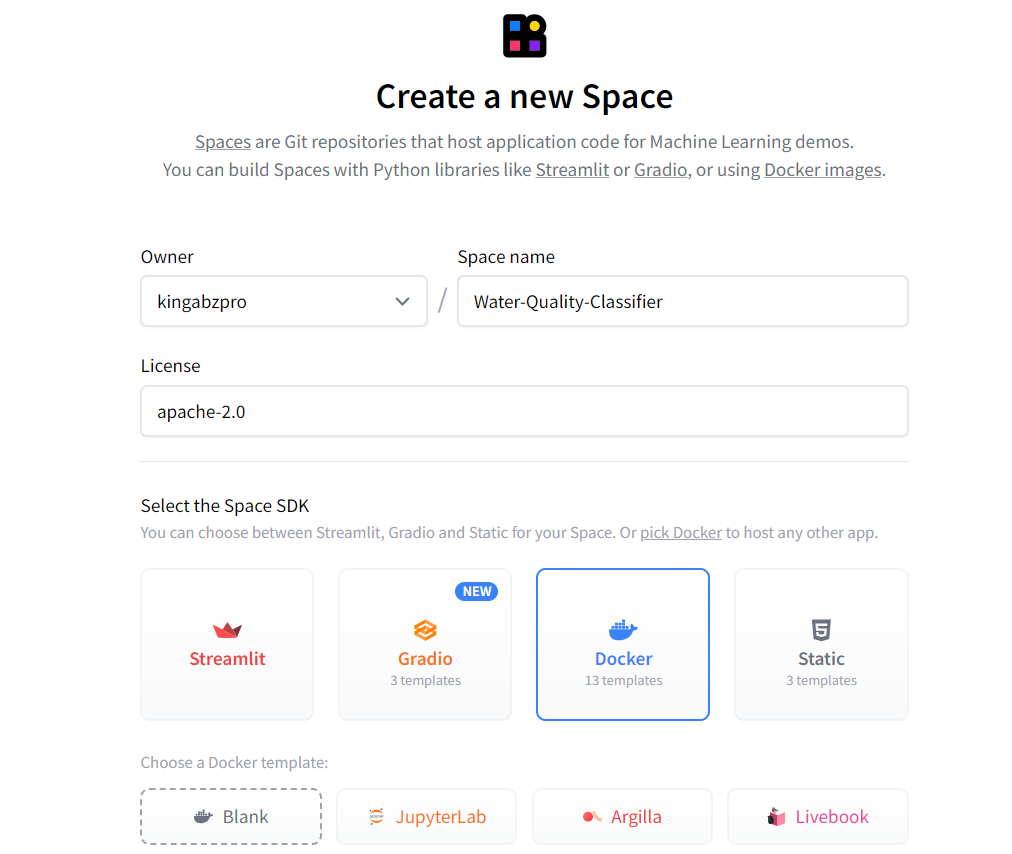
First, create a new Space by clicking on the profile picture on the Hugging Face website and then clicking on the "New Space" button. Type the app name, select the SDK type (Docker), choose the license type and press “Create Space”.
Source: Hugging Face
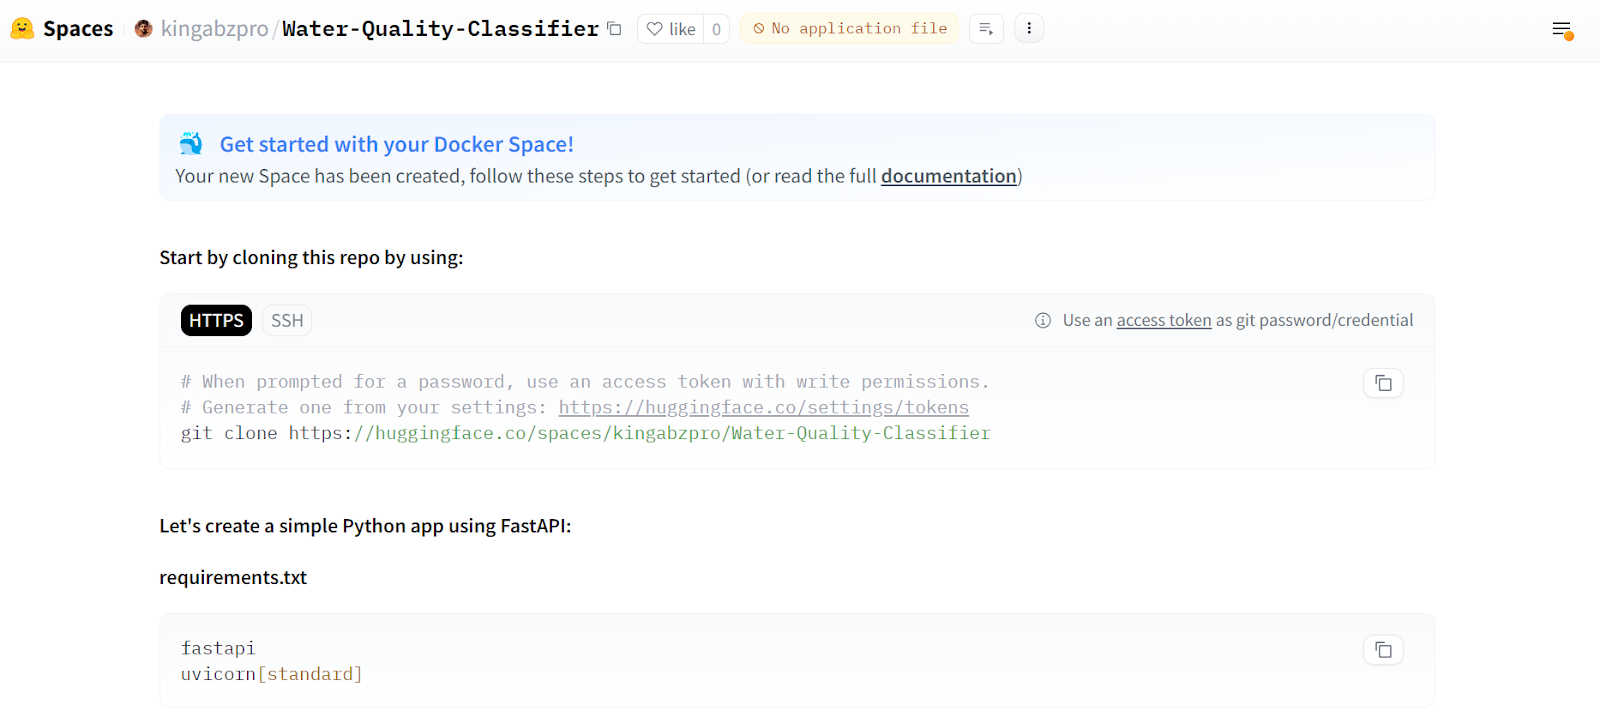
All of the instructions for deploying the app using Docker are provided on the main page.
Source: Water Quality Classifier
Next, we have to clone the repository.
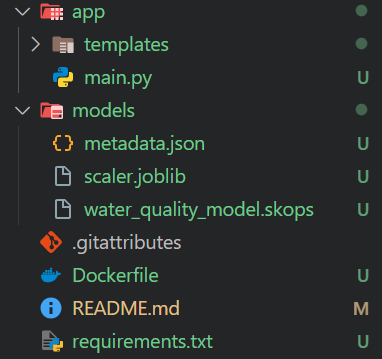
git clone https://huggingface.co/spaces/kingabzpro/Water-Quality-ClassifierWithin the repository, move the app and model folders. Create a Dockerfile and type the following command. The o1 model has provided us with the code; we only have to change the port number to 7860.
Dockerfile:
# Use an official Python runtime as a parent image
FROM python:3.9-slim

# Set the working directory
WORKDIR /app

# Copy the current directory contents into the container at /app
COPY . /app

# Install any needed packages specified in requirements.txt
RUN pip install --no-cache-dir -r requirements.txt

# Expose port 7860
EXPOSE 7860

# Run the application
CMD ["uvicorn", "app.main:app", "--host", "0.0.0.0", "--port", "7860"]
Create the requirements.txt file containing information on the Python packages. We will use this file to download and install all the required Python packages on the cloud server.
requirements.txt:
fastapi
uvicorn
jinja2
pydantic
skops
joblib
numpy
pandas
scikit-learn==1.5.1
matplotlib
seaborn
kaggle
imbalanced-learn
python-multipart
This is how our app repository should look:
Our model is a large file (> 10MB), so we need to use Git LFS to track it. Install Git LFS and track all the files with the extension “.skops”.
git lfs install
git lfs track "*.skops"
Stage all the changes, commit with the message, and push it to the remote server.
git add .
git commit -m "pushing all the files"
git push
Go to your app page on Hugging Face, and you will see that it is building the container and installing all the necessary packages.
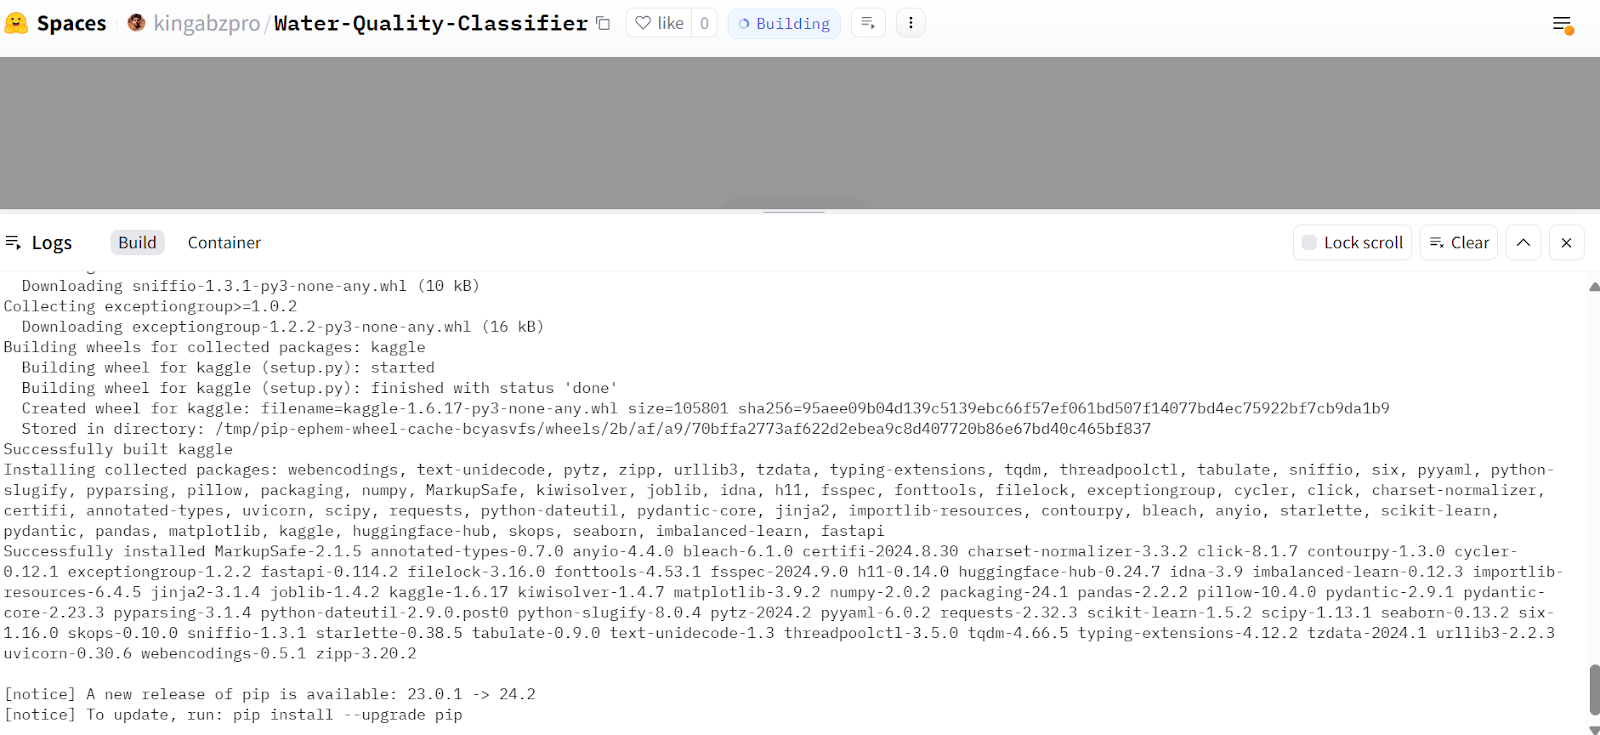
Source: Water Quality Classifier
After a few minutes, the app will be ready to use. It looks similar to the local app. Let's try to provide it with the sample values and generate the results.
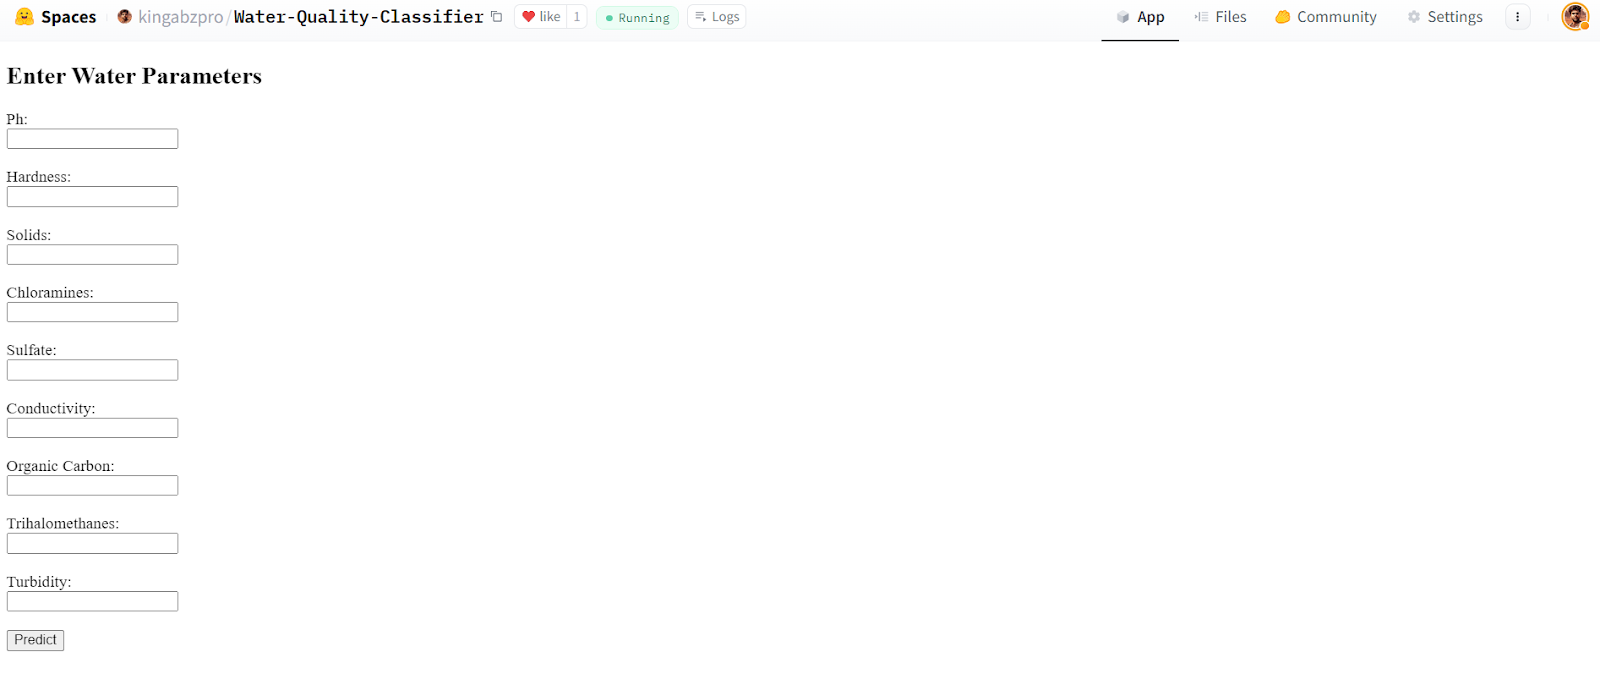
Source: Water Quality Classifier
Our app is working perfectly and has produced the expected results.

Source: Water Quality Classifier
This Hugging Face Space app is available for anyone to use, which means we can access it using the curl command in the terminal.
curl -X 'POST' \
  'https://kingabzpro-water-quality-classifier.hf.space/predict' \
  -H 'accept: text/html' \
  -H 'Content-Type: application/x-www-form-urlencoded' \
  -d 'Organic_carbon=10&Hardness=200&Turbidity=4&Solids=10000&Chloramines=7&Trihalomethanes=80&Sulfate=300&ph=7&Conductivity=400' \
  | grep -oP '(?<=<strong>).*(?=</strong>)'
Output:
Not PotableAll the project files, data, models, and metadata are available on the kingabzpro/Water-Quality-App GitHub repository.
Author's Opinion
The o1-preview model is far superior to GPT-4o. It follows instructions perfectly and is bug-free, so the code it generates is ready to use. When building the machine learning app, I only had to make minor changes, about 5%. The best part is that I also learned from the AI model's decision-making, understanding why it made certain choices.
Abid Ali Awan
Conclusion
In this tutorial, we have seen how powerful OpenAI's o1 reasoning model can be. We built a complete machine learning project with just a few changes to the code, and it worked right away. The model handled every command perfectly and produced great results without needing follow up instructions.
Right now, we have access to the smaller versions of the o1 model, like o1-preview and o1-mini. In the future, we will have access to the full o1 model, which will be even better for building complex projects. The key is to work on asking the right questions to get the most from the model.
Building a machine learning project with the AI models is simple, but if you want to make it a career, you need to understand how these models work. Without this, it can be tough to fix problems or apply the models to specific business needs. To gain this understanding, we recommend beginners take the Machine Learning Scientist with Python career track. It includes 21 courses and 3 projects to teach you how to build and improve different types of machine learning models.
Earn a Top AI Certification

As a certified data scientist, I am passionate about leveraging cutting-edge technology to create innovative machine learning applications. With a strong background in speech recognition, data analysis and reporting, MLOps, conversational AI, and NLP, I have honed my skills in developing intelligent systems that can make a real impact. In addition to my technical expertise, I am also a skilled communicator with a talent for distilling complex concepts into clear and concise language. As a result, I have become a sought-after blogger on data science, sharing my insights and experiences with a growing community of fellow data professionals. Currently, I am focusing on content creation and editing, working with large language models to develop powerful and engaging content that can help businesses and individuals alike make the most of their data.

