Track
OpenAI has recently released its long-anticipated model capable of “PhD reasoning,” and it’s not GPT-5, as many of us thought—it’s the OpenAI o1 model.
The way OpenAI o1 operates marks an important paradigm shift in computation resource allocation, with more emphasis on the training and inference phases. This approach makes it extraordinarily good at complex reasoning tasks but also very slow compared to its siblings, GPT-4o and GPT-4o mini.
That said, GPT-4o and GPT-4o mini remain the preferred options for applications requiring quick responses, image handling, or function calling. However, if your project demands advanced reasoning capabilities and can tolerate slightly longer response times, the o1 model is the way to go.
I've had the chance to explore o1 through OpenAI's API, and in this blog, I’ll provide step-by-step guidance on how to do just that. I’ll show you how to connect to the API, manage costs, and at the end, I’ll share a few prompting tips to help you minimize expenses and get better responses.
If you’re looking for a more introductory article, check out this OpenAI o1 Guide.
Note: At the time of writing this tutorial, the o1 models are still in beta. However, the process for connecting to the API remains the same.
OpenAI O1 API Requirements and Rate Limits
One of the first things you need to know is that, for now, accessing the o1 models through the API requires a Tier 5 usage level.
|
Tier |
Qualification |
Usage limits |
|
Free |
User must be in an allowed geography |
$100 / month |
|
Tier 1 |
$5 paid |
$100 / month |
|
Tier 2 |
$50 paid and 7+ days since first successful payment |
$500 / month |
|
Tier 3 |
$100 paid and 7+ days since first successful payment |
$1,000 / month |
|
Tier 4 |
$250 paid and 14+ days since first successful payment |
$5,000 / month |
|
Tier 5 |
$1,000 paid and 30+ days since first successful payment |
$50,000 / month |
To check your usage tier, go to your account page on the OpenAI developer platform and look in the Limits section under Organization.
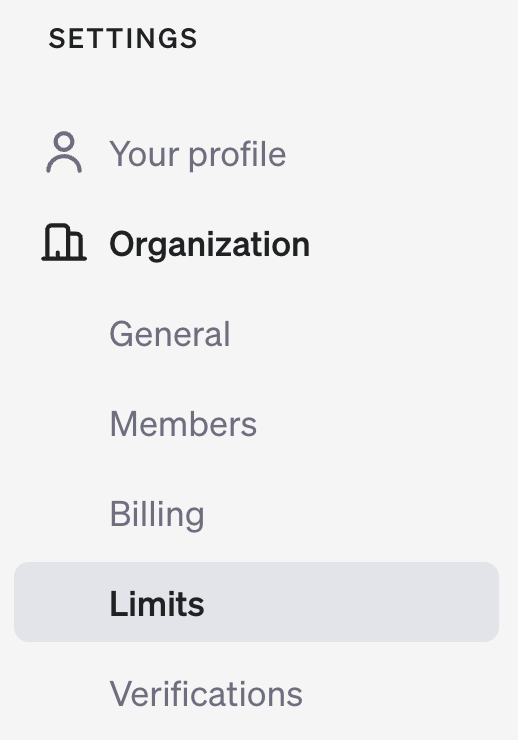
Each usage tier comes with specific rate limits. As of the time of writing this article, these are the Tier 5 rate limits:
|
Model |
RPM (Requests per Minute) |
TPM (Tokens per Minute) |
Batch Queue Limit |
|
gpt-4o |
10,000 |
30,000,000 |
5,000,000,000 |
|
gpt-4o-mini |
30,000 |
150,000,000 |
15,000,000,000 |
|
o1-preview |
500 |
30,000,000 |
not currently supported |
|
o1-mini |
1000 |
150,000,000 |
not currently supported |
O1 models take a considerable amount of time to process during the inference phase, which accounts for the lower RPM limits compared to the GPT-4o models. Note that batching is not currently supported for o1 models, meaning you cannot group (batch) multiple requests to the model at the same time.
The O1 model is still new, so these requirements and rate limits may change in the coming weeks. For instance, OpenAI initially announced that weekly rate limits would be 30 messages for o1-preview and 50 for o1-mini. However, just a few days later, they updated the rate limits to 50 queries per week for o1-preview and 50 queries per day for o1-mini.
OpenAI O1 Reasoning Tokens
We’ll get to the hands-on part in a moment, but before we do that, let’s clarify a new concept that’s fundamental to using o1 through the API: reasoning tokens. Understanding this concept is essential to understanding your monthly OpenAI bill.
If you’ve used o1-preview through the ChatGPT interface, you’ve seen that it “thinks out loud” before generating an answer.
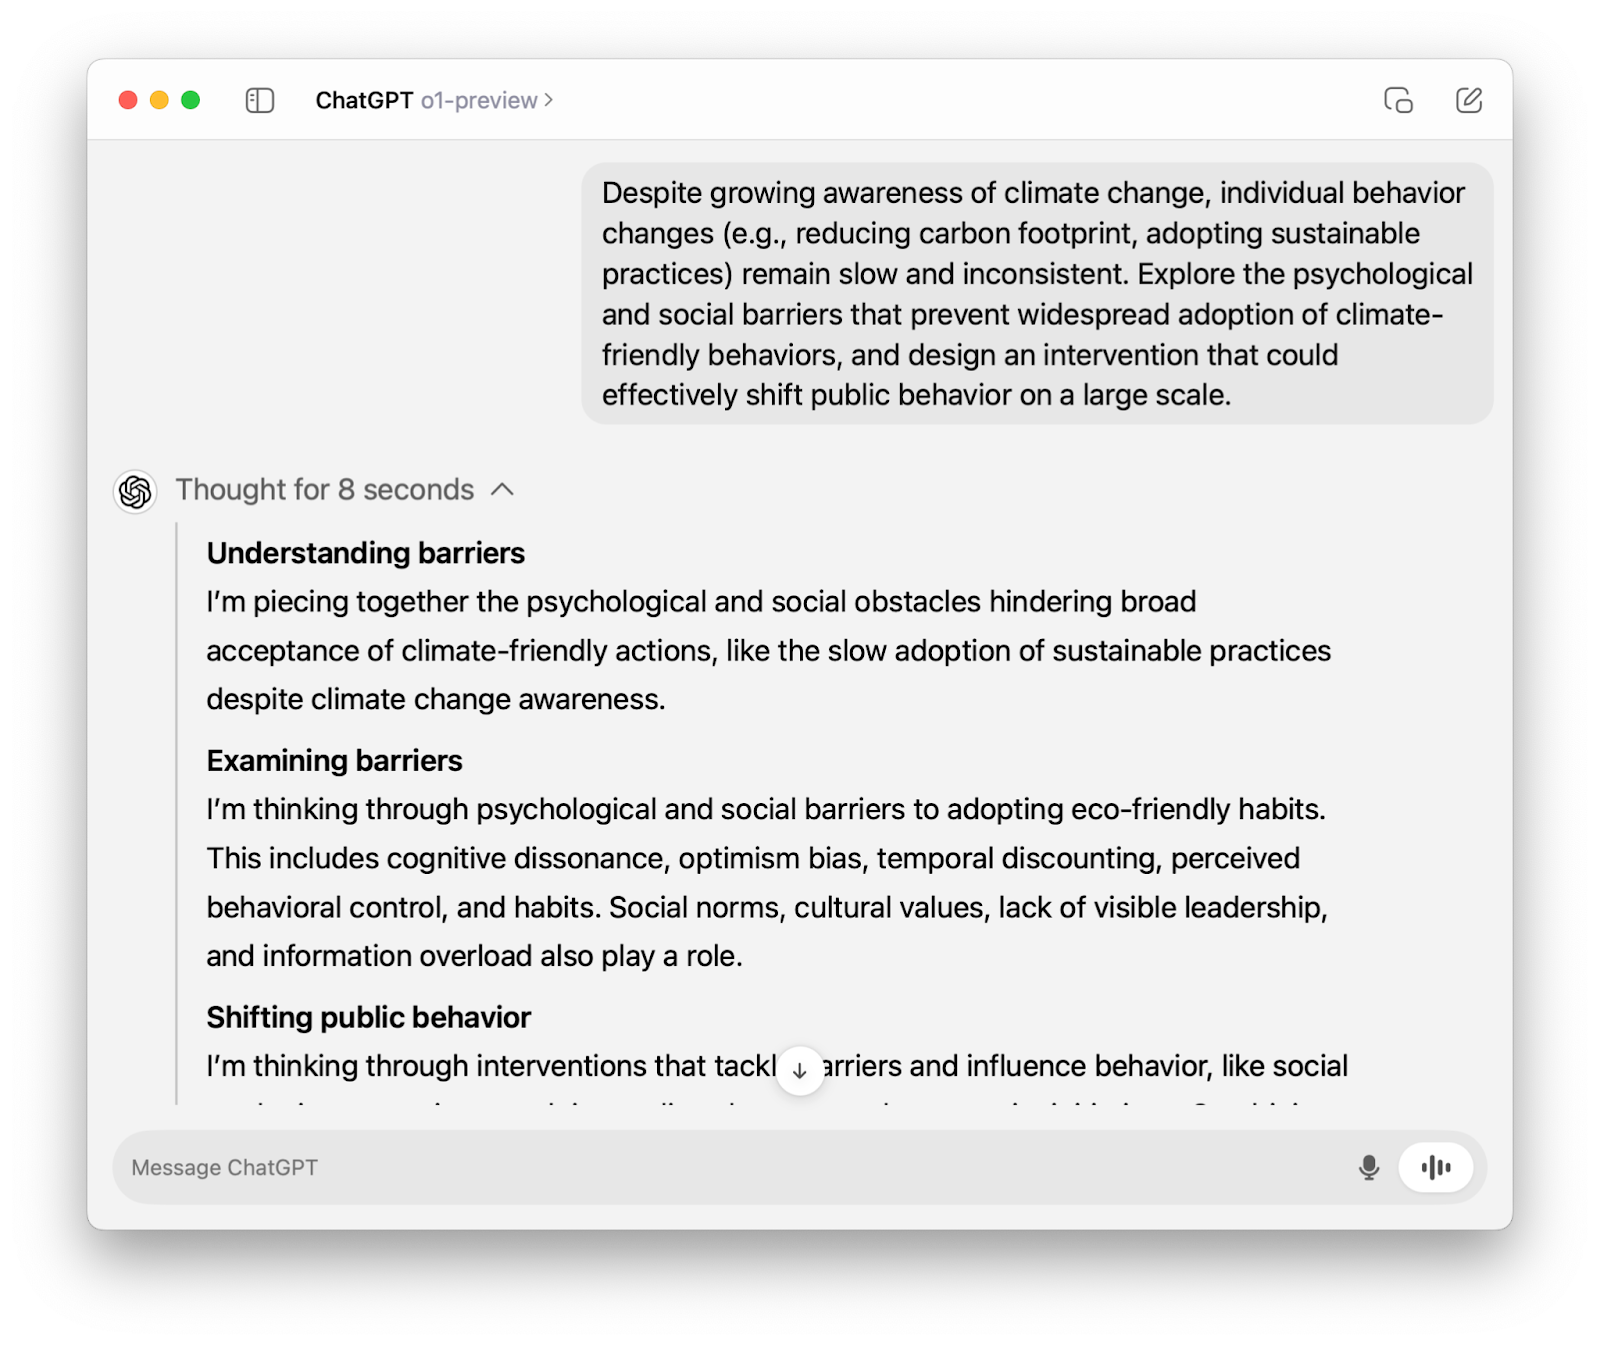
When we use the o1 model through the API, it goes through the same thinking process. The only difference is that, unlike in the ChatGPT interface, the reasoning is not visible, and all we see is the final answer.
However, the reasoning is still tokenized (hence the name “reasoning tokens”), and as you might have guessed, it’s billable. The reasoning tokens are billed as output tokens, which are four times more expensive than input tokens.
We’ll learn shortly how to control the number of tokens and manage costs, but for now, let’s focus on connecting to OpenAI’s API to use the o1 models.
OpenAI O1 API: How to Connect to OpenAI’s API
In this section, we’ll outline a series of steps to help you connect to the o1-preview model through the API. Later, we’ll also cover how to connect to the o1-mini model.
Step 1: Get API credentials
Provided you have an active account, you can obtain your secret API key from the OpenAI’s API key page.
If you’re part of an organization, you might also need your organization’s ID and a project ID, which can help your team manage costs more effectively. Be sure to check with your team about this.
Whether you’re new to APIs or an experienced developer, it’s always a good idea to follow API best practices.
Step 2: Import the openai library
OpenAI makes it easy to interact with its API through its Python library openai. You can install it using the following command:
pip install openaiOnce installed, we import OpenAI class from the openai library:
from openai import OpenAIStep 3: Initialize a client object
To interact with OpenAI’s API, we initialize a client using our secret API key:
client = OpenAI(api_key=’your-api-key’)If you’re part of an organization, you may also need your organization’s ID and a project ID, so this is how this step might look for you:
client = OpenAI(
    organization=’your-organization-id’,
    project=’your-project-id’,
    api_key=’your-api-key’
)
Step 4: Make an API call
The only o1 models available at the time of writing this article are o-1 preview and o1-mini. They are both available through the chat.completions endpoint. In the code below, notice that:
- We call the endpoint through
client.chat.completions.create(). - We specify the string
”o1-preview”for themodelparameter. - We pass the prompt as a value to the
”content”key. - We access the final response through
response.choices[0].message.content.
response = client.chat.completions.create(
    model="o1-preview",
    messages=[
        {
            "role": "user",
            "content": "Write a Python script that takes a matrix represented as a string with format '[1,2],[3,4],[5,6]' and prints the transpose in the same format."
        }
    ]
)
print(response.choices[0].message.content)
```python
import ast
# Read the input string
s = input()
# Add outer brackets to make it a valid list representation
input_str = '[' + s + ']'
# Safely evaluate the string to a list of lists
matrix = ast.literal_eval(input_str)
# Transpose the matrix
transposed = list(map(list, zip(*matrix)))
# Convert the transposed matrix back to the required string format
transposed_str = ','.join('[' + ','.join(map(str, row)) + ']' for row in transposed)
# Print the result
print(transposed_str)
```How to Find the Number of Reasoning Tokens
As mentioned earlier, the reasoning under the hood still counts as billable tokens. For the code we ran above, here’s a breakdown of all the tokens used:
print(response.usage)CompletionUsage(completion_tokens=1279, prompt_tokens=43, total_tokens=1322, completion_tokens_details={'reasoning_tokens': 1024})By examining the output, we see that the number of reasoning tokens is 1024: completion_tokens_details={'reasoning_tokens': 1024}.
The model generated a completion using 1279 tokens (completion_tokens=1279), of which 1024 were invisibile reasoning tokens—this accounts for about 80%!
Managing costs becomes a bit more complicated with the new o1 models, so let’s discuss this in more detail.
How to Control Cost With OpenAI O1 Models
With previous models, we used the max_tokens parameter to control the number of completion tokens. Things were fairly straightforward: the number of tokens generated and the number of visible tokens were always the same.
With the o1 models, however, we need a parameter that sets an upper limit on all completion tokens, including visible output tokens and invisible reasoning tokens. For this reason, OpenAI added the max_completion_tokens parameter, while deprecating max_tokens and making it incompatible with o1 models.
Let’s try max_completion_tokens with our previous example. We’ll set it to 300 and see what we get. To use this new parameter, note that you may need an update to the openai library if you’re running on older versions.
response_with_limit = client.chat.completions.create(
    model="o1-preview",
    messages=[
        {
            "role": "user",
            "content": "Write a Python script that takes a matrix represented as a string with format '[1,2],[3,4],[5,6]' and prints the transpose in the same format."
        }
    ],
    max_completion_tokens=300
)
print(response_with_limit.choices[0].message.content) Notice that we didn’t get any output. But are we still paying? The answer is yes.
print(response_with_limit.usage)CompletionUsage(completion_tokens=300, prompt_tokens=43, total_tokens=343, completion_tokens_details=CompletionTokensDetails(reasoning_tokens=300))If the o1 model reaches the token limit before it reaches a final answer, it stops its reasoning process and doesn’t return any output. For this reason, it’s important to set max_completion_tokens to a value that guarantees output—otherwise we’ll be billed for both reasoning tokens and input tokens without getting anything in return.
You’ll need to experiment with the exact value of max_completion_tokens based on your specific use case, but OpenAI advises reserving at least 25,000 tokens for the total number of completion tokens.
To avoid truncated output (or no output at all), you’ll also need to be mindful of the context window if your use case involves a large number of tokens. The o1-preview and o-1 mini models have a context window of 128,000 tokens. Note, however, that that the output tokens (visible and invisibile) are capped at 32,768 tokens for o1-preview and 65,536 tokens for o1-mini.
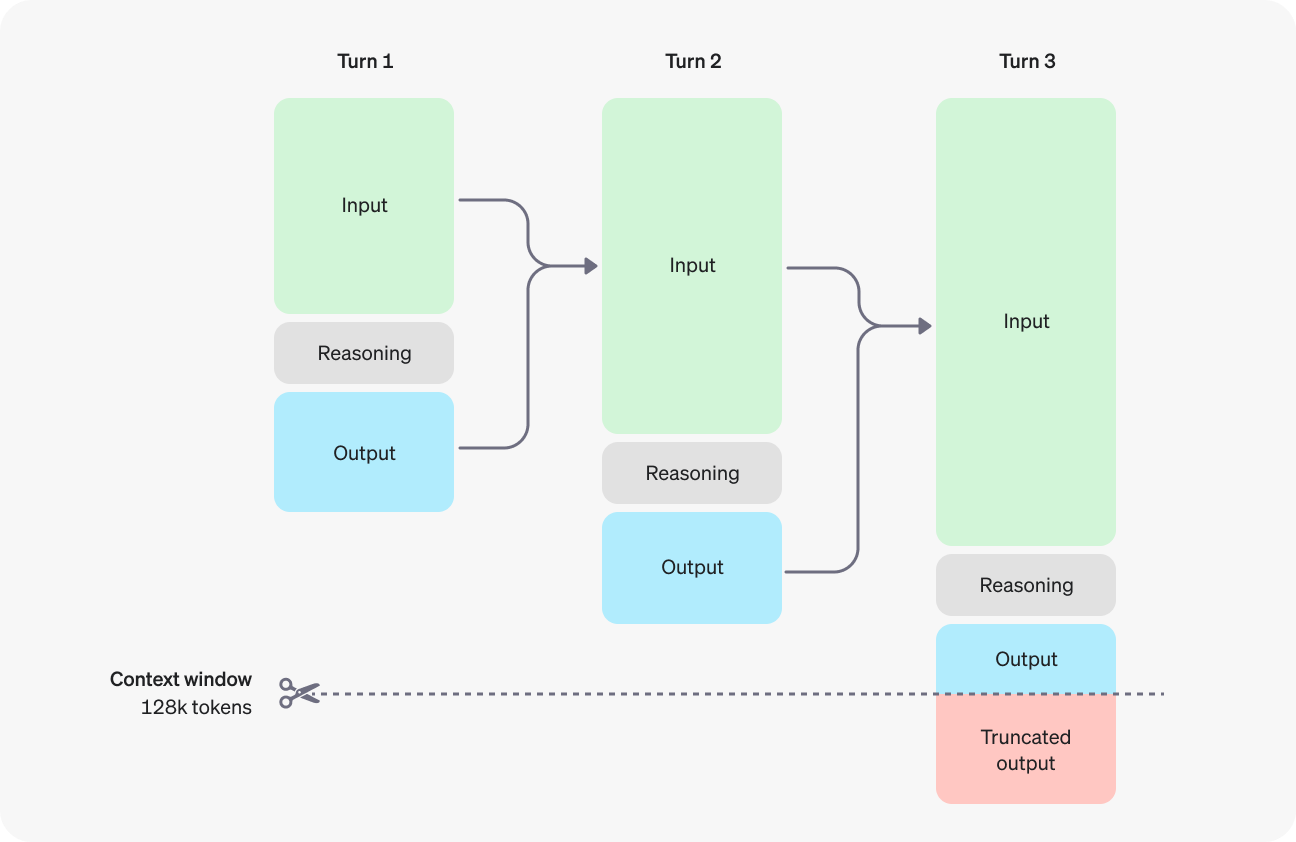
Source: OpenAI
OpenAI O1-Mini API: How to Connect to OpenAI’s API
The large o1 model is powerful at advanced reasoning, but it’s also very slow. If you need faster response times for your applications and are willing to make a small compromise in reasoning performance, then the o1-mini model might be a better choice.
To connect to the o1-mini model through the API, follow all the steps we covered for the o1-preview model—except for the model parameter, where you need to use the string ”o1-mini”.
We’ll use the same prompt as in our last example, so we can compare token usage:
response_mini = client.chat.completions.create(
    model="o1-mini",
    messages=[
        {
            "role": "user",
            "content": "Write a Python script that takes a matrix represented as a string with format '[1,2],[3,4],[5,6]' and prints the transpose in the same format."
        }
    ]
)
print(response_mini.choices[0].message.content)
Certainly! Below is a Python script that takes a matrix represented as a string in the format `'[1,2],[3,4],[5,6]'`, computes its transpose, and prints the transposed matrix in the same string format.
```python
def parse_matrix(matrix_str):
"""
Parses a matrix string like '[1,2],[3,4],[5,6]' into a list of lists.
"""
# Split the string by '],[' to separate the rows
rows = matrix_str.strip().split('],[')
# Clean the first and last elements by removing any leading '[' or trailing ']'
rows[0] = rows[0].lstrip('[')
rows[-1] = rows[-1].rstrip(']')
# Convert each row into a list of integers
matrix = []
for row in rows:
# Split each row by ',' and convert each element to integer
matrix.append([int(num) for num in row.split(',')])
return matrix
def transpose_matrix(matrix):
"""
Transposes a given matrix (list of lists).
"""
# Use zip with unpacking to transpose the matrix
transposed = list(zip(*matrix))
# Convert each tuple in the transposed matrix back to a list
transposed = [list(row) for row in transposed]
return transposed
def matrix_to_string(matrix):
"""
Converts a list of lists into a string format like '[1,3,5],[2,4,6]'.
"""
# Convert each row to a string
row_strings = []
for row in matrix:
# Convert each number to string and join with commas
row_str = ','.join(str(num) for num in row)
# Enclose the row in brackets
row_strings.append(f'[{row_str}]')
# Join all rows with commas
return ','.join(row_strings)
def main():
# Example input
input_str = '[1,2],[3,4],[5,6]'
# Parse the input string into a matrix
matrix = parse_matrix(input_str)
# Compute the transpose of the matrix
transposed = transpose_matrix(matrix)
# Convert the transposed matrix back to string format
output_str = matrix_to_string(transposed)
# Print the result
print(output_str)
if __name__ == "__main__":
main()
```
### How It Works:
1. **Parsing the Input String:**
- The `parse_matrix` function takes the input string and splits it into individual rows by looking for the pattern `"],["`.
- It cleans the first and last rows by removing any leading `[` or trailing `]`.
- Each row string is then split by `,` to extract individual numbers, which are converted to integers and stored in a nested list.
2. **Transposing the Matrix:**
- The `transpose_matrix` function uses the `zip` function along with unpacking (`*`) to transpose the matrix. This effectively switches rows with columns.
- Since `zip` returns tuples, each transposed row is converted back into a list.
3. **Converting Back to String:**
- The `matrix_to_string` function takes the transposed matrix and converts each row back into a string in the desired format.
- It joins the elements of each row with commas and encloses them in brackets.
- Finally, all row strings are joined together with commas to form the final output string.
4. **Main Execution:**
- The `main` function demonstrates the usage with an example input. You can modify `input_str` to test with different matrices.
- It prints the transposed matrix in the specified string format.
### Example:
Given the input string:
```
'[1,2],[3,4],[5,6]'
```
The script will output:
```
[1,3,5],[2,4,6]
```
### Handling User Input:
If you'd like the script to accept user input instead of having a hardcoded string, you can modify the `main` function as follows:
```python
def main():
# Take user input
input_str = input("Enter the matrix string (e.g., '[1,2],[3,4],[5,6]'): ").strip()
# Parse the input string into a matrix
matrix = parse_matrix(input_str)
# Compute the transpose of the matrix
transposed = transpose_matrix(matrix)
# Convert the transposed matrix back to string format
output_str = matrix_to_string(transposed)
# Print the result
print(output_str)
```
With this modification, when you run the script, it will prompt you to enter the matrix string:
```
Enter the matrix string (e.g., '[1,2],[3,4],[5,6]'): [1,2],[3,4],[5,6]
[1,3,5],[2,4,6]
```
### Notes:
- **Error Handling:** The current script assumes that the input string is well-formatted. For production code, you might want to add error handling to manage malformed inputs.
- **Non-integer Elements:** If your matrix contains non-integer elements (e.g., floats or strings), you'll need to adjust the parsing logic accordingly.
### Running the Script:
1. **Save the Script:** Save the above code to a file, say `transpose_matrix.py`.
2. **Run the Script:** Open a terminal or command prompt, navigate to the directory containing the script, and execute:
```bash
python transpose_matrix.py
```
3. **Provide Input:** If you've modified it to accept user input, enter the matrix string when prompted.
This script provides a straightforward way to transpose a matrix represented as a string and can be easily adapted or extended based on specific requirements.The visible output is much more verbose compared to o1-preview’s output—let’s compare usage:
print(response_mini.usage) # o1-mini
print(response.usage) # o1-preview
CompletionUsage(completion_tokens=1511, prompt_tokens=43, total_tokens=1554, completion_tokens_details=CompletionTokensDetails(reasoning_tokens=256))
CompletionUsage(completion_tokens=1279, prompt_tokens=43, total_tokens=1322, completion_tokens_details={'reasoning_tokens': 1024})The o1-mini model reasons four times less compared to the o1 model (256 vs. 1024 reasoning tokens). However, because of its verbose answer, the total number of completion tokens is actually larger. Even though o1-mini is significantly cheaper than o1-preview, this is still not ideal.
One way we could mitigate this is through prompt engineering—we’ll instruct the model to avoid explanations and introductions and limit its output to just the answer.
response_mini_2 = client.chat.completions.create(
    model="o1-mini",
    messages=[
        {
            "role": "user",
            "content": "Write a Python script that takes a matrix represented as a string with format '[1,2],[3,4],[5,6]' and prints the transpose in the same format. Limit yourself to the answer and don't add explanations or introductions."
        }
    ]
)
print(response_mini_2.choices[0].message.content)
```python
import ast
def parse_matrix(matrix_str):
rows = matrix_str.split('],[')
rows[0] = rows[0].lstrip('[')
rows[-1] = rows[-1].rstrip(']')
matrix = [ast.literal_eval(f'[{row}]') for row in rows]
return matrix
def transpose(matrix):
return list(zip(*matrix))
def format_matrix(transposed):
return ','.join([f'[{",".join(map(str, row))}]' for row in transposed])
input_str = '[1,2],[3,4],[5,6]'
matrix = parse_matrix(input_str)
transposed = transpose(matrix)
output_str = format_matrix(transposed)
print(output_str)
```Much better! The total number of completion tokens is about three times less:
print(response_mini_2.usage)CompletionUsage(completion_tokens=487, prompt_tokens=55, total_tokens=542, completion_tokens_details=CompletionTokensDetails(reasoning_tokens=320))API Beta Limitations
At the time of writing this tutorial, the o1 models are still in beta. While OpenAI has announced plans for additional features and friendlier rate limits in the coming weeks, here are the limitations you’ll encounter when using the beta o1 models:
- Modalities: Only text is supported; images cannot be processed.
- Message types: Only user and assistant messages are allowed; system messages are not permitted.
- Streaming: This feature is not available.
- Tools: Function calling, tools, and response format parameters are not included.
- Logprobs: This parameter is not supported.
- Other settings:
temperature,top_p, andnare fixed at1, while bothpresence_penaltyandfrequency_penaltyare set to0. - Assistants and batch: These models cannot be used with the Assistants API or Batch API.
OpenAI O1 API: Pricing
At the moment, OpenAI doesn’t seem to have much competition in the advanced reasoning arena. Hence, the prices are maybe a bit inflated, and as you can see, they are significantly higher compared to the GPT-4o models:
|
Model |
Pricing |
|
o1-preview |
$15.00 / 1M input tokens |
|
$60.00 / 1M output tokens |
|
|
o1-mini |
$3.00 / 1M input tokens |
|
$12.00 / 1M output tokens |
|
|
gpt-4o |
$5.00 / 1M input tokens |
|
$15.00 / 1M output tokens |
|
|
gpt-4o-mini |
$0.150 / 1M input tokens |
|
$0.600 / 1M output tokens |
Best Prompting Practices With the O1 Models
The o1 models are significantly different from the models we’re used to, such as GPT-4o or Claude 3.5 Sonnet. Since the o1 models already engage in chain-of-thought reasoning, they work best with straightforward prompts. Using few-shot prompting or asking the model to think “step by step” may actually degrade its performance.
Here are some best prompting practices recommended by the developers at OpenAI:
- Keep prompts concise and clear: The models thrive on short, direct instructions without the need for elaborate explanations.
- Avoid chain-of-thought prompts: These models handle reasoning internally, so there’s no need to ask them to “think step by step” or “explain your reasoning.”
- Utilize delimiters for clarity: Incorporate delimiters like triple quotation marks, XML tags, or section headers to clearly define different parts of the input.
- Limit extra context in retrieval-augmented generation (RAG): When adding context or documents, include only the most pertinent information to avoid complicating the model’s response.
Conclusion
Throughout this blog, I have shared step-by-step guidance on connecting to the o1 models via OpenAI’s API.
If your project calls for advanced reasoning capabilities and can accommodate slightly longer response times, the o1 models are excellent options.
For applications requiring rapid responses, image processing, or function calling, GPT-4o and GPT-4o mini remain the preferred choices.
To continue learning, I recommend these resources:
FAQs
Does OpenAI o1 have an API?
Yes, OpenAI provides an API for accessing its O1 models. The API allows you to integrate the capabilities of o1 models into your applications, enabling tasks like generating text, translating languages, and more. The tutorial above outlines the steps to connect to the o1 models using this API.
Is OpenAI's o1 API free?
The OpenAI's o1 is not free—see this tutorial's section on pricing for more details.
When is the o1 version (not the o1-preview) expected to be released?
The release date for the full o1 version (beyond the preview) is typically announced by OpenAI through official channels. Keep an eye on OpenAI's blog, website, or social media for the latest updates and announcements regarding o1's release timeline.
What is the pricing for OpenAI o1 models?
The pricing for o1-preview is $15.00 per 1 million input tokens and $60.00 per 1 million output tokens, while o1-mini costs $3.00 per 1 million input tokens and $12.00 per 1 million output tokens. In comparison, gpt-4o costs $5.00 per 1 million input tokens and $15.00 per 1 million output tokens, and gpt-4o-mini is priced at $0.150 per 1 million input tokens and $0.600 per 1 million output tokens.
What are reasoning tokens in OpenAI o1 models?
In the o1 models, reasoning tokens refer to tokens that are used internally by the model during its thought process. While the reasoning tokens consume computational resources and count toward the total token usage (and hence costs), they are not displayed to the end-user as part of the output.
Develop AI Applications
I’m an editor and writer covering AI blogs, tutorials, and news, ensuring everything fits a strong content strategy and SEO best practices. I’ve written data science courses on Python, statistics, probability, and data visualization. I’ve also published an award-winning novel and spend my free time on screenwriting and film directing.


