
Course
Introduction to Apache Airflow in Python
4 hr
65.3K
Practice and track your progress.
Continue with GoogleAI prototypes are easy to start. A notebook, an API key, and a few Python lines may be enough to classify text, summarize documents, or generate recommendations.
However, keeping that prototype running reliably every day is a different challenge.
What happens when the model API reaches its rate limit? What if one request times out, the output does not follow the expected format, or a downstream database is temporarily unavailable?
As an AI pipeline becomes a recurring workflow, reliability, monitoring, and recovery quickly become as important as the model itself.
In this article, I will show you how to build a complete AI pipeline with Apache Airflow, an open-source platform for developing, scheduling, and monitoring workflows.
Our pipeline will run daily, fetching customer reviews, classifying their sentiment using a large language model (LLM), and storing the results. All reliably in a single workflow!
A Jupyter notebook is great for experimentation. We all love notebooks for testing ideas, writing quick code, and visualizing results as we go.
A cron job is often enough to run a simple script every night. Although, if we are being honest, many scripts are run manually for weeks before someone finally gives them a proper schedule.
The problems begin when a script grows into several scripts, and those scripts start depending on one another. At that point, we no longer have a standalone program: we have a workflow.
Neither notebooks nor cron jobs are designed to manage complex workflows reliably.
Dependencies are often hidden inside the code, failures require manual investigation, and rerunning the pipeline may mean repeating steps that had already completed successfully.
We already encounter some of this complexity in traditional Extract-Transform-Load (ETL) pipelines. ETL workflows may need to retrieve data, transform it, validate it, and load it into another system.
Even when the inputs and transformations are predictable, every additional step creates another possible failure point. Nowadays, AI pipelines make this challenge even more pronounced.
If you are interested specifically in ETL pipelines, I recommend this course on ETL pipelines in Airflow.
Consider a typical AI workflow: collect data, clean it, call a model API, validate the response, store the result, and notify someone when something goes wrong.
Each step depends on the previous one, and each can fail in a different way: An API may return a rate-limit error. A model request may time out. A generated response may be valid JSON but still fail a quality check.
Outputs may also be incomplete, inconsistent, or formatted differently from what the next step expects.
Airflow does not eliminate these failures, but it makes them easier to manage.
With Airflow, a task that calls an LLM can retry after a temporary rate-limit response without rerunning the data-ingestion step. A validation task can reject a malformed or low-quality result before it reaches production. Alerts can notify the team only after the configured retries have been exhausted.
Airflow makes this possible by representing the workflow as a Directed Acyclic Graph (DAG).
Instead of hiding the entire pipeline inside one long script, a DAG defines each operation as a separate task with explicit dependencies, retry policies, logs, and execution status.
This is the main reason Airflow fits AI pipelines so well: it treats failures as an expected part of the workflow rather than as an exceptional surprise.
As an experiment grows into a recurring production process, Airflow provides the orchestration layer needed to make it observable, recoverable, and easier to maintain.
Before we start building our own pipeline, let’s set up the environment.
There are three brief steps we need to take to get the environment set up.
For this tutorial, we will run Airflow locally.
This setup is convenient for learning and development because a single command initializes the metadata database and starts the services needed to use Airflow.
First, let’s create and activate a virtual environment to keep Airflow and its dependencies isolated from the rest of your Python installation:
python3 -m venv ~/airflow-venv
source ~/airflow-venv/bin/activate
Next, we need to install Airflow 3 using version pinning and the official constraints file:
AIRFLOW_VERSION=3.3.0
PYTHON_VERSION="$(python -c 'import sys; print(f"{sys.version_info.major}.{sys.version_info.minor}")')"

CONSTRAINT_URL="https://raw.githubusercontent.com/apache/airflow/constraints-${AIRFLOW_VERSION}/constraints-${PYTHON_VERSION}.txt"

pip install "apache-airflow==${AIRFLOW_VERSION}" \
 --constraint "${CONSTRAINT_URL}"
Note that Airflow depends on many Python packages, and those packages have their own dependencies. Without the constraints file, pip may choose newer or incompatible package versions.
The installation might appear to work, but Airflow can later fail when importing providers, starting services, or running tasks. Airflow’s official installation guide recommends using constraint files to install a known-compatible dependency set.
Because our workflow will call an LLM, we also need Airflow’s Common AI provider and the OpenAI dependency for Pydantic AI:
pip install \
 "apache-airflow-providers-common-ai" \
 "pydantic-ai-slim[openai]"
Next, let’s configure the OpenAI connection. Airflow uses connections to store credentials and connection settings outside the DAG code. This keeps the Python file cleaner and avoids hard-coding secrets in the pipeline.
Once we have validated the installation, it is time to set the OpenAI key to allow actual communication with the model. There are many options for doing so.
My preferred option is:
export OPENAI_API_KEY="your-openai-api-key"airflow connections add pydanticai_default \
--conn-type pydanticai \
--conn-password "$OPENAI_API_KEY" \
--conn-extra '{"model":"openai:gpt-4o-mini"}'The Common AI provider uses the pydanticai connection type to communicate with LLM providers through Pydantic AI.
This command stores the connection in Airflow’s metadata database, so after that you do not need to keep the .env file or pass the key again every time you start Airflow.
airflow standaloneKeep this terminal open while Airflow is running. Standalone mode is ideal for local development and tutorials, but it is not intended for production deployments.
To access the Airflow interface, we can now open http://localhost:8080 in the browser. The first thing we will see is the login page. But which username and password should we use?
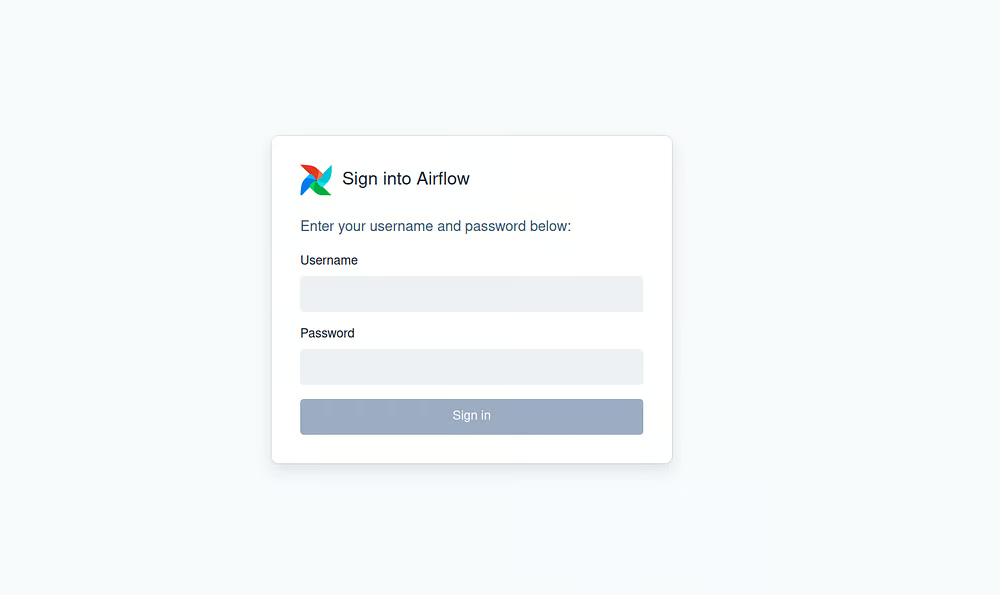
Login view of Apache Airflow.
When Airflow starts in standalone mode, it automatically generates login credentials. The username and password are printed in the terminal output and also stored in $AIRFLOW_HOME/simple_auth_manager_passwords.json.generated.
By default, AIRFLOW_HOME is ~/airflow, so we can retrieve the credentials with:
cat ~/airflow/simple_auth_manager_passwords.json.generatedFinally, those credentials will allow us to log in to the Airflow interface.
After logging in, Airflow opens on the Home page. This view gives you a quick overview of the local Airflow environment.
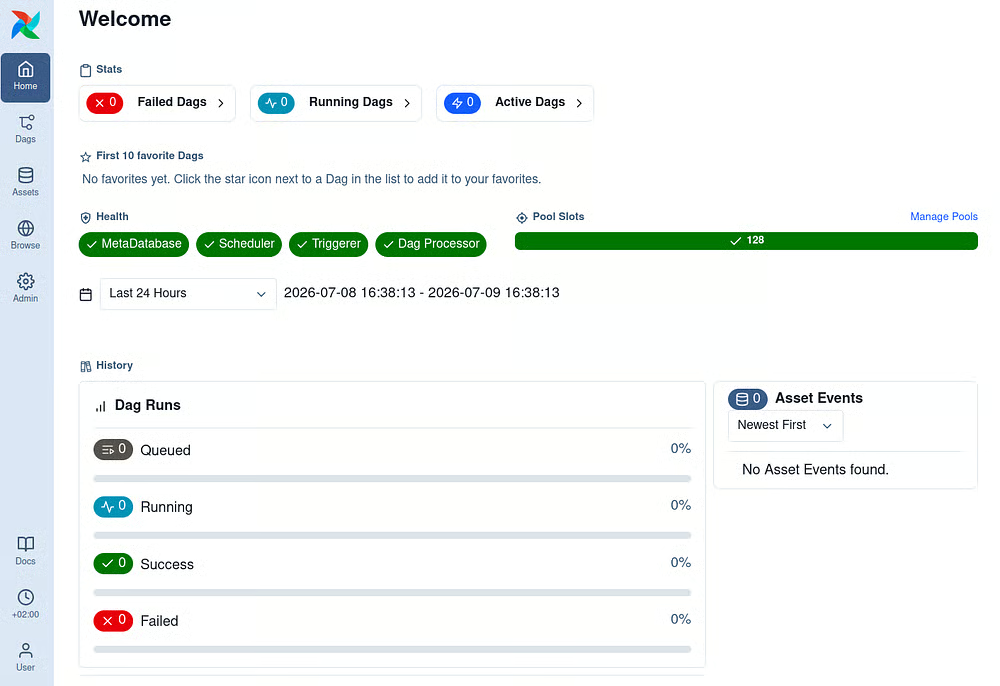
Airflow UI view after the first login.
At the top, the Stats cards summarize the current state of your DAGs, including failed, running, and active workflows.
Since we have not created our pipeline yet, these values may still be zero.
The Health section shows whether the main Airflow services are running.
Below, the Pool Slots bar shows the available execution capacity. We will not configure custom pools in this article, but this area becomes useful when controlling how many tasks can run at the same time.
Finally, the History section summarizes recent DAG runs. Once we trigger our review sentiment pipeline, this area will start showing queued, running, successful, and failed runs.
Now that Airflow is running, let’s create the required files for our pipeline:
mkdir -p ~/airflow/dags
touch ~/airflow/dags/review_sentiment_pipeline.py
touch ~/airflow/requirements.txt
In a local standalone installation, Airflow uses ~/airflow as AIRFLOW_HOME by default. We will place our DAG file inside the dags directory and keep a requirements.txt file to document the project dependencies.
Therefore, the project will have the following structure:

Minimal Airflow project structure.
The eview_sentiment_pipeline.py file will contain the workflow definition, including the tasks for fetching reviews, classifying their sentiment, and storing the results.
Airflow monitors the configured dags directory and looks for valid DAG definitions inside Python files. Once our file contains a valid DAG, the workflow will appear on the Dags page in the Airflow UI.
If you find you’re having some issues with the onboarding, I suggest checking out the tutorial Getting Started with Apache Airflow. .
To start working hands-on with Airflow, we will build a daily job that processes customer reviews and classifies their sentiment.
Imagine that we have just built an e-commerce platform. Customers are already leaving reviews, and we want to analyze them automatically every day.
Instead of running a script manually, we can use Airflow to orchestrate the workflow.
Let’s imagine that the raw reviews are stored in a .jsonl file.
Each line contains one review as a JSON object, and new reviews are appended to the end of the file during the day. In a production system, this data might come from an API, database, object store, or message queue. For this tutorial, the JSONL file gives us a simple and realistic source of raw review data.
In this scenario, the first step in the pipeline is to load those reviews into Airflow. We start with a regular Python function, just as we would in a notebook or script:
REVIEWS_FILE = Path.home() / "airflow" / "data" / "reviews.jsonl"

def fetch_reviews() -> list[dict]:
   """Load raw customer reviews from the JSONL landing file."""
   reviews = []

   with REVIEWS_FILE.open("r", encoding="utf-8") as file:
       for line_number, line in enumerate(file, start=1):
           if not line.strip():
               continue

           try:
               reviews.append(json.loads(line))
           except json.JSONDecodeError as error:
               raise ValueError(
                   f"Invalid JSON on line {line_number}"
               ) from error

   print(f"Fetched {len(reviews)} reviews")
   return reviews
This function opens the JSONL file, reads it line by line, skips empty lines, and converts each JSON object into a Python dictionary.
If one line contains invalid JSON, the task fails with a clear error message showing the line number.
So far, this is plain Python. The next step is to turn it into an Airflow task and place it inside a DAG.
To turn the function into part of an Airflow workflow, we need three pieces:
@task. This tells Airflow that the function is a task.@dag. The DAG gives the workflow a name, schedule, start date, and other configuration.Here is the minimal version:
from airflow.sdk import dag

@dag(    fetch_reviews()
   dag_id="fetch_reviews_pipeline",
)

def fetch_reviews_pipeline():
   fetch_reviews()

fetch_reviews_pipeline()
Note that this DAG will not be executed automatically yet.
As written, we would need to trigger it manually from the Airflow UI. To configure when the workflow should run, we can add scheduling parameters to the DAG definition. One possible option is:
@dag(
   dag_id="review_sentiment_pipeline",
   schedule="@daily",
   start_date=datetime(2026, 1, 1),
   catchup=False,
   tags=["ai", "sentiment"],
)
Let’s break it down!
dag_id gives the DAG a unique name in Airflow.schedule="@daily" runs the DAG once per day.start_date tells Airflow when scheduling can begin.catchup=False prevents Airflow from creating runs for past dates.tags help organize and filter the DAG in the Airflow UI.Once the DAG is defined, we can jump to the UI and check how this looks in practice:
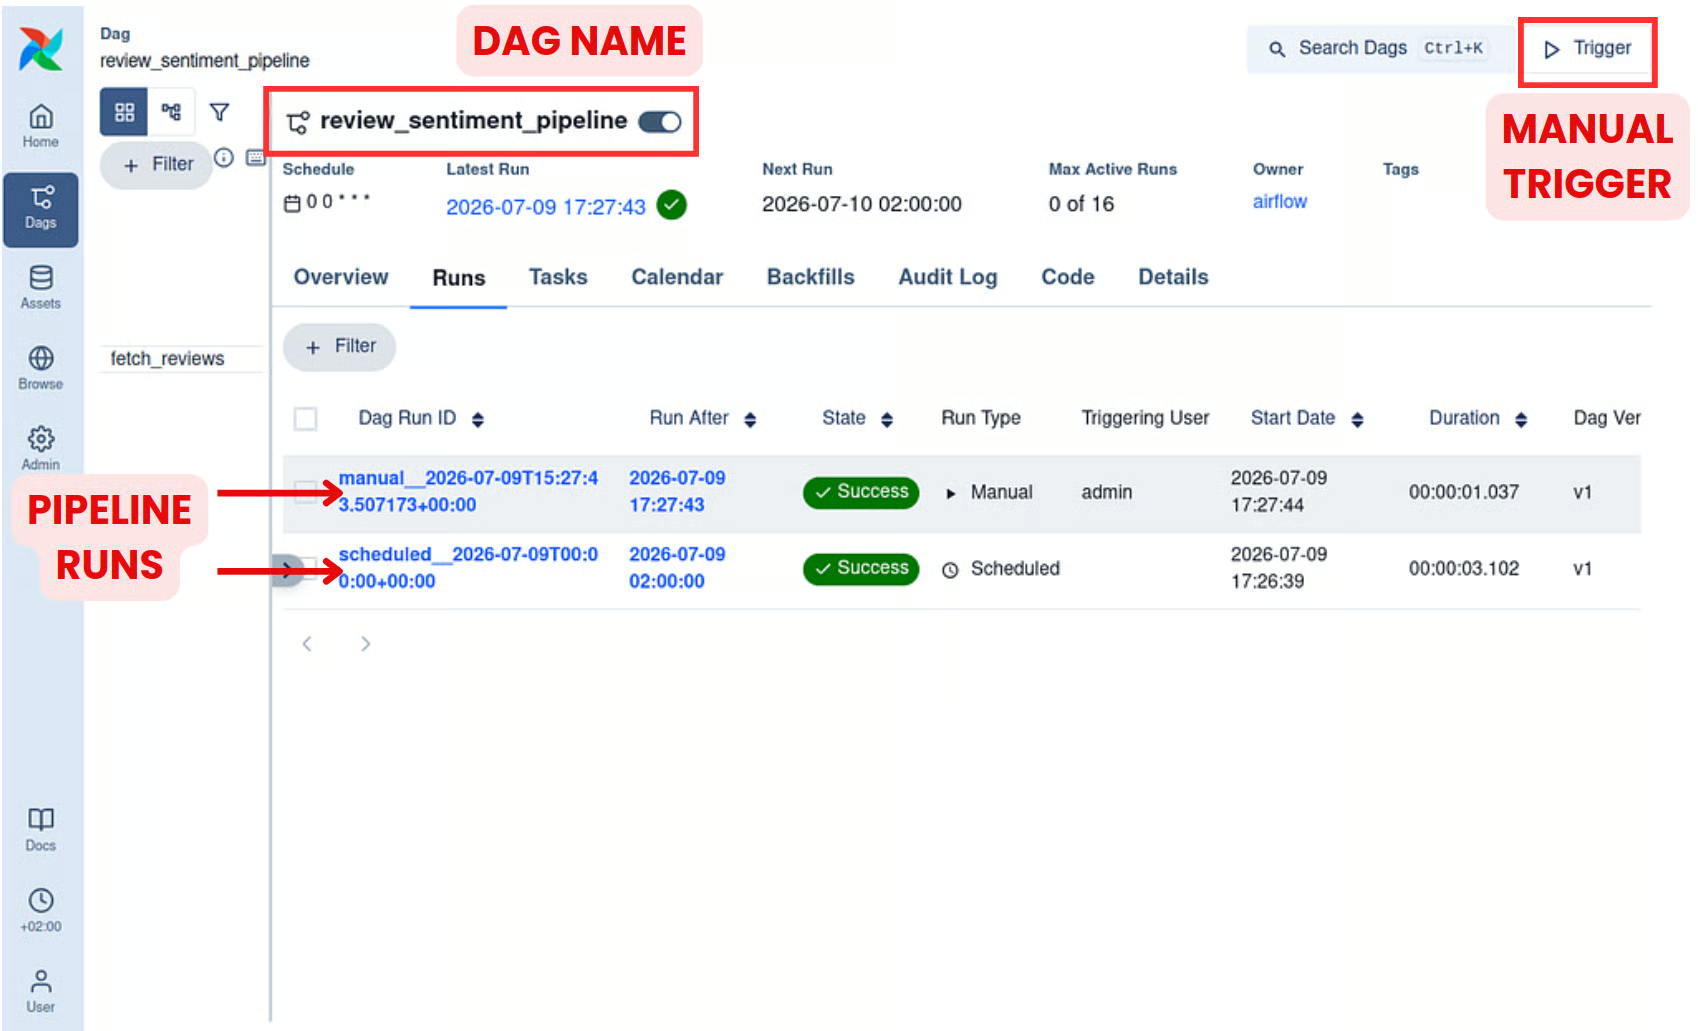
Airflow UI view of our pipeline review_sentiment_pipeline. Note the two types of runs (scheduled and manual) and the manual Trigger button.
In the UI, we can see that Airflow automatically discovered the DAG named review_sentiment_pipeline.
We can also see that it ran according to its schedule, and that we triggered one additional run manually using the Trigger button in the top-right corner of the interface.
One nice feature is the calendar-style view, where Airflow logs pipeline runs together with the status of each run:
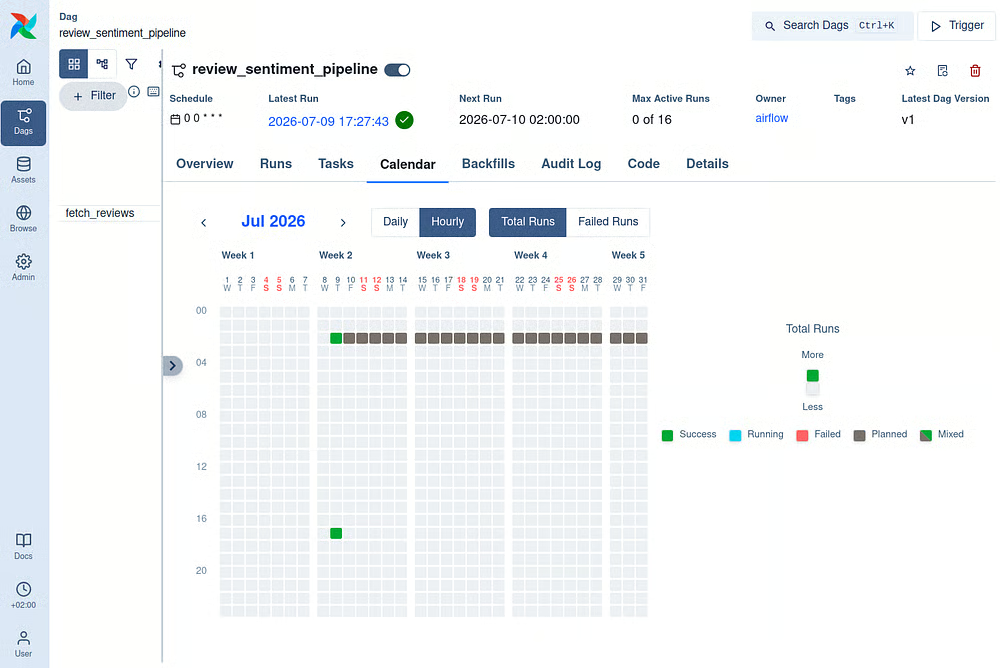
Calendar view of our Airflow pipeline with both the scheduled and manual runs.
Feel free to pause the article here and explore the Airflow UI!
With the reviews loaded, the next step is to classify their sentiment. For this, we will use @task.llm, a decorator that turns an LLM call into a native Airflow task.
We could call the OpenAI API manually inside a regular @task, but @task.llm gives us a cleaner integration.
It handles LLM-specific details such as the model connection, system prompt, structured output, and result serialization. At the same time, the task still benefits from standard Airflow features such as retries, logging, monitoring, and dependency management.
This second step has a few more pieces than the exact task, so let’s build it gradually:
from typing import Literal
from pydantic import BaseModel

class ReviewClassification(BaseModel):
   """Structured result returned by the LLM."""

   review_id: str
   sentiment: Literal["positive", "neutral", "negative"]
This tells the LLM task that each response should contain the review ID and one of three sentiment labels: positive, neutral, or negative.
@task.llm(
   llm_conn_id="pydanticai_default",
   system_prompt=(
       "Classify the customer review as positive, neutral, or negative. "
       "Use both the written review and the star rating as context. "
       "Return the review ID and sentiment."
   ),
   output_type=ReviewClassification,
   serialize_output=True,
   retries=3,
)
def classify_review(review: dict) -> str:
   """Build the prompt sent to the LLM."""
   return (
       f"Review ID: {review['review_id']}\n"
       f"Product: {review['product']}\n"
       f"Rating: {review['rating']} out of 5 stars\n"
       f"Review: {review['review_text']}"
   )
The function body returns a string prompt, while the @task.llm decorator takes care of sending that prompt to the model using the pydanticai_default connection we configured earlier.
The system_prompt gives the model its instruction, while output_type=ReviewClassification asks for a structured response. We also set serialize_output=True so Airflow stores the result as a plain dictionary, which makes it easier to pass to downstream tasks.
Interested in tasks requiring LLM inference? Consider this LangChain course for more specialized applications!
The classification task returns a structured result, but during development, it is useful to see what the model produced without waiting until the final storage step.
Indeed, a pipeline step can be composed of more than one Airflow task.
In this case, we will add a small task that prints each classification to the Airflow logs:
@task
def show_classification(classification: dict) -> dict:
   """Print one model classification to the Airflow task logs."""
   print(
       f"Review {classification['review_id']}: "
       f"{classification['sentiment']}"
   )

   return classification
This task does not change the result. It simply logs the model output and returns the same dictionary, so the classification can still be passed to the next step of the pipeline.
3. Finally, we need to connect the new tasks inside the DAG function:
@dag(
   dag_id="review_sentiment_pipeline",
   schedule="@daily",
   start_date=datetime(2026, 1, 1),
   catchup=False,
   tags=["ai", "sentiment"],
)
def review_sentiment_pipeline():
   reviews = fetch_reviews()

   classifications = classify_review.expand(
       review=reviews
   )

   displayed_classifications = show_classification.expand(
       classification=classifications
   )

review_sentiment_pipeline()Note: In this pipeline, we use dynamic task mapping with .expand(review=reviews). This tells Airflow to create one classify_review task instance for each review, so each review is sent to the LLM in a separate request.
This is usually preferable to sending the entire review list to one LLM task. A call such as classify_reviews(reviews) would process all reviews together, which can make failures harder to debug, retries less targeted, and large inputs more likely to hit model context or API limits.
Before finishing this second step of the pipeline, we can return to the Airflow UI and visualize how the workflow has evolved.
At this point, the DAG contains three tasks: fetch_reviews, classify_review, and show_classification :
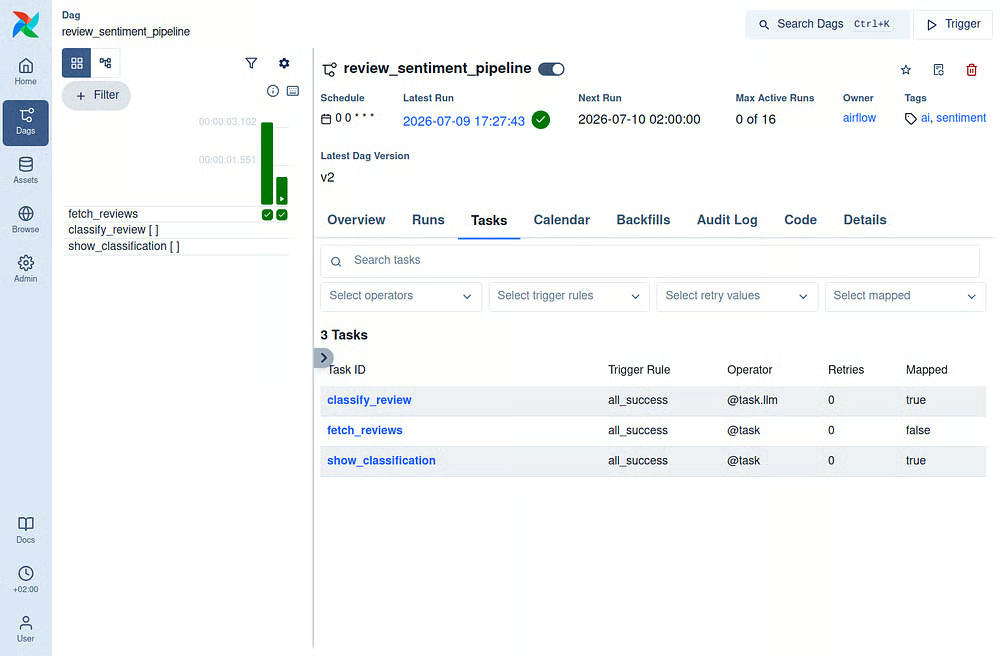
Airflow UI view of the three tasks in our review_sentiment_pipeline DAG.
Because we used dynamic task mapping, Airflow sends one LLM request per review. This is useful because each review is tracked independently:

Airflow UI showing reviews being classified independently. Some tasks have already completed or failed, while others are still running.
LLM requests can fail for reasons such as API rate limits, network issues, or model timeouts.
Instead of failing the whole pipeline immediately, we can ask Airflow to retry the affected task automatically.
Let’s add this feature!
from datetime import timedelta

@task.llm(
   llm_conn_id="pydanticai_default",
   system_prompt=(
       "Classify the customer review as positive, neutral, or negative. "
       "Use both the written review and the star rating as context. "
       "Return the review ID and sentiment."
   ),
   output_type=ReviewClassification,
   serialize_output=True,
   retries=3,
   retry_delay=timedelta(seconds=30),
   retry_exponential_backoff=True,
   max_retry_delay=timedelta(minutes=5),
)
Here, retries=3 allows up to three additional attempts after the first failure.
The first retry waits 30 seconds, and exponential backoff increases the delay between later attempts, up to a maximum of five minutes.
The nice part is that Airflow retries only the failed mapped task.
If 49 reviews were classified successfully and one request failed, only that failed review is scheduled for retry. The rest of the pipeline does not need to repeat work that has already succeeded.
After some time, the failed review classifications will again be up for retry:

Airflow UI showing all failed review-classification tasks waiting to be retried.
Once the review classification succeeds, each mapped show_classification() task instance displays the model response for one review in its own logs.
This means the display step is independent too: you can open, inspect, or debug the output of one review regardless of the state of the others.
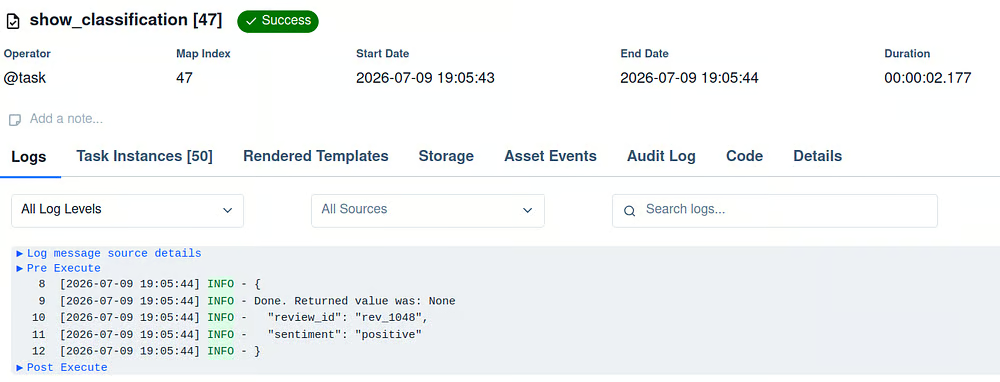
Airflow UI view of the LLM sentiment classification for review 47.
Printing each classification is useful while developing the DAG because it lets us quickly inspect the model responses in the Airflow logs.
However, logs are not a reliable place to store pipeline results. They are harder to query, reuse, and integrate with downstream systems.
The final step is therefore to collect the classifications and write them to a structured output.
For this article, we will remove the call to show_classification() and store the results in a local JSON file.
In a production pipeline, this task would typically write to a database, data warehouse, or object store.
One possible implementation for this new @task would be:
OUTPUT_FILE = (
   Path.home()
   / "airflow"
   / "output"
   / "classified_reviews.json"
)

@task
def store_results(results: list[dict]) -> str:
   """Write all classified reviews to a local JSON file."""
   OUTPUT_FILE.parent.mkdir(parents=True, exist_ok=True)

   classifications = list(results)

   with OUTPUT_FILE.open("w", encoding="utf-8") as file:
       json.dump(
           classifications,
           file,
           indent=2,
           ensure_ascii=False,
       )

   print(
       f"Stored {len(classifications)} classifications "
       f"in {OUTPUT_FILE}"
   )

   return str(OUTPUT_FILE)
This task is our load step.
It takes the classifications produced by the LLM, creates an output folder if needed, and writes everything to a local JSON file.
The small list(results) conversion is useful because the classifications come from mapped tasks.
Airflow collects those mapped outputs for us, and this task turns them into a regular list before saving them. Now we only need to connect the task inside the DAG by calling store_results(classifications).
With this line, Airflow knows that store_results() depends on the classification step. In other words, the output file is written only after all review classifications have finished successfully.
With all three steps connected, the complete DAG now fetches the reviews, creates one LLM task for each review, and stores the combined results.
Inside the DAG function, the pipeline looks like this:
@dag(
   dag_id="review_sentiment_pipeline",
   schedule="@daily",
   start_date=datetime(2026, 1, 1),
   catchup=False,
   tags=["ai", "sentiment"],
)
def review_sentiment_pipeline():
   reviews = fetch_reviews()
   classifications = classify_review.expand(
       review=reviews
   )
   store_results(classifications)

review_sentiment_pipeline()
After you save the file, Airflow will take a few seconds to parse it and discover the complete DAG. Once review_sentiment_pipeline appears in the DAG list, enable it with the toggle and click Trigger to start a manual run.
This lets us test the full pipeline immediately, without waiting for the next scheduled daily run. Once the run succeeds, the final JSON file will be locally available at ~/airflow/output/classified_reviews.json.
The output JSON file is the durable output of the workflow, which can be reused outside the DAG or passed to downstream systems later.
In contrast, the Airflow UI gives us the operational view of the pipeline: which tasks ran, which ones failed or succeeded, and where to inspect logs.
The final pipeline is displayed below:
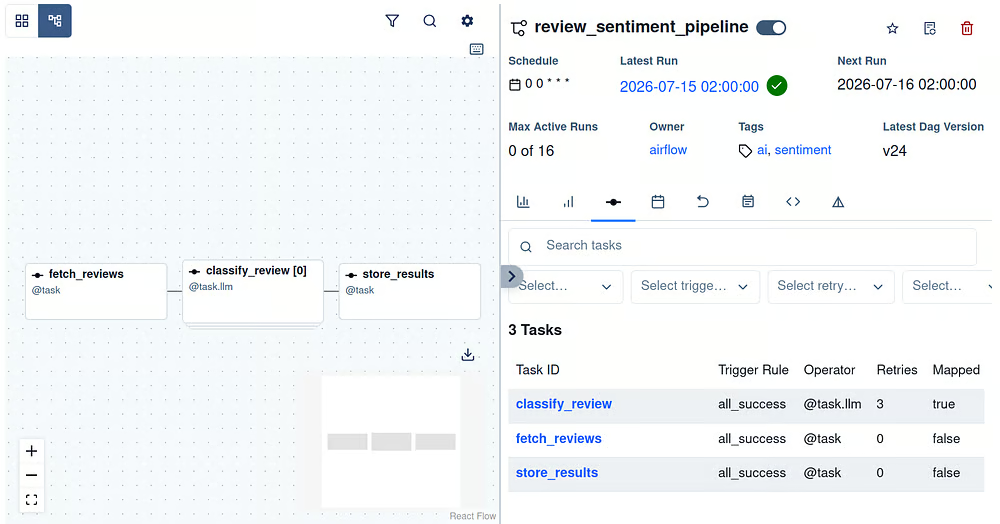
Airflow UI view of the three tasks in our pipeline. The bottom-right panel displays each task’s properties, including its name, trigger rule, operator or decorator, and number of retries.
Finally, over the next few days, the Airflow UI will start filling with automatic daily runs, giving us a clear history of when the pipeline ran and whether each execution succeeded:
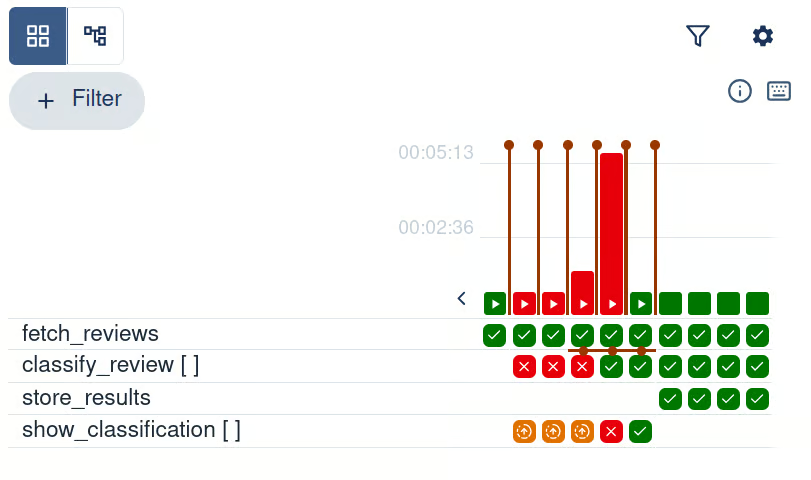
Airflow UI view of the pipeline runs and their states. After Step 3, the pipeline stops using show_classification and runs store_results instead.
Our pipeline now fetches reviews, classifies them with an LLM, and stores the results on a daily schedule.
Airflow 3 also supports more advanced patterns that can make AI workflows more responsive and easier to supervise.
Instead of running the pipeline at a fixed time every day, Airflow can start it when an external event occurs.
For example, the review pipeline could run whenever a new review file is uploaded to object storage or a message arrives in a queue.
Airflow 3 supports event-driven scheduling through assets and event-compatible triggers. This removes the need to repeatedly check for new data and allows the pipeline to react as soon as an event is detected.
Not every model decision should be accepted automatically.
Some reviews may be ambiguous, sensitive, or require human judgment. Airflow’s human-in-the-loop operators can pause a running workflow and request input through the Airflow interface.
A reviewer can approve or reject a result, provide information, or choose which branch of the workflow should continue.
The Common AI provider also supports interactive review patterns for agentic workflows, where a reviewer can approve, reject, or request changes to an LLM-generated result.
Together, event-driven scheduling and human review make it possible to build AI pipelines that react quickly without removing human oversight where it matters.
To learn more about the features of Airflow 3.0, I recommend checking out our separate guide.
In this article, we built a complete AI pipeline with Apache Airflow.
The pipeline fetches customer reviews, classifies each review with an LLM, and stores the final results in a structured JSON file.
Along the way, we saw how Airflow turns Python functions into scheduled, observable tasks. This is especially useful for AI workflows, where API limits, model timeouts, and unexpected outputs can happen.
With task dependencies, dynamic task mapping, retries, logs, and the Airflow UI, we can make AI pipelines easier to monitor, debug, and recover.
The example used local files to keep things simple, but the same structure can be extended to APIs, databases, event-driven workflows, and human-in-the-loop review.
If you are ready to continue exploring, I recommend starting with our Introduction to Apache Airflow in Python course, then moving on to Building Data Pipelines with Airflow for more hands-on practice.
For a broader learning path, the Data Engineer in Python career track covers the wider set of skills needed to build and manage production data pipelines.
Top DataCamp Courses
Course
Course
Practice and track your progress.
Continue with GoogleTutorial
Jake Roach
10 min
Tutorial
François Aubry
12 min
Tutorial
Jake Roach
15 min
Tutorial
Moez Ali
12 min
Tutorial
Austin Chia
Tutorial
Moez Ali
15 min