Track
The newly introduced OpenAI Realtime API enables us to integrate fast, low-latency, multimodal experiences into our applications. With this API, we can create seamless speech-to-speech interactions between users and large language models (LLMs).
This API eliminates the need for multiple models to achieve voice-driven experiences as it offers the complete solution in one integrated API. Not only does it aim to reduce latency, but it also retains the emotional nuances and natural flow of conversations.
In this article, we’ll learn how to use the OpenAI Realtime API to build voice-controlled AI assistants. We’ll create persistent WebSocket connections using Node.js and how this can be utilized within the terminal to communicate with the API. Additionally, I’ll guide you on deploying a React app that uses the capabilities of this API.
Generate the API Key for the OpenAI Realtime API
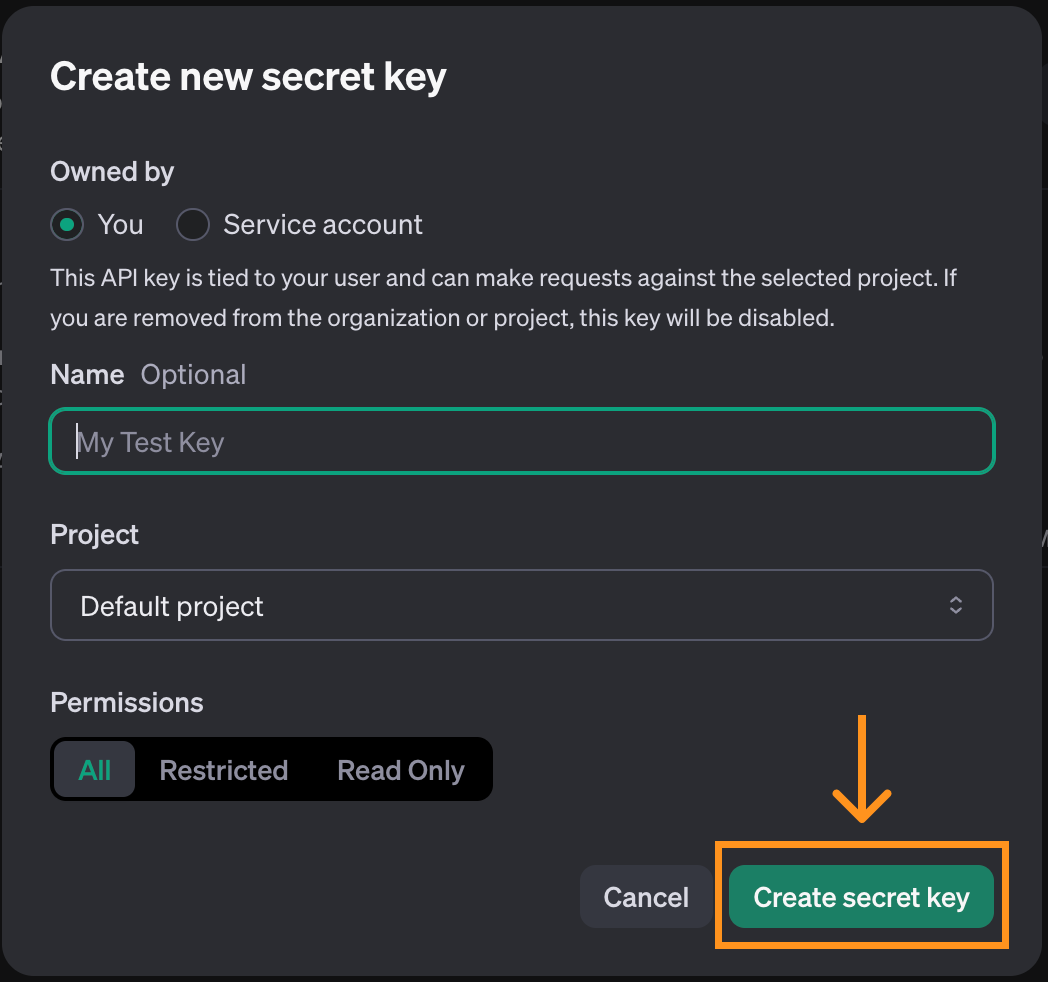
To use the OpenAI Realtime API, we must first generate an API key. To do so, navigate to the API key page. Note that an account is required for this. At the top of the page, click the “Create new secret key” button.

A pop-up window will open. We can use the default options and click “Create secret key”.
When the key is created, we get the opportunity to copy it. Make sure to copy it before closing the window, as this is the only time it will be shown.
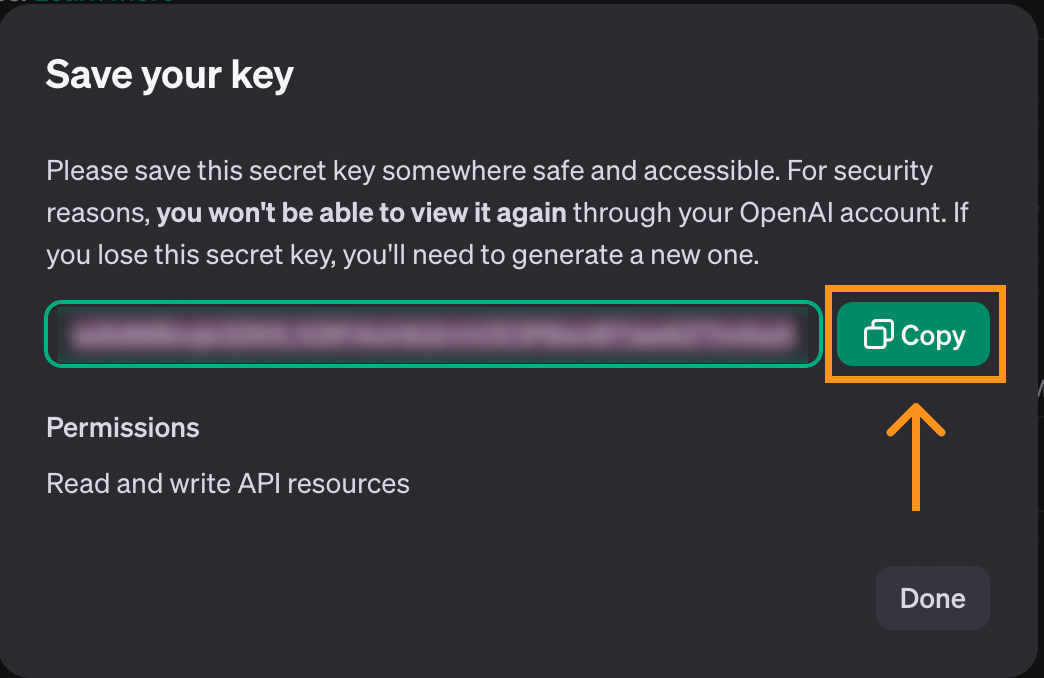
If the key gets lost, we can always delete it and create a new one.
To store the key, we recommended creating a file named .env and saving the key in there with the following format:
OPENAI_API_KEY=<paste_they_key_here>We’ll use this file throughout this article to connect to the API.
Cost Considerations for the Realtime API
Before proceeding, note that the Realtime API isn’t free, and we need to add credits to our account to use it. We can add credits on the billing page, which is located in our profile.
To give an idea of the costs, here’s an overview of how much it cost me to experiment with the API while working on this article:

I spent around five dollars in total. This isn’t a huge amount, but it’s much more expensive than the other APIs provided by OpenAI. Be mindful of that as you work on this article.
Most of the cost (first bar) corresponds to me playing with the React console app that we explore at the end of this article. The rest, around half a dollar, is what it cost me to use the API using WebSockets. Therefore, it’s possible to follow along with this article for less than a dollar.
For more details on the pricing of the API, check the “Realtime API” section on their pricing page.
Develop AI Applications
Using The Realtime API With WebSockets
Unlike other components of the OpenAI API, the Realtime API utilizes WebSockets. WebSockets is a communication protocol that establishes a bidirectional communication channel between a client and a server. In contrast to the conventional request-response model used by HTTP, WebSockets support ongoing, real-time interactions. This makes WebSockets particularly suitable for real-time applications, such as voice chat.
This article will cover how WebSockets work and include several examples of interacting with the Realtime API.
We are going to use Node.js, so we need to ensure it is installed on our computer. If not, we can download and install Node.js from its official website.
Initializing the script
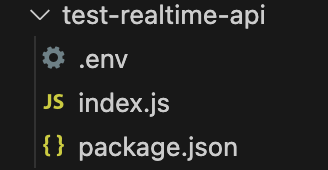
To follow along, we recommend creating a folder with the .env file created above. Inside that folder, run the following command to initialize the script:
npm init -y && touch index.jsAfter this command finishes, these files should be inside the folder:
Installing the dependencies
Start by installing two packages:
ws: This is the WebSocket package, the main package required to interact with the API.dotenv: A utility package that loads the API key from the.envfile.
Install these by running the command:
npm install ws dotenvConnecting to the Realtime API
To initiate a connection with the Realtime API, we create a new WebSocket object passing the API URL and the headers with the required information to connect to it:
// Import the web socket library
const WebSocket = require("ws");
// Load the .env file into memory so the code has access to the key
const dotenv = require("dotenv");
dotenv.config();
function main() {
  // Connect to the API
  const url = "wss://api.openai.com/v1/realtime?model=gpt-4o-realtime-preview-2024-10-01";
  const ws = new WebSocket(url, {
      headers: {
          "Authorization": "Bearer " + process.env.OPENAI_API_KEY,
          "OpenAI-Beta": "realtime=v1",
      },
  });
}
main();
Setting up an action when the connection is opened
The above code creates the web socket connection to the API but doesn’t do anything with it yet.
WebSockets allow us to set up actions to be executed when some events occur. We can use the open event to specify some code we want to execute once the connection is established.
The generic syntax to add an event listener is the following:
ws.on(<event>, <function>);Replacing <event> with a string containing the name of the event and <function> with a function to be executed when the event occurs.
Here’s how we can display text once the connection is ready:
// Add inside the main() function of index.js after creating ws
async function handleOpen() {
  console.log("Connection is opened");
}
ws.on("open", handleOpen);
To run this code, we use the command:
node index.jsIf the API key is set correctly, we’ll see the “Connection is open” message in the terminal. The script will keep running because the connection is still open so we have to stop it manually.
Setting up an action when a message is received
Another event that we can respond to when using WebSockets is the message event. This is triggered each time a message is received from the server. Let’s add a function that displays each received message:
// Add inside the main() function of index.js
 async function handleMessage(messageStr) {
    const message = JSON.parse(messageStr);
    console.log(message);
}
ws.on("message", handleMessage);
Running the script now should also display the session.created event that the API sends when the session is initialized.
Other WebSocket events
Above, we learned how to add event listeners to the open and message events. WebSockets support two additional events that we won’t use in our examples.
The close event can be used to add a callback when the socket is closed:
async function handleClose() {
  console.log(“Socket closed”);
}
ws.on(“close”, handleClose);
The error event is used to add a callback when there’s an error:
async function handleError(error) {
  console.log(“Error”, error);
}
ws.on(“error”, handleError);
Communicating with the Realtime API
Working with WebSockets requires us to program in an event-driven way. Messages are sent back and forth on the communication channel, and we cannot control when these messages will be delivered or received.
The code that initiates the communication should be added inside handleOpen(). O Otherwise, an error would occur because that code may be executed before the web socket communication channel is created.
The same is true for the code handling messages. All the logic should go into the handleMessage() function.
In the upcoming examples, we’ll use the following code as the starting point. Most of the changes involve updating the handleOpen() and handleMessage().
// Import the web socket library
const WebSocket = require("ws");
// Load the .env file into memory so the code has access to the key
const dotenv = require("dotenv");
dotenv.config();
function main() {
  // Connect to the API
  const url = "wss://api.openai.com/v1/realtime?model=gpt-4o-realtime-preview-2024-10-01";
  const ws = new WebSocket(url, {
      headers: {
          "Authorization": "Bearer " + process.env.OPENAI_API_KEY,
          "OpenAI-Beta": "realtime=v1",
      },
  });
  async function handleOpen() {
    console.log("Connection is opened");
  }
  ws.on("open", handleOpen);
  async function handleMessage(messageStr) {
    const message = JSON.parse(messageStr);
    console.log(message);
  }
  ws.on("message", handleMessage);
}
main();
Using the Realtime API to send and receive text
Communication with the Realtime API happens by using events. The OpenAI real-time documentation API lists the events it supports. We use the conversation.item.create event to initiate a conversation. Events are represented as JSON objects whose fields are described in the documentation.
Here’s an example of a conversation.item.create event sending the prompt ”Explain in one sentence what a web socket is”:
const createConversationEvent = {
  type: "conversation.item.create",
  item: {
    type: "message",
    role: "user",
    content: [
      {
        type: "input_text",
        text: "Explain in one sentence what a web socket is"
      }
    ]
  }
};
This event tells the API that we want to initiate a textual conversation. This is specified in the content field, using a type of ”input_text” and providing a text prompt.
We use the ws.send() method to send a message. The web socket package expects a string as the argument so we need to convert our JSON event to a string using the JSON.stringify() function. Putting these together, here’s how we can send the above event:
ws.send(JSON.stringify(createConversationEvent));This will initiate the conversation, but it won’t trigger the API to send us a response automatically. To trigger a response, we send a response.create event. Here’s an example:
const createResponseEvent = {
  type: "response.create",
  response: {
      modalities: ["text"],
      instructions: "Please assist the user.",
  }
}
ws.send(JSON.stringify(createResponseEvent));
This event uses the modalities response parameter to request a textual response. The instructions are the most important part, describing what we want the model to do, in this case, a generic prompt asking to assist the user.
We send these two events in the handleOpen() function so that a conversation is initiated as soon as the connection is established. Here’s the full implementation of the handleOpen() function from this example:
async function handleOpen() {

  // Define what happens when the connection is opened

  // Create and send an event to initiate a conversation

  const createConversationEvent = {

    type: "conversation.item.create",

    item: {

      type: "message",

      role: "user",

      content: [

        {

          type: "input_text",

          text: "Explain in one sentence what a web socket is"

        }

      ]

    }

  };

  // Create and send an event to initiate a response

  ws.send(JSON.stringify(createConversationEvent));

  const createResponseEvent = {

    type: "response.create",

    response: {

        modalities: ["text"],

        instructions: "Please assist the user.",

    }

  }

  ws.send(JSON.stringify(createResponseEvent));

}
Regarding the incoming messages, there are three types of events that are worth noting for this example: the response.text.delta, response.text.done, and response.done events:
- The
response.text.deltaevents contain the response broken down into chunks in thedeltafield. They are important when we want to provide a real-time experience because they allow us to stream the response chunk by chunk straight away. - The
response.text.doneevent marks the end of the textual response and contains the full answer in thetextfield. - The
response.doneevent marks the end of the response.
We can specify how we want our script to respond to these events using a switch statement in the handleMessage() function:
async function handleMessage(messageStr) {
  const message = JSON.parse(messageStr);
  // Define what happens when a message is received
  switch(message.type) {
    case "response.text.delta":
      // We got a new text chunk, print it
      process.stdout.write(message.delta);
    break;
    case "response.text.done":
      // The text is complete, print a new line
      process.stdout.write("\n");
    break;
    case "response.done":
      // Response complete, close the socket
      ws.close();
    break;
  }
}
In this example, we use the response.text.delta event to print chunks of the response to the console as we receive it. When the response is complete, the response.text.done event is triggered, and we print a new line to show that the output is completed. Finally, we close the web socket when we receive the response.done event.
To run this example, we paste these functions into the template code above and run it with the command:
node index.jsThis will generate a response in the terminal to the prompt "Explain in one sentence what a web socket is", similar to when we use ChatGPT.
The full code for the text example is available here.
Using the Realtime API to send and receive audio
The previous example showed how we handle text data. However, the real interest in the Realtime API is to create a voice assistant that replies in real-time.
Handling audio data is slightly more complicated than dealing with textual data. We will skip over some of the details specific to how audio works as they would distract us from the main subject of this article.
First, we install two packages:
npm install node-record-lpcm16 speakernode-record-lpcm16records sound from the microphone so we can send a voice prompt.speakeris used to play the AI voice response.
We also need to install SoX (Sound eXchange), a command-line utility for audio processing that the node library will use to interface with the microphone and record audio. Use brew install sox to install it on macOS or sudo apt install sox on Linux.
With these packages installed, we import them and add a function startRecording() that records the user's audio prompts. We don’t explain the function in detail as it would steer us too much off course from our main subject.
Add the following code to the index.js file after loading the environment:
// Add to index.js before the main() function
// Import the web socket library
const WebSocket = require("ws");
// Load the .env file into memory so the code has access to the key
const dotenv = require("dotenv");
dotenv.config();
const Speaker = require("speaker");
const record = require("node-record-lpcm16");
// Function to start recording audio
function startRecording() {
  return new Promise((resolve, reject) => {
    console.log("Speak to send a message to the assistant. Press Enter when done.");
    // Create a buffer to hold the audio data
    const audioData = [];
    // Start recording in PCM16 format
    const recordingStream = record.record({
      sampleRate: 16000, // 16kHz sample rate (standard for speech recognition)
      threshold: 0, // Start recording immediately
      verbose: false,
      recordProgram: "sox", // Specify the program
    });
    // Capture audio data
    recordingStream.stream().on("data", (chunk) => {
      audioData.push(chunk); // Store the audio chunks
    });
    // Handle errors in the recording stream
    recordingStream.stream().on("error", (err) => {
      console.error("Error in recording stream:", err);
      reject(err);
    });
    // Set up standard input to listen for the Enter key press
    process.stdin.resume(); // Start listening to stdin
    process.stdin.on("data", () => {
      console.log("Recording stopped.");
      recordingStream.stop(); // Correctly stop the recording stream
      process.stdin.pause(); // Stop listening to stdin
      // Convert audio data to a single Buffer
      const audioBuffer = Buffer.concat(audioData);
      // Convert the Buffer to Base64
      const base64Audio = audioBuffer.toString("base64");
      resolve(base64Audio); // Resolve the promise with Base64 audio
    });
  });
};
The startRecording() function records audio from the microphone and waits for “Enter” to be pressed.
Next, we update the main() function by initializing the Speaker() which is used to play the AI’s response:
// Add to the main() function after ws is initialized
const speaker = new Speaker({
  channels: 1, // Mono or Stereo
  bitDepth: 16, // PCM16 (16-bit audio)
  sampleRate: 24000, // Common sample rate (44.1kHz)
});
With that out of the way, we can implement the handleOpen() and handleMessage() to process audio.
In the handleOpen() function, we only need to call the startRecording() function to record the user’s audio prompt. We also need to update the events slightly:
- Update the content of the
createConversationEventto use the type”input_audio”instead of”input_textand replace thetextfield withaudio: base64AudioData. - Add
”audio”to the response modality in thecreateResponseEvent.
Here’s the updated handleOpen() function:
async function handleOpen() {
  // Define what happens when the connection is opened
  const base64AudioData = await startRecording();
  const createConversationEvent = {
    type: "conversation.item.create",
    item: {
      type: "message",
      role: "user",
      content: [
        {
          type: "input_audio",
          audio: base64AudioData,
        },
      ],
    },
  };
  ws.send(JSON.stringify(createConversationEvent));
  const createResponseEvent = {
    type: "response.create",
    response: {
      modalities: ["text", "audio"],
      instructions: "Please assist the user.",
    },
  };
  ws.send(JSON.stringify(createResponseEvent));
}
To implement the handleMessage() function, we modify the ”response.audio.delta” event to update the audio buffer and play the new sound delta:
case "response.audio.delta":
  // We got a new audio chunk
  const base64AudioChunk = message.delta;
  const audioBuffer = Buffer.from(base64AudioChunk, "base64");
  speaker.write(audioBuffer);
  break;
We remove the ”response.text.done” event from the switch statement and update the ”response.done” event to stop the speaker:
case "response.audio.done":
  speaker.end();
  ws.close();
  break;
The final implementation of the handleMessage() function looks like this:
function handleMessage(messageStr) {
  const message = JSON.parse(messageStr);
  // Define what happens when a message is received
  switch (message.type) {
    case "response.audio.delta":
      // We got a new audio chunk
      const base64AudioChunk = message.delta;
      const audioBuffer = Buffer.from(base64AudioChunk, "base64");
      speaker.write(audioBuffer);
      break;
    case "response.audio.done":
      speaker.end();
      ws.close();
      break;
  }
}
To run this example, apply these modifications to the template code and run it with the command:
node index.jsThe microphone will start recording. We can say our request and press “Enter” to send it. Then, the AI’s response will play on the speakers (make sure the microphone is not muted and the speakers have volume).
The full code for the audio example is available here.
Function calling
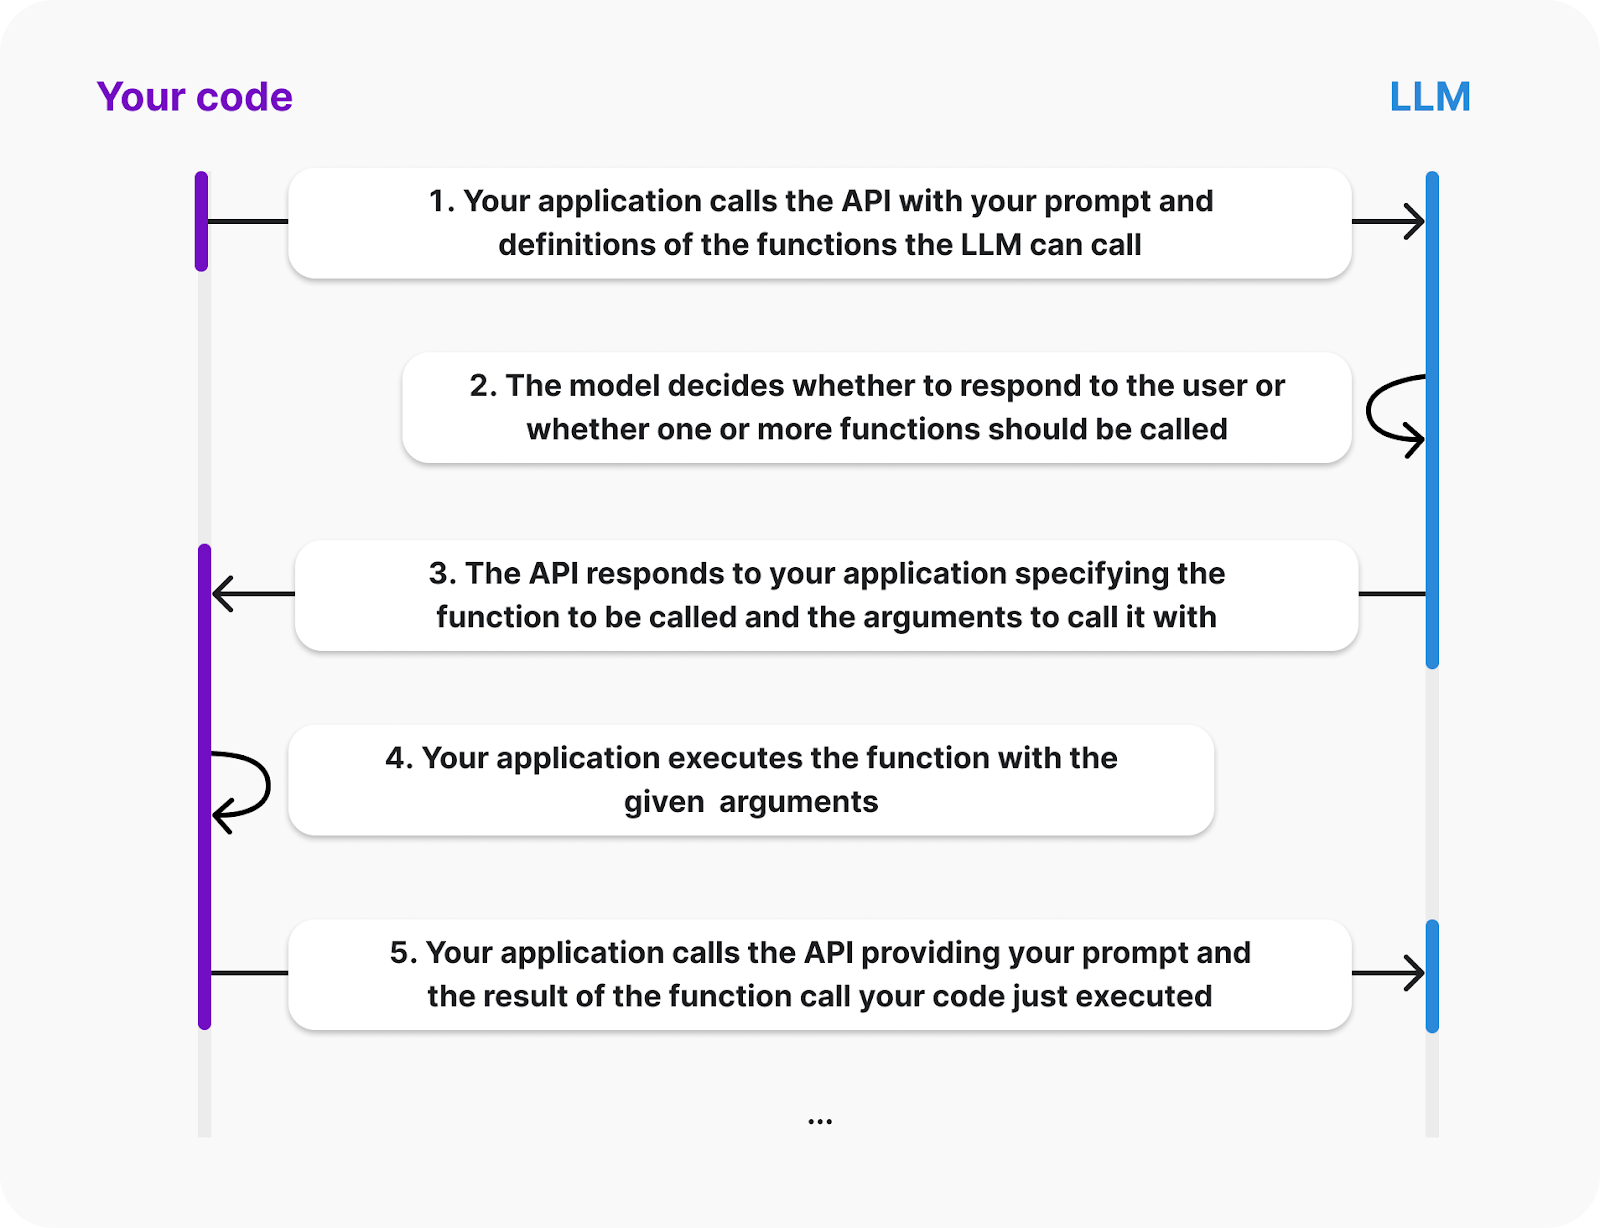
One nice feature of the OpenAI API is the ability to perform function calls. We can add functions to the assistant and if it detects that one of those functions can be useful to provide the answer, it will send an event requesting a specific function to be called.
The OpenAI documentation provides the following diagram explaining the life cycle of a function call:
Source: OpenAI
From the diagram, we see that the client must provide the definitions of the functions the LLM can call. Also, the function execution will happen on the client side; the AI will send an event requesting the function to be called and its arguments. Then, we are responsible for sending back the result.
Let’s empower our assistant with a function that adds two numbers together. We’ll build this example by extending the audio example above.
To specify the available functions, we must provide the LLM with a list of tools. Each tool is a JSON object that specifies the information about the function. Here’s how we can define a tool for the sum function:
const sumTool = {
  type: "function",
  name: "calculate_sum",
 description: "Use this function when asked to add numbers together, for example when asked 'What's 4 + 6'?.",
  parameters: {
      type: "object",
      properties: {
          "a": { "type": "number" },
          "b": { "type": "number" }
      },
      required: ["a", "b"]
  }
}
Let’s explain the object structure:
- The
typespecifies that we’re defining a function. - The
nameis used to identify the function. This is what the LLM uses to tell us which function it wants to call. - The
descriptionis used to identify when the LLM should use this function. - The
parametersare used to specify the arguments of the function. In this case, two numbers namedaandb.
The next step is to define the function in our code. We’ll use a dictionary with the key calculate_sum to make it easier to call the appropriate function when we respond to a function call event:
const functions = {
  calculate_sum: (args) => args.a + args.b,
}
The API will provide the function arguments as a dictionary with the same structure defined on the parameters above. In this case, to add, say 3 and 5, the dictionary would be {“a”: 3, “b”: 5}.
The sumTool and functions constants can be added to the top of index.js, after the imports and before the main() function.
Next, we update the response.create event to let the LLM know that the sumTools is available. This is done by adding the tools and tool_choice fields to the response:
const createResponseEvent = {
  type: "response.create",
  response: {
    modalities: ["text", "audio"],
    instructions: "Please assist the user.",
    tools: [sumTool], // New
    tool_choice: "auto", // New
  },
};
When the LLM decides it wants to call a function, it will emit a response.function_call_arguments.done event. We need to respond to it by:
- Getting the function information and calling the function.
- Sending the result of the function call.
- Requesting a response.
We handle this by adding the following case to the switch statement inside the hanldeMessage() function:
case "response.function_call_arguments.done":
  console.log(Using function ${message.name} with arguments ${message.arguments});
  // 1. Get the function information and call the function
  const function_name = message.name;
  const function_arguments = JSON.parse(message.arguments);
  const result = functions[function_name](function_arguments);
  // 2. Send the result of the function call
  const functionOutputEvent = {
    type: "conversation.item.create",
    item: {
      type: "function_call_output",
      role: "system",
      output: ${result},
    }
  };
  ws.send(JSON.stringify(functionOutputEvent));
  // 3. Request a response
  ws.send(JSON.stringify({type: "response.create"}));
  break;
If we now run the script and request the result of adding two numbers, the model should call the function and provide the result.
This function is relatively simple but because the function is executed by the client, it could be anything. In the next section, we’ll see two examples of more complex functions.
The full code of this example is available here.
Build MLOps Skills Today
Demo App Using OpenAI Realtime API
The OpenAI team provides a demo React app to showcase the Realtime API. Here we’ll learn how to set it up and explore how it works. This is a great starting point to build a more complex app.
App setup
React knowledge isn’t required to get it up and running. However, you’d need to be familiar with React to modify or extend it.
Their app is hosted in this repository. To set it up, start by cloning using the following Git command:
git clone org-14957082@github.com:openai/openai-realtime-console.gitAlternatively, we can also download it manually from the GitHub interface.
To install the app, we use the following NPM (node package manage) command:
npm installOnce the installation is complete, create a file named .env in the root folder of the project and paste the following content:
OPENAI_API_KEY=<openai_api_key>
REACT_APP_LOCAL_RELAY_SERVER_URL=http://localhost:8081
Replace <openai_api_key> with the OpenAI API key.
The application should now be ready to be executed. It is composed of two parts:
- A React frontend which consists of the application’s web user interface.
- A relay server is used as an intermediary between the frontend and the OpenAI API.
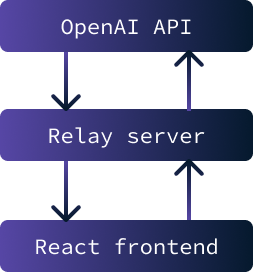
The primary purpose of implementing a relay server between the frontend and the OpenAI API is to securely store the API key. Interacting with the API is impossible without this key.
However, if the key were stored on the frontend, it would be accessible to any user. Therefore, the solution involves setting up a server that securely stores the key and facilitates data exchange between the API and the frontend. In this particular scenario, security concerns are minimal since the application will only be run locally.
To launch the application, it's necessary to initiate both the relay server and the frontend. To start the relay server, use the following command:
npm run relayTo start the React frontend use the command:
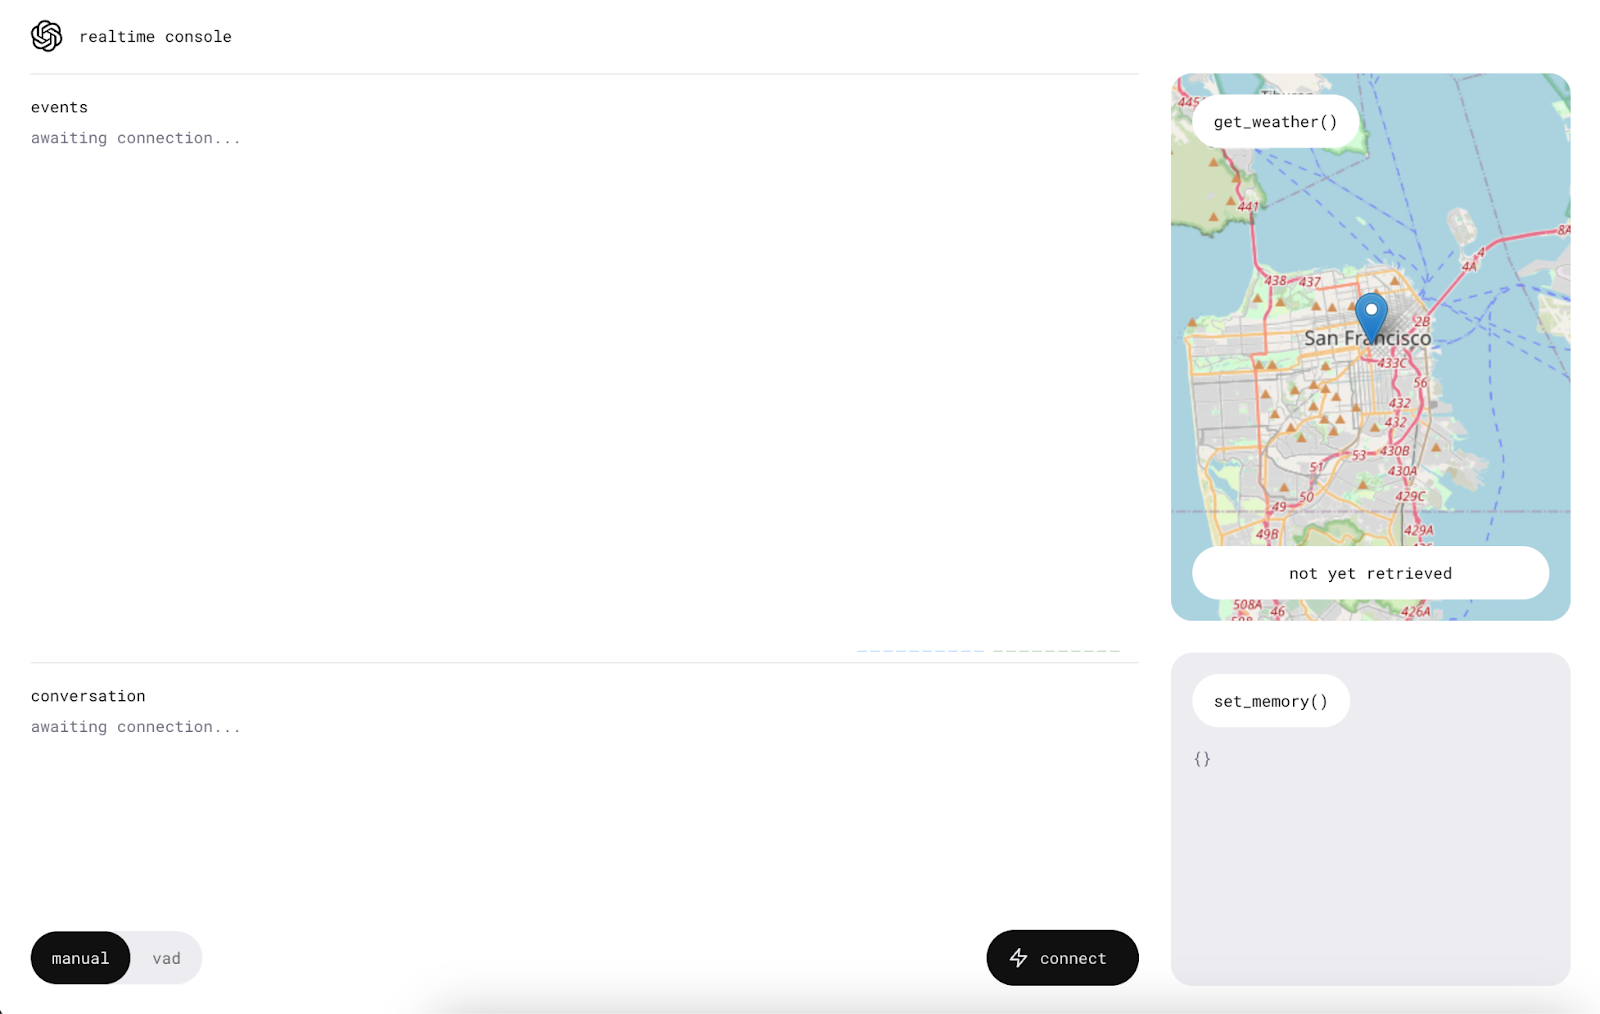
npm startAfter it finishes loading, a tab will open on the browser with the application running on it.
Using the app
Before starting to use the app, make sure the computer isn’t on mute and allow microphone access to the application.
We start by clicking the “connect” button. This will send a ”Hello” message to the Realtime API, and we’ll receive a greeting.

Once the connection is established, a new button will appear in the center, allowing us to talk to the AI assistant.

To use it, press and talk without releasing the button. The message is sent out when the button is released.
The application also has a VAD (voice activity detection) mode in which we don’t need to press any button. In this mode, the application will continuously listen allowing us to have an active conversation with the assistant. To use it, simply press the “vad” button and speak.

Functions
As we learned, the Realtime API offers a feature that enables the AI to perform specific functions. This demonstration showcases two functions: one for inquiring about the weather forecast in a particular location and another for adding memory items to personalize the assistant.
Experience these functions by asking questions such as “What’s the weather like tomorrow in New York?” and stating preferences like “My favorite color is blue.” The assistant will provide verbal responses to these queries, and the information will also be displayed on the right side of the application.
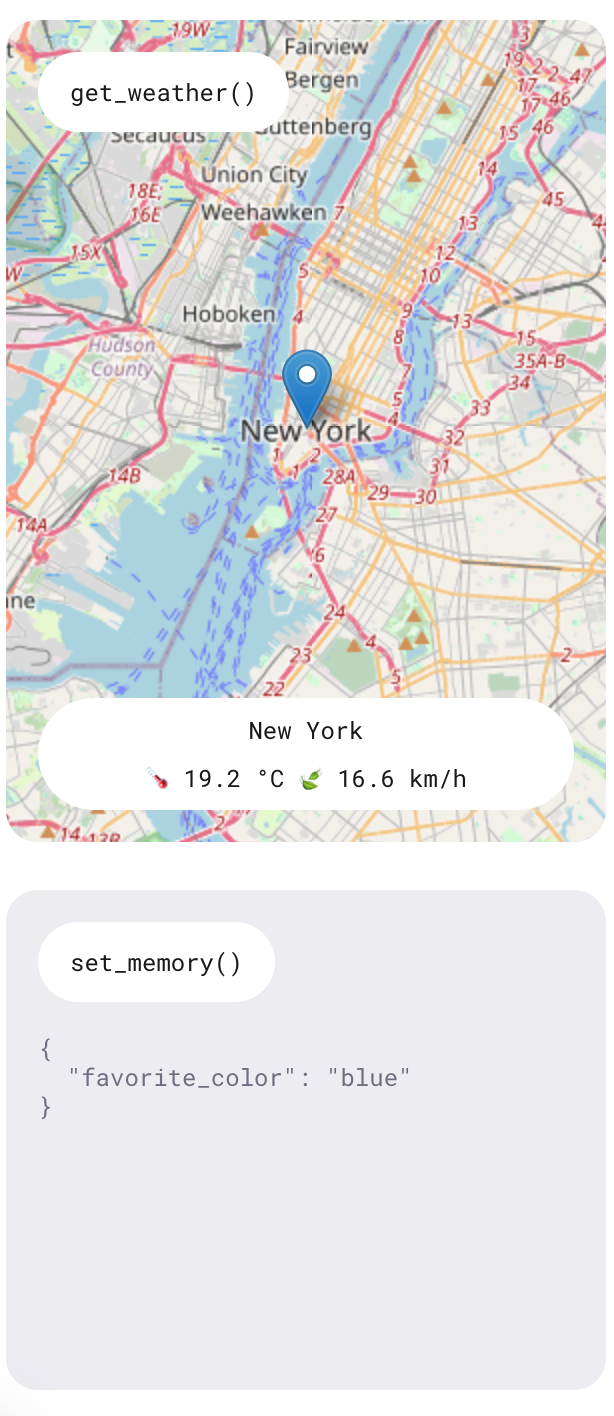
There were times when I requested a weather report, and the response indicated an inability to access it at that moment. However, the information was consistently displayed on the right side. Being a demo app, it is not intended to be a fully functional product but rather serves to showcase the capabilities of the API.
Understanding the client
This section requires a high-level understanding of React to follow as we cover some of the implementation details of the application.
We’ll be looking at the ConsolePage.tsx file. This is where most of the application logic is defined. The demo app doesn’t use the raw WebSockets as we did in our Node.js command line app examples. They built a real-time client that helps interact with the API. This is what is imported at the top of the file:
import { RealtimeClient } from '@openai/realtime-api-beta';The integration with the API is defined in this useEffect() call. The code within this useEffect() is executed when the console page is initially rendered. Similar to our Node.js script, it outlines how to respond to API events. The primary distinction is its use of the RealtimeClient client wrapper.
Defining the tools
The RealtimeClient.addTool() function is used to define tools. It takes two parameters:
- The tool definition JSON object.
- The function to be executed.
This approach simplifies the integration of tools since the client is already equipped to handle events and automate function invocations. The memory tool is defined here, whereas the weather tool's definition is defined here.
For example, to add the previously defined sum tool, we can do the following:
client.addTool(
  {
    name: "calculate_sum",
    description: "Use this function when asked to add numbers together, for example when asked 'What's 4 + 6'?.",
    parameters: {
        type: "object",
        properties: {
            "a": { "type": "number" },
            "b": { "type": "number" }
        },
        required: ["a", "b"]
    }
  },
  (a: number, b: number): number => a + b
);
Note that the application utilizes TypeScript, thus requiring the specification of types within the function definition.
Listening to events
To listen to an event, the RealtimeClient.on() function is used. It accepts two parameters:
- The name of the event.
- The callback function to be executed.
This approach is similar to the WebSocket.on() function previously used, except it implements a different set of events. Their GitHub page provides the list of supported events.
In this particular example, the following events are used:
- The
realtime.eventevent here is used to keep a log of all the events. - The
errorevent here simply logs the errors to the console for debugging purposes. - The
conversation.interruptedevent here is used to cancel the requests when the conversion is interrupted. - Finally, the
conversation.updatedevent here is used to append new audio to the audio stream when new chucks come in from the API.
Conclusion
In this tutorial, we explored the OpenAI Realtime API and how it uses WebSockets for real-time communication. We covered the setup of a Node.js environment to interact with the API, sending and receiving text and audio messages, and implementing function calling for enhanced functionality.
We also explored the OpenAI demo React app, demonstrating how to deploy a basic voice assistant application.
To learn more about the latest OpenAI development tools, I recommend these tutorials:


