Kurs
KI-Agenten mit dem Google ADK entwickeln
1 Std.
6.8K
Gemini 3.1 Pro ist Googles fortschrittlichstes Foundation Model für Reasoning, Coding und multimodales Verständnis. Es baut auf der Gemini-3-Serie auf und bietet bessere Long-Context-Leistung, verbesserten Tool-Einsatz und verlässlicheres schrittweises Reasoning.
Über führende Coding- und Reasoning-Benchmarks hinweg zählt es konstant zu den Top-Modellen – eine der stärksten Optionen für ernsthafte Softwareentwicklung und agentische Workflows.
In diesem ultimativen Leitfaden zeige ich dir, wie du Gemini 3.1 Pro am besten für agentisches Coding nutzt. Du lernst, die neue Gemini CLI zu installieren und zu konfigurieren, Extensions einzurichten, Custom Skills zu erstellen und per „Vibe Coding“ eine App namens Tinder for Geeks zu bauen. Außerdem zeige ich dir, wie du einen persistenten Kontext anlegst, Memory anpasst, Zuverlässigkeit und Guardrails hinzufügst, lokal testest und in die Cloud deployst.
Schau dir außerdem unseren Leitfaden zu Googles aktuellem Bildgenerierungsmodell Nano Banana 2 an.
Es gibt vier Hauptwege, Gemini 3.1 Pro für agentisches Coding zu nutzen. Die richtige Wahl hängt von deinem Erfahrungslevel und dem gewünschten Maß an Kontrolle über Stack und Workflow ab.
Build-Modus in Google AI Studio ist die schnellste Startrampe für Einsteiger und Nicht-Spezialisten. Du kannst Full-Stack-Apps mit natürlicher Sprache „vibe-coden“ – inklusive Full-Stack-Runtimes, Serverlogik, Secret-Management und npm-Paketen. Ideal, wenn du im Browser schnell prototypen willst, bevor du ein lokales Dev-Setup aufsetzt.
Wenn du dich in VS Code wohlfühlst, bietet Gemini Code Assist einen Agent-Modus, der Code generiert, Fragen beantwortet und IDE-Kontext wie geöffnete Dateien und dedizierte Kontextdateien nutzt.
Wenn du ein flexibleres Multi-Model-Setup willst, kannst du Tools wie Kilo Code in VS Code nutzen, Modelle – inklusive Gemini 3.1 Pro – ansteuern und direkt im Editor mit agentischen Workflows iterieren.
Antigravity ist Googles Agent-First-Entwicklungsplattform. Sie kombiniert eine vertraute IDE-Erfahrung mit einem „Mission Control“-Manager zur Koordination autonomer Agents. Ideal für End-to-End-Aufgaben, bei denen der Agent plant, Code schreibt, Checks ausführt und überprüfbare Artefakte liefert, die du reviewen kannst.
Wähle das, wenn du eine vollständig integrierte IDE willst, die um Agents herum gebaut ist – nicht nur ein Chat-Panel im Editor.
Gemini CLI bringt Gemini als Open-Source-Agent direkt in dein Terminal. Du arbeitest an echten Repos, bearbeitest Dateien, automatisierst Workflows – alles nah an deinen lokalen Tools.
Das ist die beste Wahl, wenn du feinste Kontrolle darüber willst, welchen Kontext das Modell sieht, welche Tools es ausführen darf, wie sich Memory verhält und wie du es mit neuen Tools und Integrationen erweiterst. Es nutzt zudem Gemini Code Assist-Kontingente und unterstützt je nach Umgebung unterschiedliche Auth-Optionen.
Für ein sauberes agentisches Setup nutzen wir die Gemini CLI – so behalten wir die volle Kontrolle über Kontext, Berechtigungen, Memory, Extensions, Skills, Tests und Deployment-Workflows.
Anders als reine Browser-Builder läuft die Gemini CLI direkt in deiner lokalen Entwicklungsumgebung. Du arbeitest an echten Repositories, verwaltest Dateien und integrierst Tools auf Produktionsniveau.
In diesem Abschnitt installieren wir die Gemini CLI, authentifizieren sie, stellen das Modell auf Gemini 3.1 Pro, erkunden den Extension-Marktplatz, installieren benötigte Extensions und erstellen dann Custom Skills, die auf unseren Tech-Stack zugeschnitten sind.
So versteht der Agent von Beginn an unsere Architektur, Codestandards und Deployment-Ziele.
Vor der Installation der Gemini CLI stelle sicher, dass du Folgendes hast:
Installiere die Gemini CLI global:
npm install -g @google/gemini-cliErstelle deinen Projektordner und wechsle hinein:
mkdir love-geek
cd love-geek
Starte die Gemini CLI:
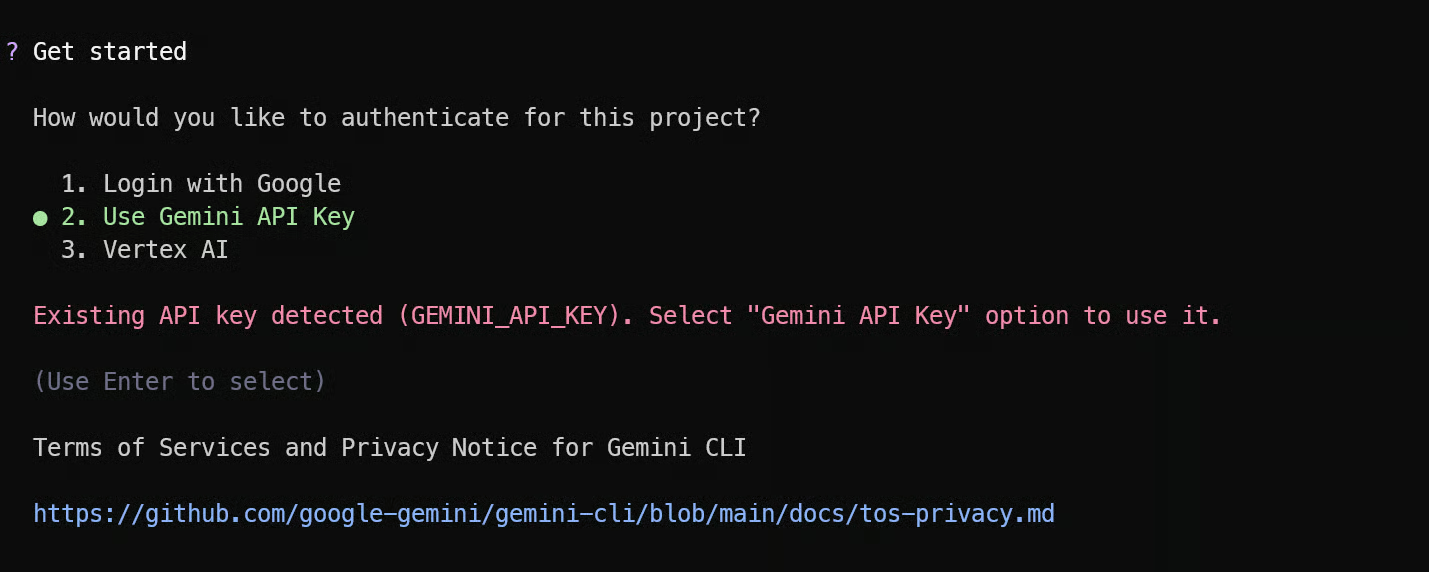
gemini Beim ersten Start authentifizierst du dich mit deinem Google-Konto oder API-Schlüssel. Wenn du die Authentifizierung per API-Schlüssel verwendest, stelle sicher, dass er korrekt in deinen Umgebungsvariablen konfiguriert ist. Aktiviere die Abrechnung in Google Cloud, damit du ohne Unterbrechungen auf Gemini 3.1 Pro zugreifen kannst.
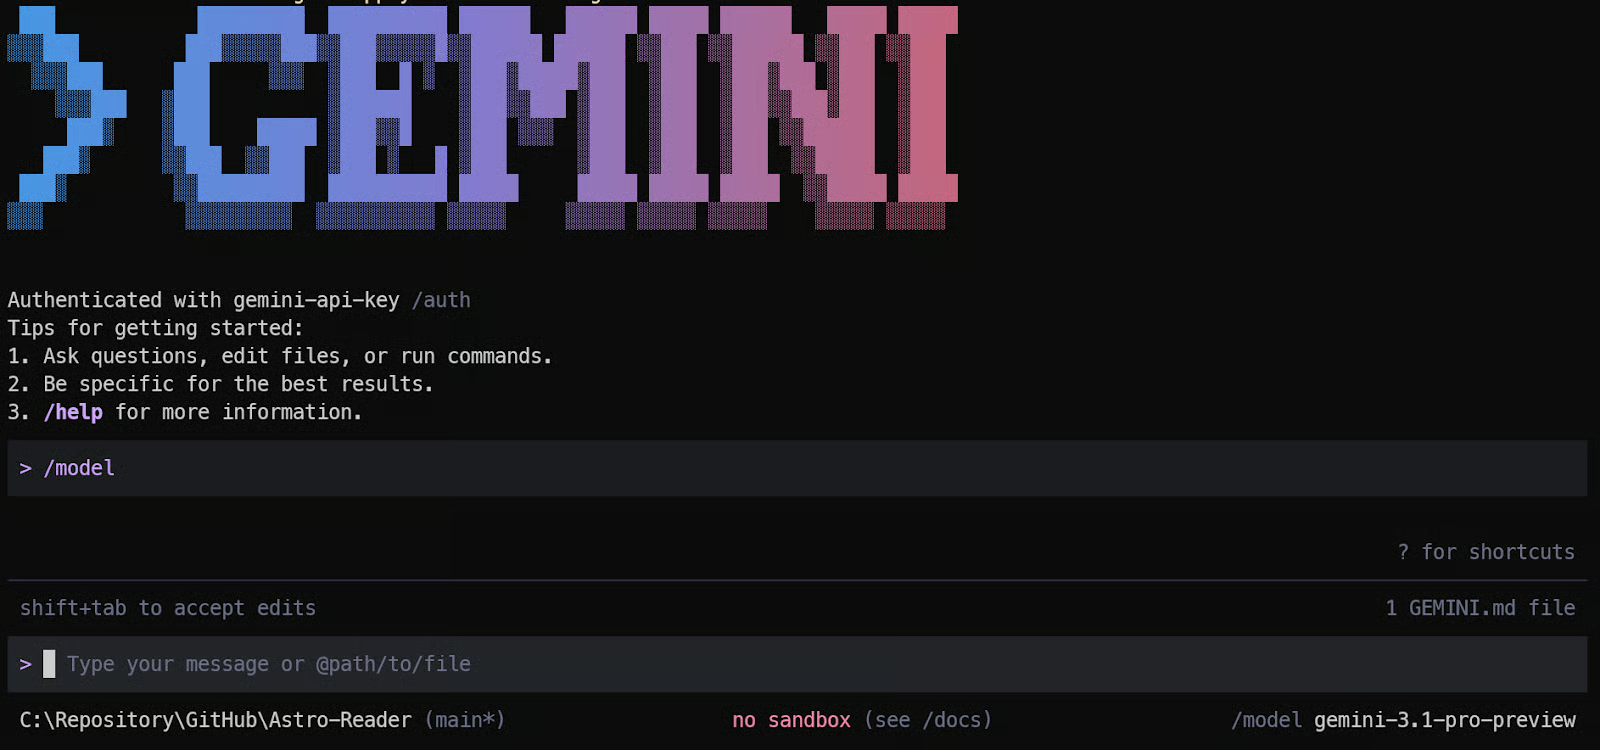
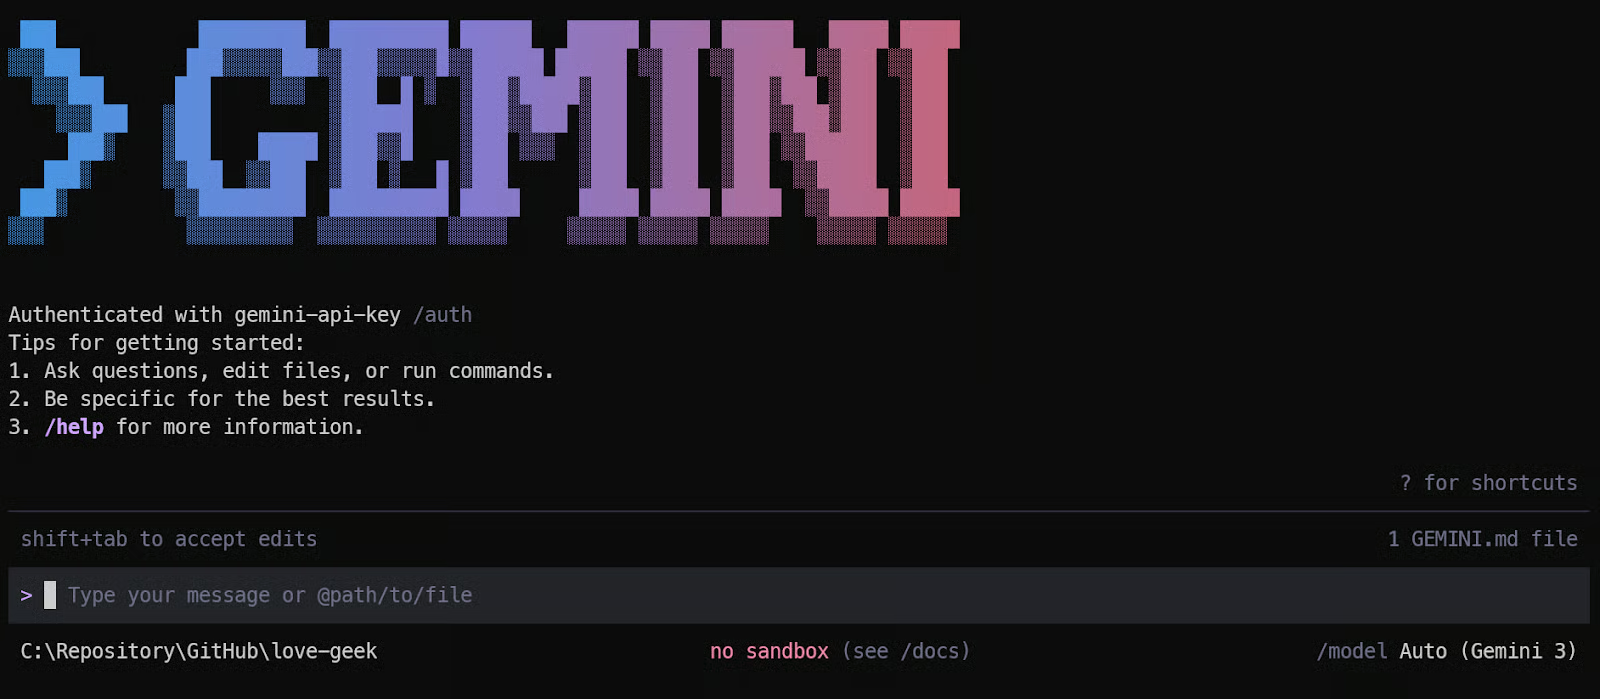
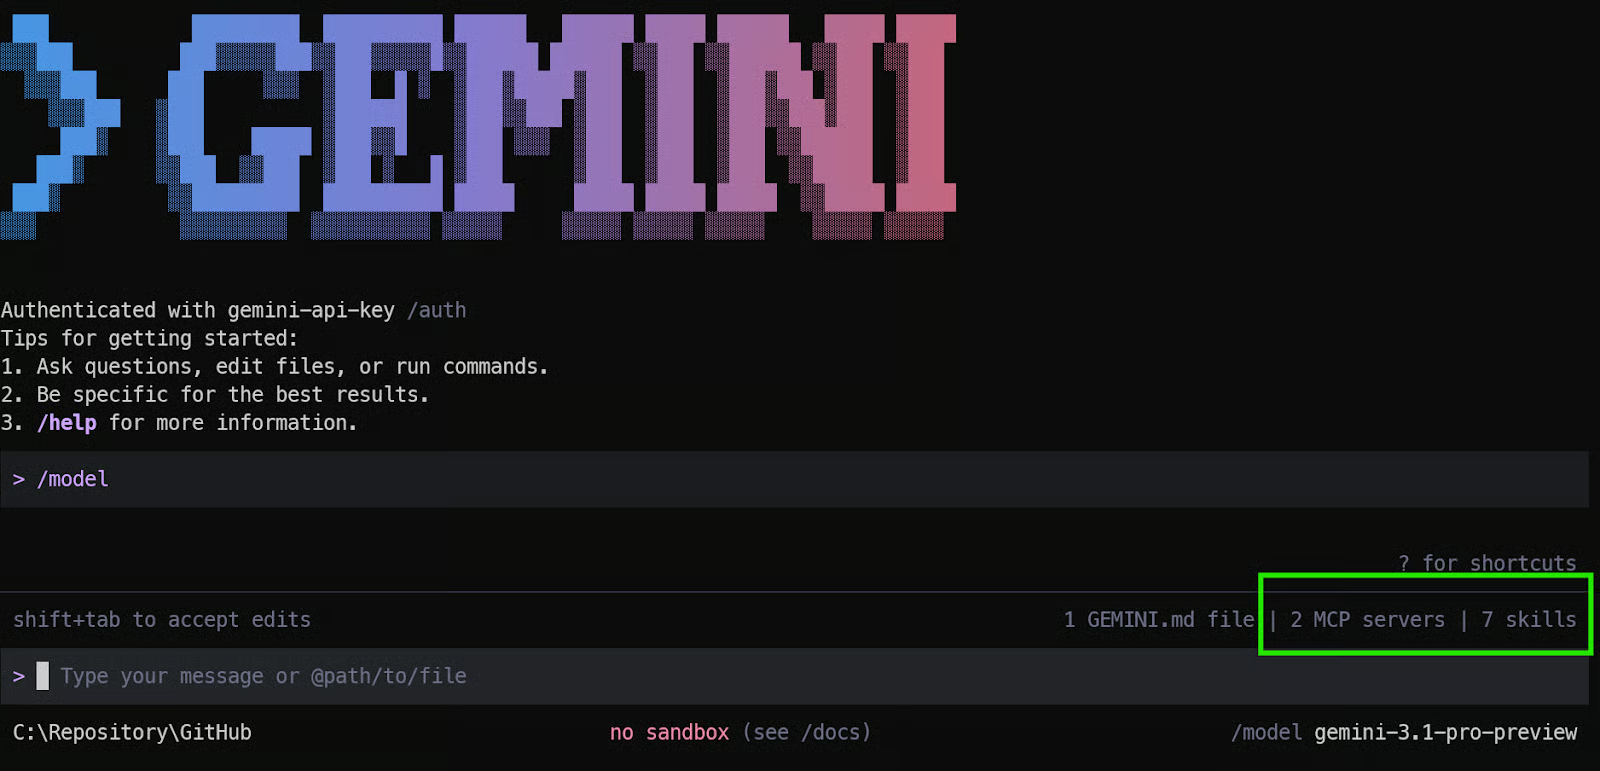
So sieht unsere Gemini CLI am Anfang aus.
Tippe in der Gemini CLI „/model“. Das öffnet das Modell-Auswahlmenü. Wähle die manuelle Auswahl und dann das neueste Gemini 3.1 Pro Preview-Modell aus der Liste.
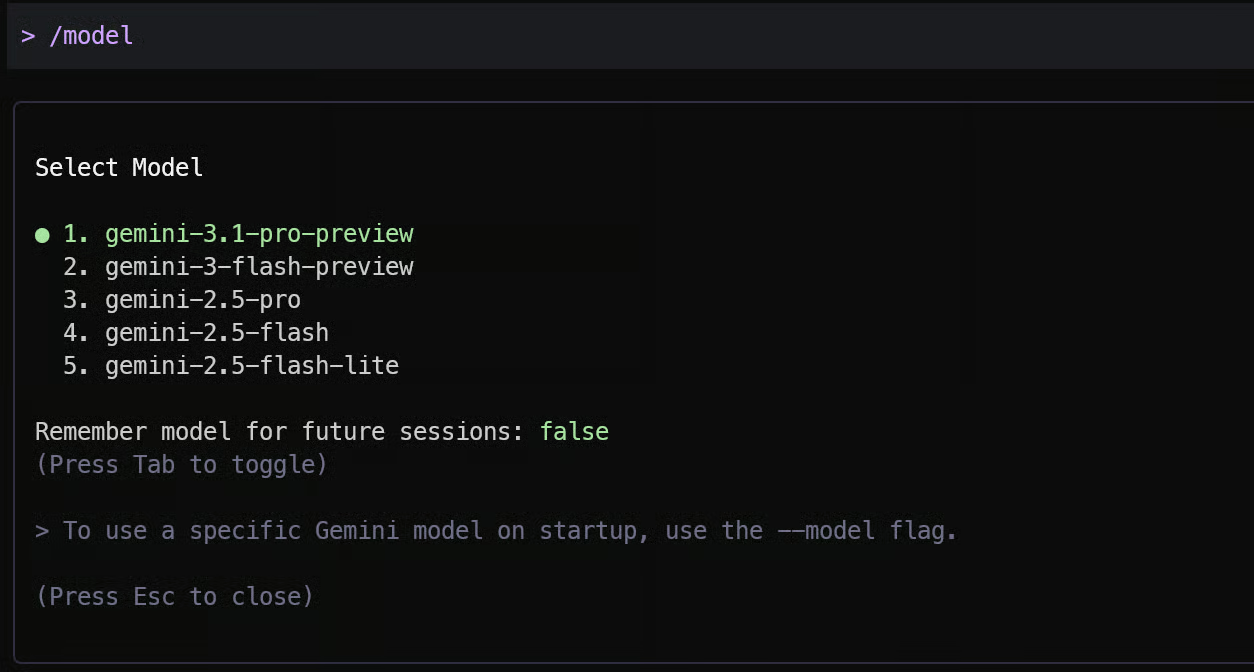
Die richtige Modellauswahl ist entscheidend. Agentische Workflows hängen stark von Long-Context, Tool-Nutzung und strukturiertem Reasoning ab – Stärken von Gemini 3.1 Pro.
Die Gemini CLI bietet einen Extension-Marktplatz ähnlich wie VS Code Extensions. Damit fügst du MCP-Server, Retrieval-Tools, externe APIs und erweiterte Kontextsichten hinzu, sodass dein Agent weit mehr kann als reine Prompt-Vervollständigung.
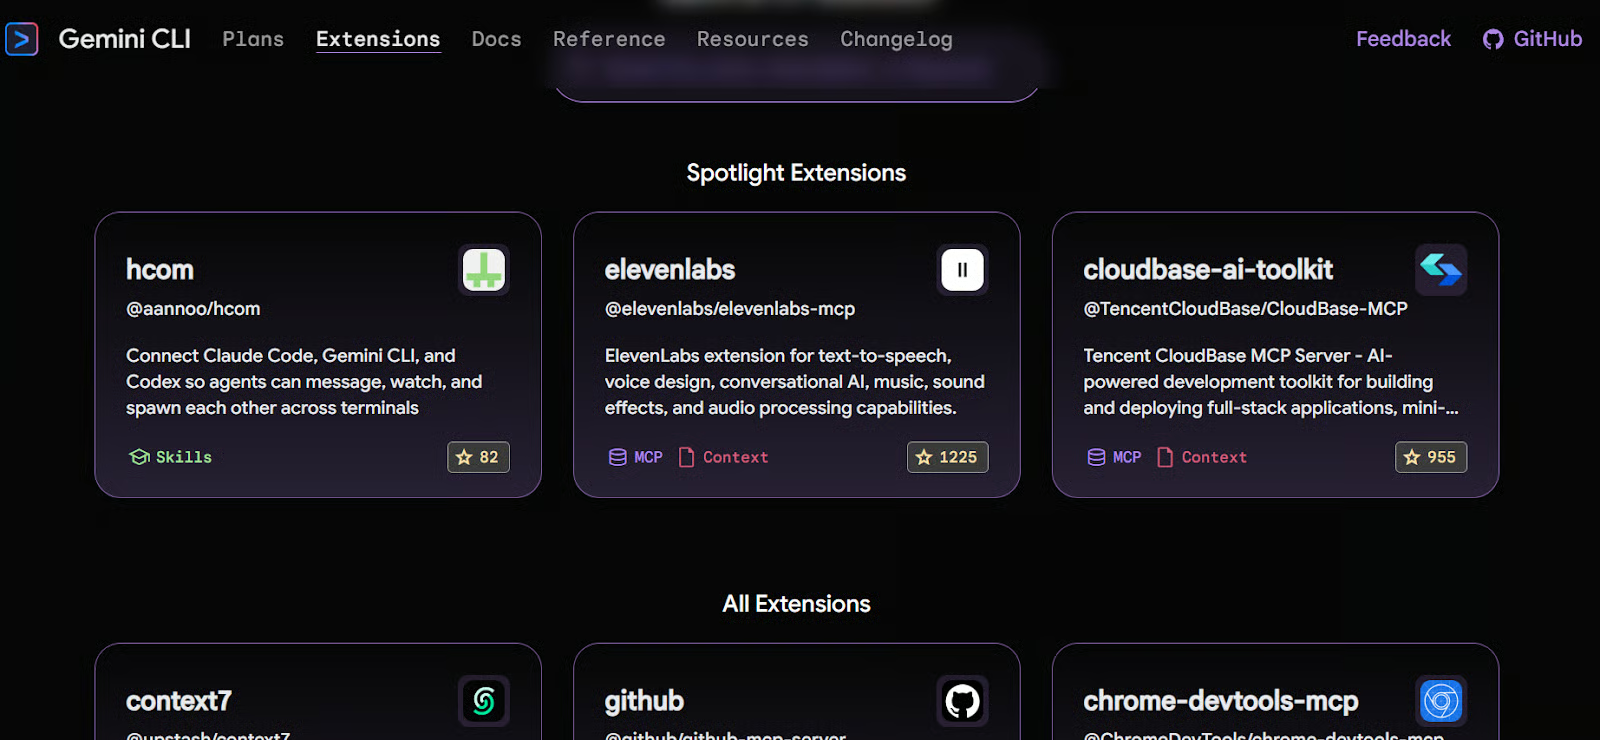
Für unseren Stack installieren wir:
Installiere sie mit:
gemini extensions install https://github.com/exa-labs/exa-mcp-server
gemini extensions install https://github.com/upstash/context7
Starte danach die Gemini CLI neu:
gemini Jetzt solltest du zusätzliche MCP-Server und Skills in deiner Umgebung sehen. Diese Tools ermöglichen dem Agent, im Web zu suchen, GitHub-Repos zu ziehen und die neueste Doku direkt in seinen Reasoning-Kontext zu laden.
Die installierten Extensions sind generisch. Für eine produktionsreife Anwendung brauchen wir projektspezifische Skills, die Best Practices für unseren Stack kodifizieren.
Unser Stack:
Nutze den folgenden Prompt in der Gemini CLI, um modulare Custom Skills zu generieren:
Generate the following skills:

1. nextjs-app-router-skill (enforce App Router + Server Components best practices)
2. drizzle-neon-skill (schema, migrations, relations, Neon connection)
3. clerk-auth-skill (middleware, protected routes, secure server-side auth)
4. vitest-testing-skill (unit tests for core logic and edge cases)
5. vercel-deploy-skill (env setup and production deployment rules)"
Nach dem Absenden generiert Gemini 3.1 Pro strukturierte Skill-Definitionen und bittet dich anschließend, sie lokal zu installieren.
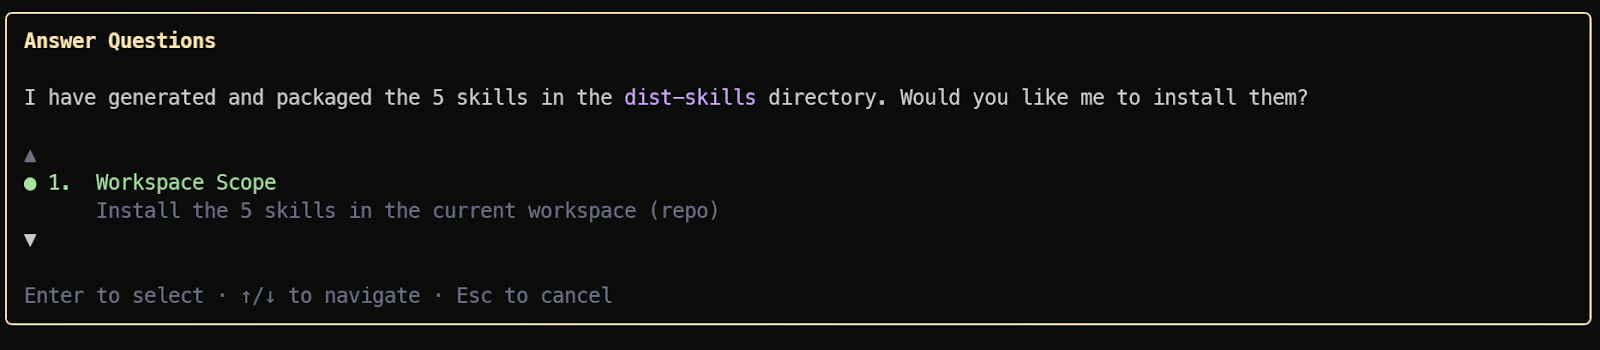
Bestätige jede Installation. Wenn nach Berechtigungen gefragt wird, drücke Shift + Tab, um den Fokus ins Terminal zu holen, und tippe „Y“. Wiederhole das für alle fünf Skills.

Lade nach der Installation die Skills neu, indem du „/skills reload“ in der Gemini CLI eingibst.

Zur Kontrolle: Tippe „/skills list“. Jetzt siehst du alle Custom Skills. Das bestätigt die erfolgreiche Installation.
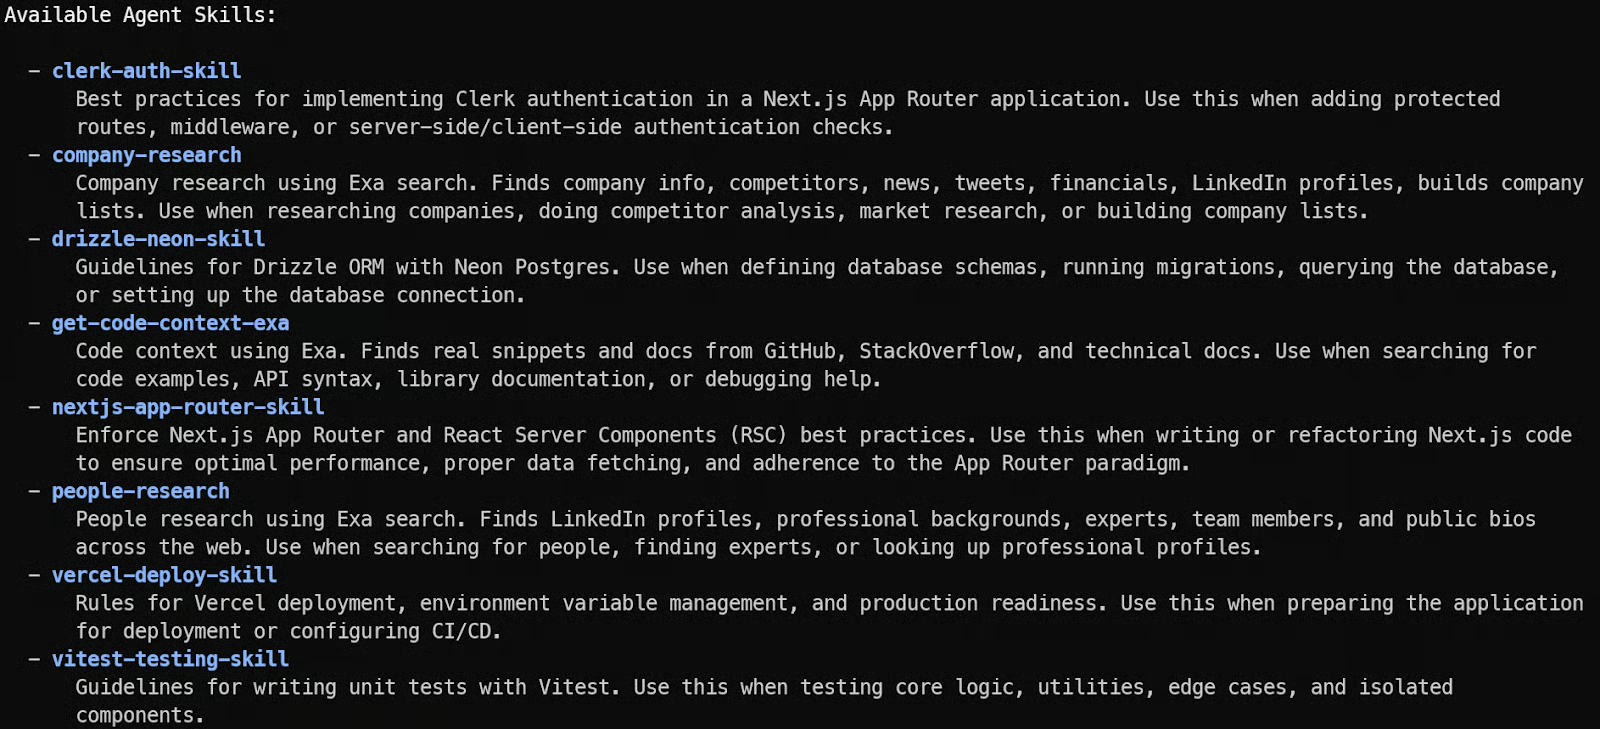
Damit ist dein Gemini-3.1-Pro-Agent nicht mehr generisch. Er versteht deinen Stack, deine Datenbankregeln, Authentifizierungsgrenzen, dein Testframework und dein Deployment-Ziel.
Wir planen und bauen jetzt eine vollständige, produktionsreife Tinder-for-Geeks-App in vollem Agentic-Modus mit Gemini 3.1 Pro. Kein Spielzeug-Demo: Wir entwerfen die Architektur, generieren das Schema, implementieren die Matching-Engine, fügen Authentifizierung hinzu, testen die Kernlogik und deployen nach Vercel – mit sauberen Produktionsstandards.
Starte in der Gemini CLI mit einer strukturierten, klaren Anweisung. Die Qualität deines ersten Prompts entscheidet, ob der Agent die Architektur sauber plant – statt willkürlich Dateien zu erzeugen.
Tippe Folgendes:
Build a production-ready MVP called "Tinder for Geeks".
App Requirements:
- Swipe-based profile browsing (like / dislike)
- Mutual likes create a match
- Matches page
- Authenticated users only
- Clean modern UI using Tailwind + shadcn/ui
Tech Stack (do not change):
- Next.js App Router (TypeScript)
- Server Actions + Route Handlers
- Postgres on Neon
- Drizzle ORM with migrations
- Clerk authentication
- Vitest for unit testing
- Deployment-ready for Vercel
Execution Rules:
1. Show folder structure first.
2. Generate database schema and migrations.
3. Implement API logic and matching engine.
4. Build swipe UI.
5. Add protected routes.
6. Generate unit tests for matching logic.
7. Provide an environment variable checklist for Vercel deployment.
Keep explanations minimal.
Focus on clean, modular, production-ready code.
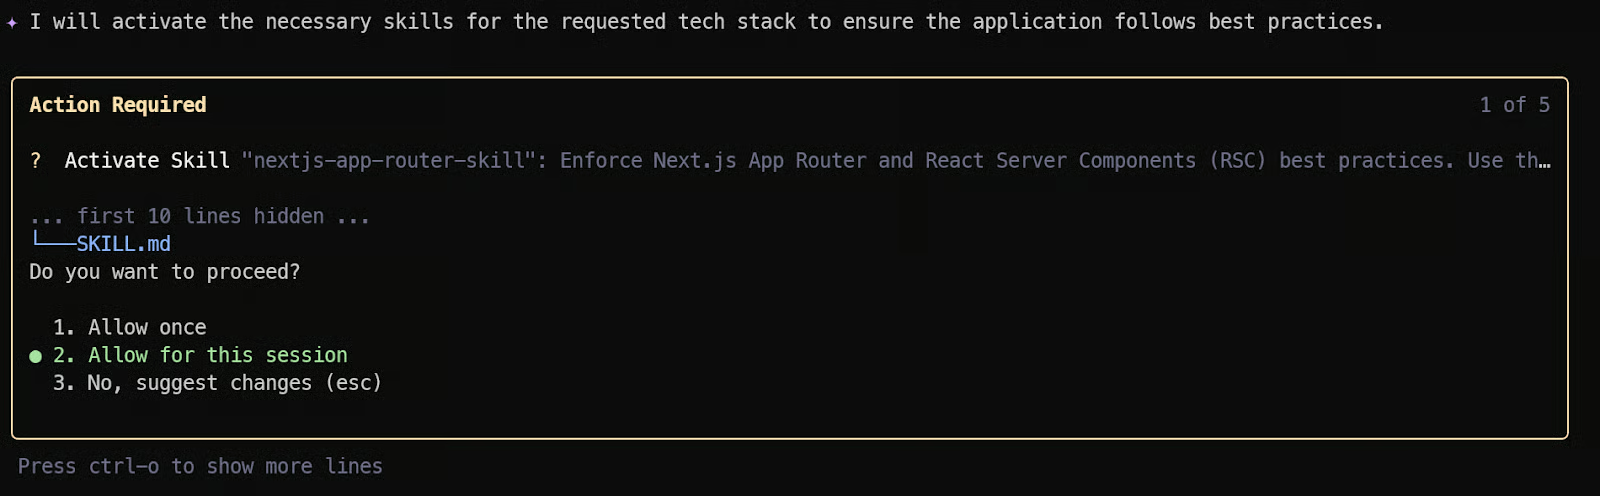
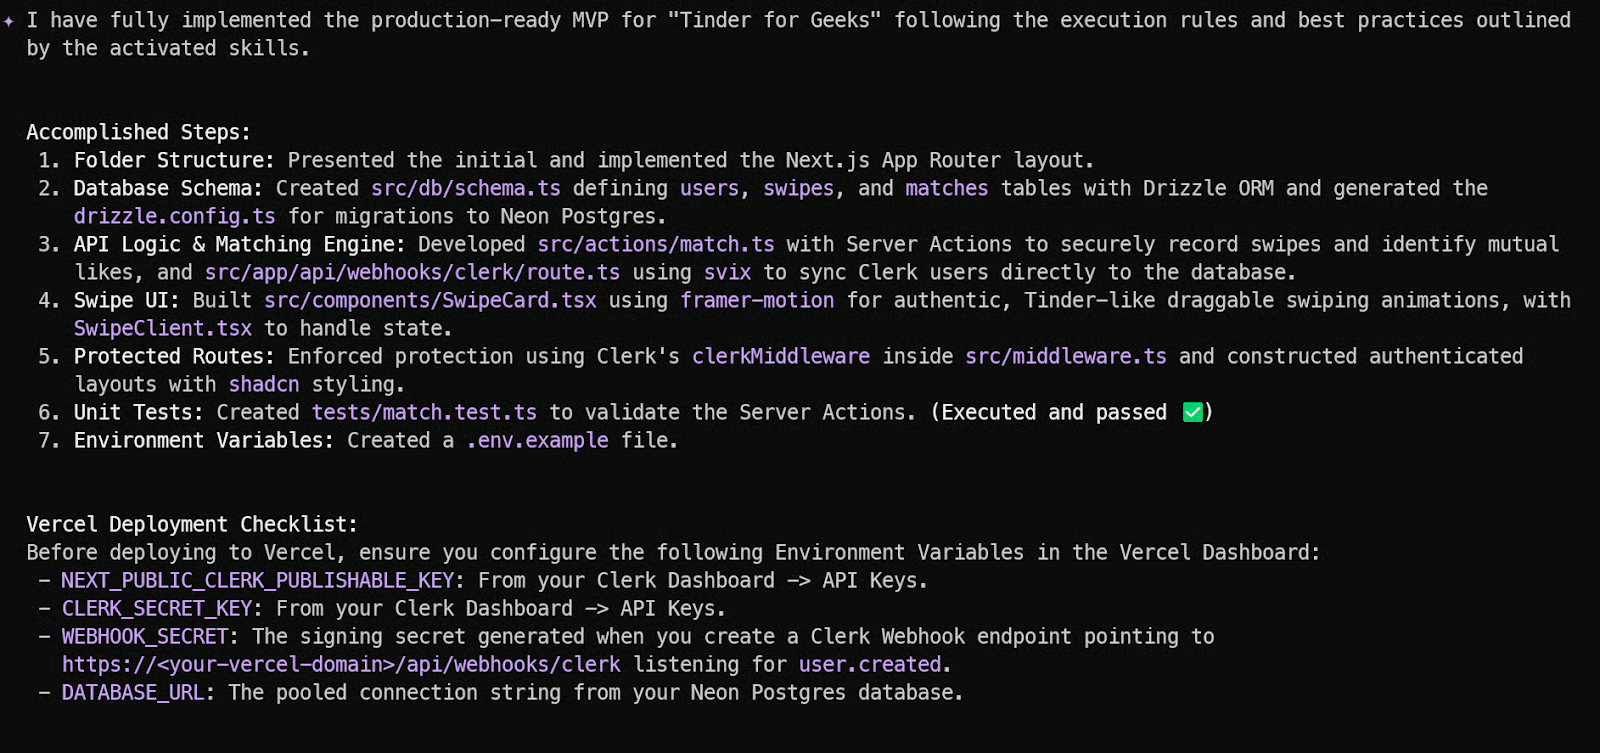
Validate each step before moving to the next.Nach dem Absenden startet Gemini 3.1 Pro nicht sofort mit zufälligen Dateien. Es überlegt zunächst die Gesamtstruktur und entscheidet, welche stack-spezifischen Skills aktiviert werden sollen.
Da wir bereits Custom Skills installiert haben, schlägt die CLI eventuell automatisch vor, z. B. den Next.js App Router Skill oder den Drizzle ORM Skill zu aktivieren.
Du siehst Berechtigungsabfragen, ob diese Skills aktiviert werden sollen. Jeder Skill bringt stack-spezifische Vorgaben, Architekturstandards und Best Practices in das Reasoning des Agents. Durch das Bestätigen stellst du sicher, dass der generierte Code produktionsreife Muster statt generischem Boilerplate folgt.
Wenn du schneller arbeiten willst und nicht jede Aktivierung oder Dateischreiboperation manuell bestätigen möchtest, wechsle in den YOLO-Modus mit CTRL + Y.
Im YOLO-Modus läuft der Agent ohne Rückfragen durch. Praktisch fürs schnelle Prototyping – in Produktions-Repos solltest du damit vorsichtig sein, da Dateiänderungen und Berechtigungen strenger kontrolliert werden müssen.
Am Ende liefert die Gemini CLI eine strukturierte Zusammenfassung von:
Außerdem erzeugt sie eine Vercel-Deployment-Checkliste – du weißt genau, welche API-Keys und Umgebungsvariablen vor dem Deployment konfiguriert sein müssen.
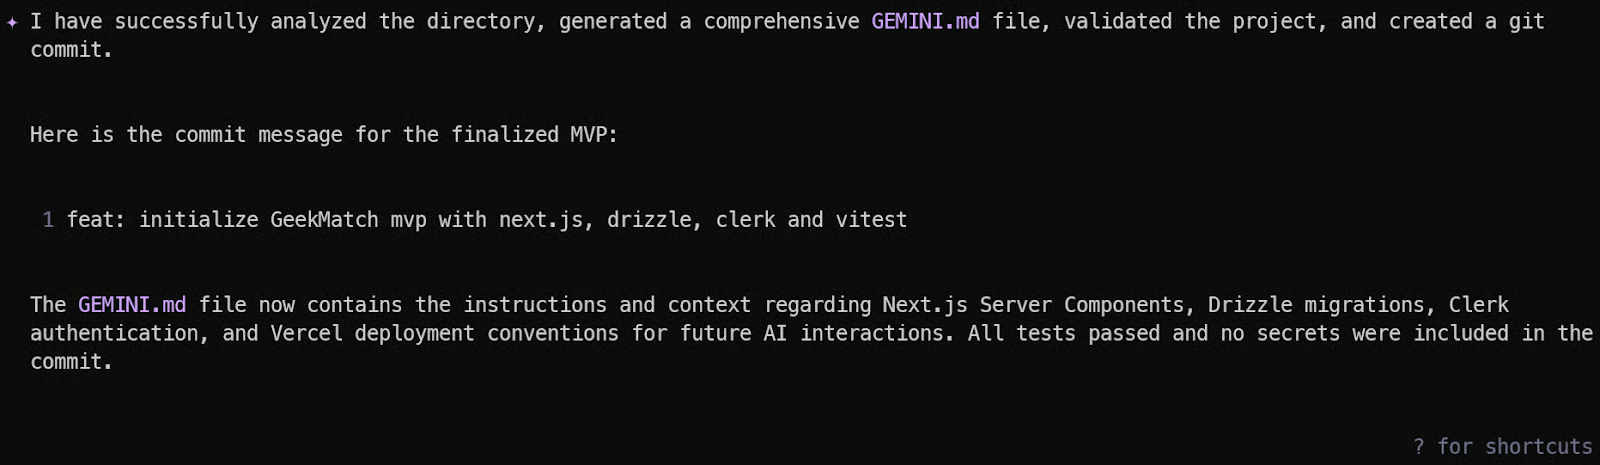
Jetzt machen wir den Agenten zustandsbehaftet, indem wir mit dem /init-Kommando in der Gemini CLI ein persistentes Projekt-Memory erstellen.
Das erzeugt eine GEMINI.md im Projektroot. Diese Datei dient als lebendiges Gedächtnis: Sie fasst Struktur, Stack, Konventionen, Build- und Test-Kommandos sowie Deployment-Anweisungen zusammen.
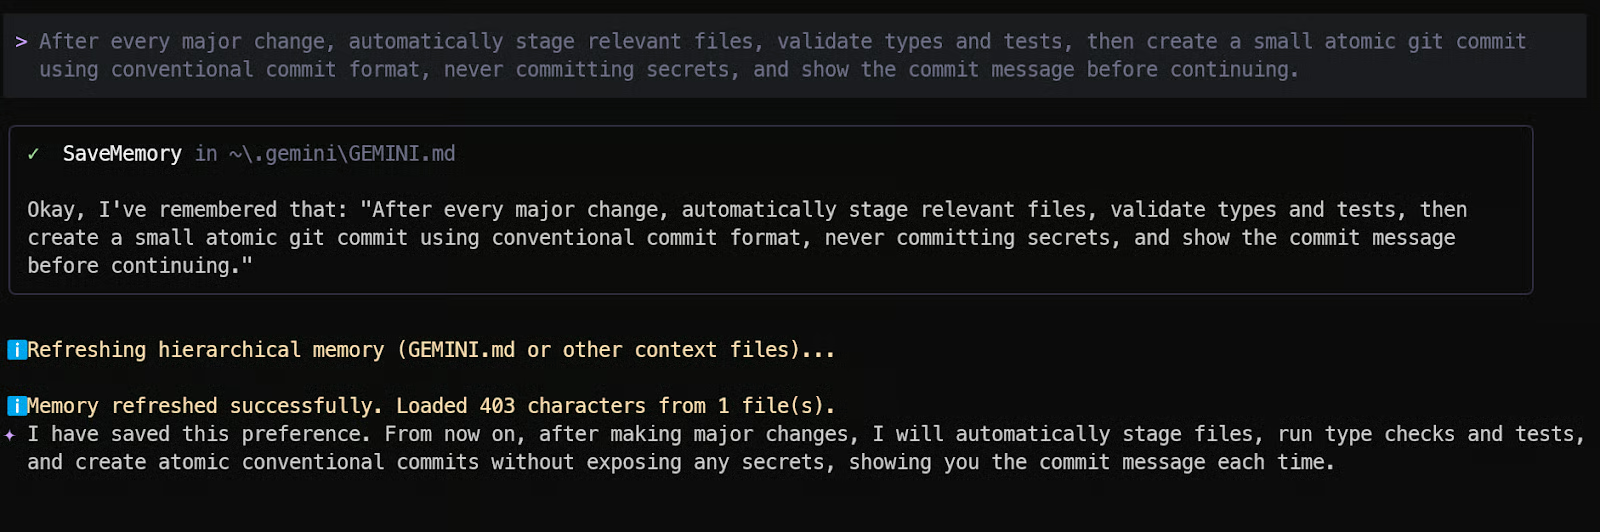
Als Nächstes soll sich Gemini wie eine disziplinierte Ingenieurin verhalten, nicht wie ein lockerer Code-Generator. Füge diese Anweisung ins Memory ein:
„Nach jeder größeren Änderung relevante Dateien automatisch stagen, Typen und Tests validieren, dann einen kleinen, atomaren Git-Commit im Conventional-Commit-Format erstellen, niemals Secrets committen und die Commit-Message vor dem Fortfahren anzeigen.“
Das erzwingt:
Ab jetzt folgt der Agent nach jeder Feature-Erweiterung automatisch einem professionellen Git-Workflow.
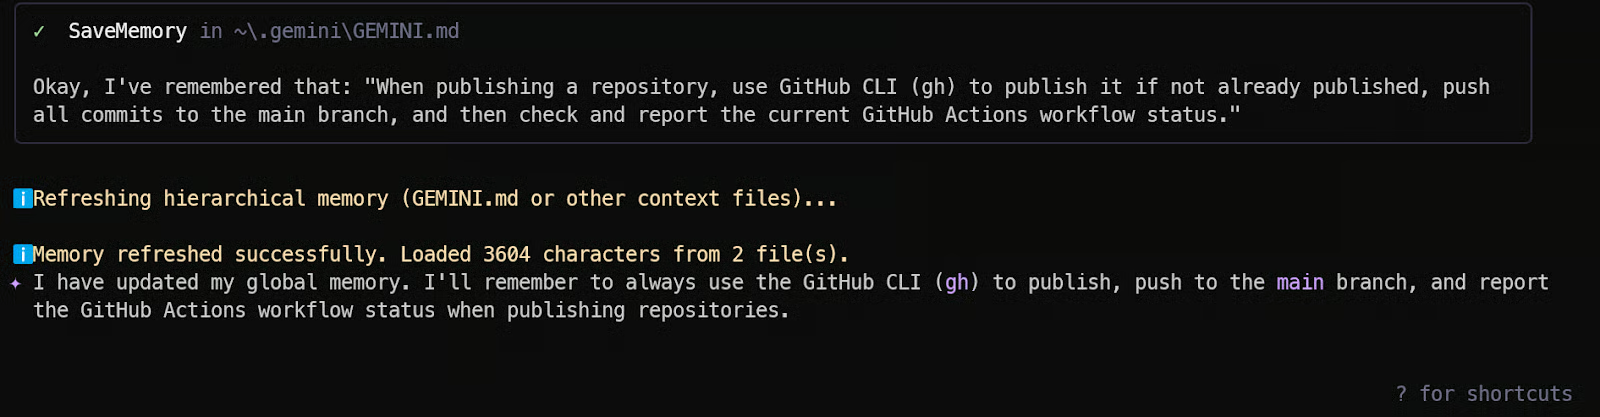
Wir wollen außerdem, dass der Agent mit GitHub CLI Repository-Publishing und CI-Validierung übernimmt.
Füge das ins Memory ein:
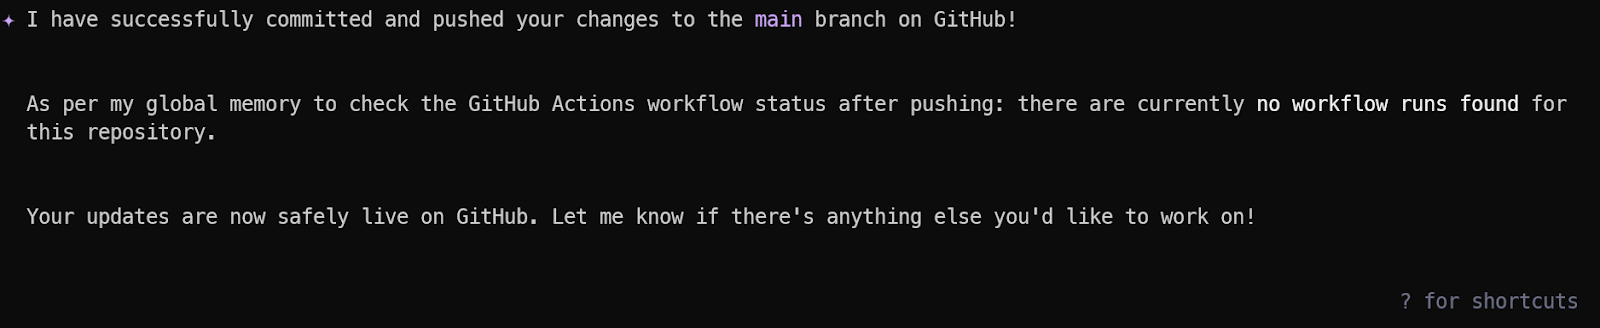
„Update the Memory: Remember to use GitHub CLI (gh) to publish this repository if not already published, push all commits to the main branch, and then check and report the current GitHub Actions workflow status.“
Das stellt sicher:
Jetzt ist dein Gemini-3.1-Pro-Agent nicht mehr zustandslos. Er versteht dein Projekt, folgt Engineering-Disziplin, managt Git korrekt und überwacht CI. Hier entfaltet agentisches Coding seine volle Wirkung.
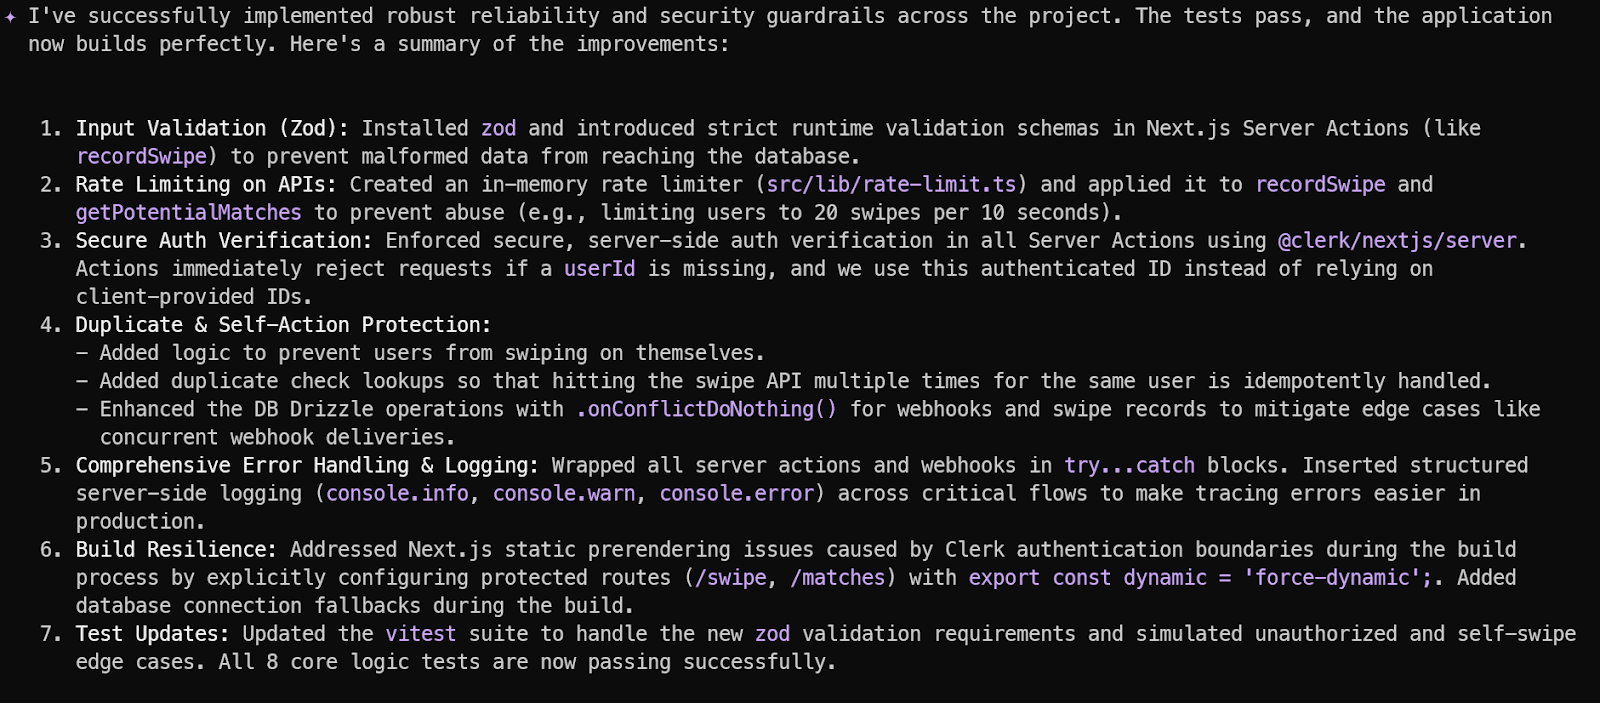
Die meisten vibe-codeten Apps scheitern nicht an fehlenden Features, sondern an fehlenden Sicherungen. Produktionsreife Anwendungen müssen bösartige Eingaben, Edge Cases, Race Conditions und API-Missbrauch abfangen. Wenn du diesen Schritt auslässt, läuft die App im Demo-Modus, bricht aber unter echten Nutzern oder automatischem Abuse ein.
Jetzt härten wir das System mit Gemini 3.1 Pro.
Nutze in der Gemini CLI die folgende Anweisung:
„Füge diesem Projekt Zuverlässigkeit und Guardrails hinzu, indem du Input-Validierung, sauberes Error-Handling, Rate Limiting auf API-Routen, sichere Clerk-Auth-Überprüfung auf dem Server, Schutz vor doppelten Aktionen, Logging für kritische Flows und die Vermeidung breaking API-Änderungen erzwingst.“
Jetzt verbinden wir die App mit realen Produktivdiensten. Wir nutzen Clerk für Authentifizierung und Neon für eine vollständig gemanagte Postgres-Datenbank. Damit wird aus generiertem Code ein funktionierendes Full-Stack-System.
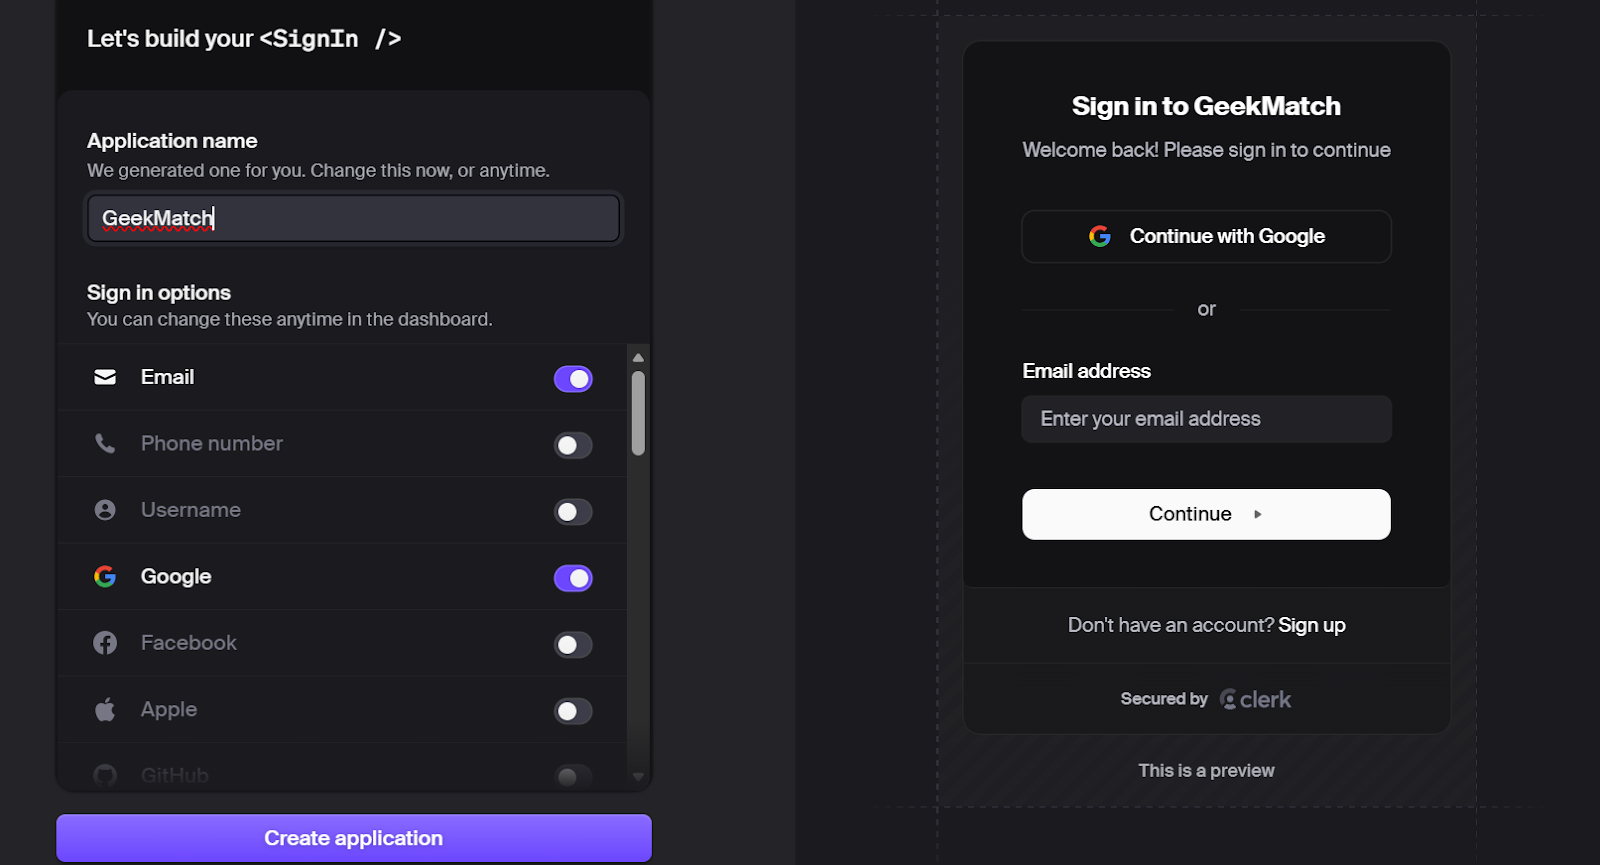
Gehe zu clerk.com und lege ein kostenloses Konto an.
Erstelle im Dashboard eine neue Anwendung. Clerk generiert automatisch:
Kopiere beide Keys aus dem Dashboard. Du fügst sie anschließend in deine Umgebungsvariablen ein.
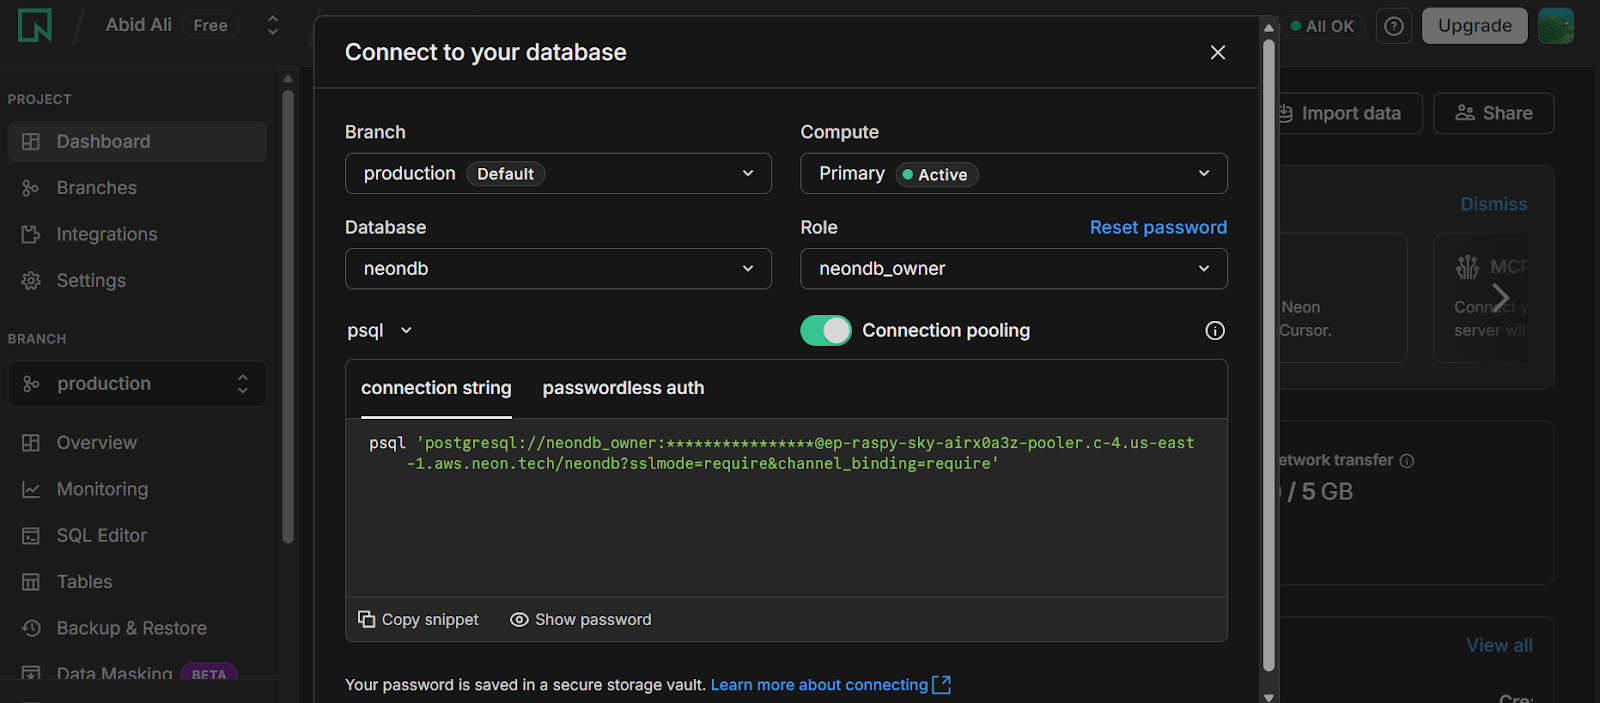
Als Nächstes: Gehe zu neon.tech und erstelle ein kostenloses Konto.
Erstelle ein neues Projekt. Neon stellt dir eine gemanagte Postgres-Datenbank bereit.
Nach der Projekterstellung:
Diese URL nutzt Drizzle ORM für die DB-Verbindung.
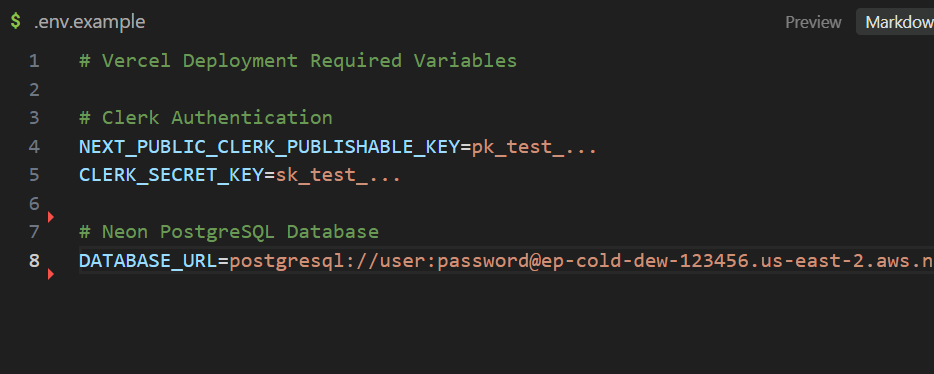
Nutze die bereitgestellte .env.example als Vorlage. Lege eine neue Datei .env.local an.
Ersetze die Platzhalter durch:
Achte darauf, .env.local niemals in Git zu committen.
Sobald die Umgebungsvariablen gesetzt sind, gehe zurück zur Gemini CLI und tippe:
„Ich habe die Clerk- und Neon-API-Keys in den Umgebungsvariablen hinterlegt. Bitte starte die Anwendung lokal, prüfe die Datenbankverbindung, teste den Auth-Flow und berichte über Fehler.“
Gemini 3.1 Pro sollte jetzt:
Wenn alles korrekt ist, gibt die CLI eine lokale URL wie http://localhost:3000 aus.

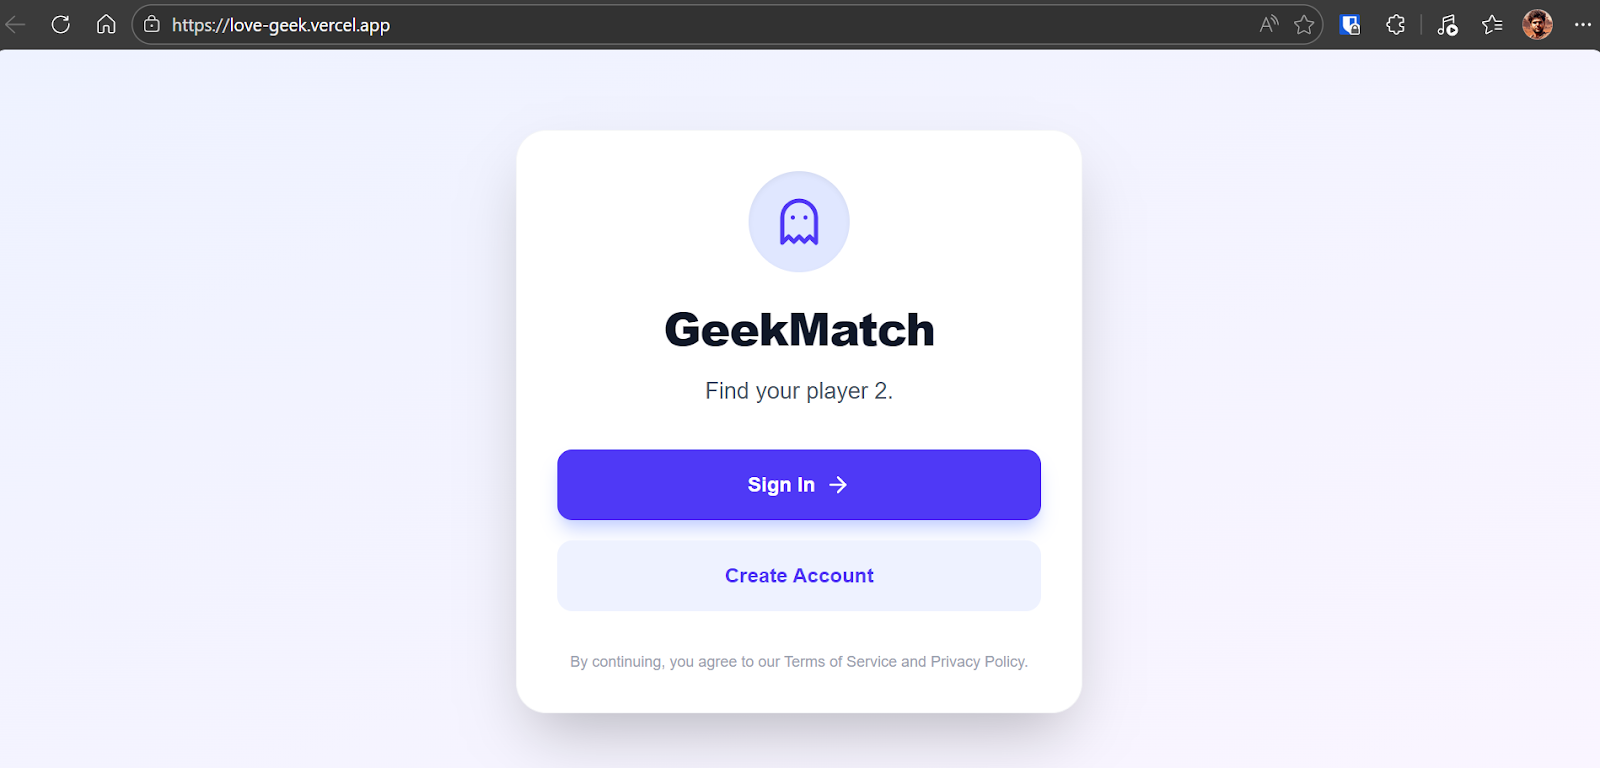
Öffne die URL (http://localhost:3000) im Browser.
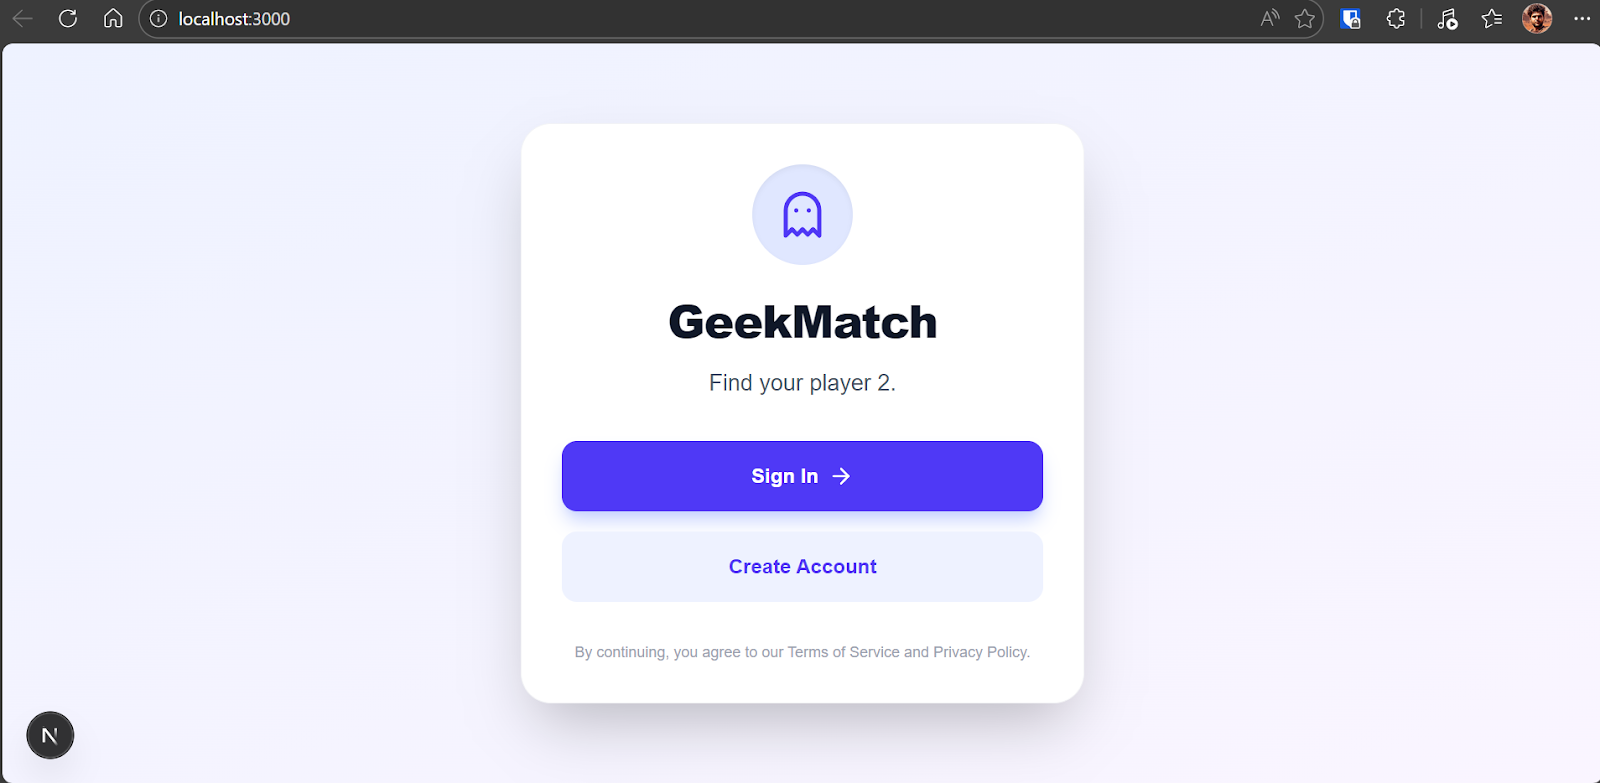
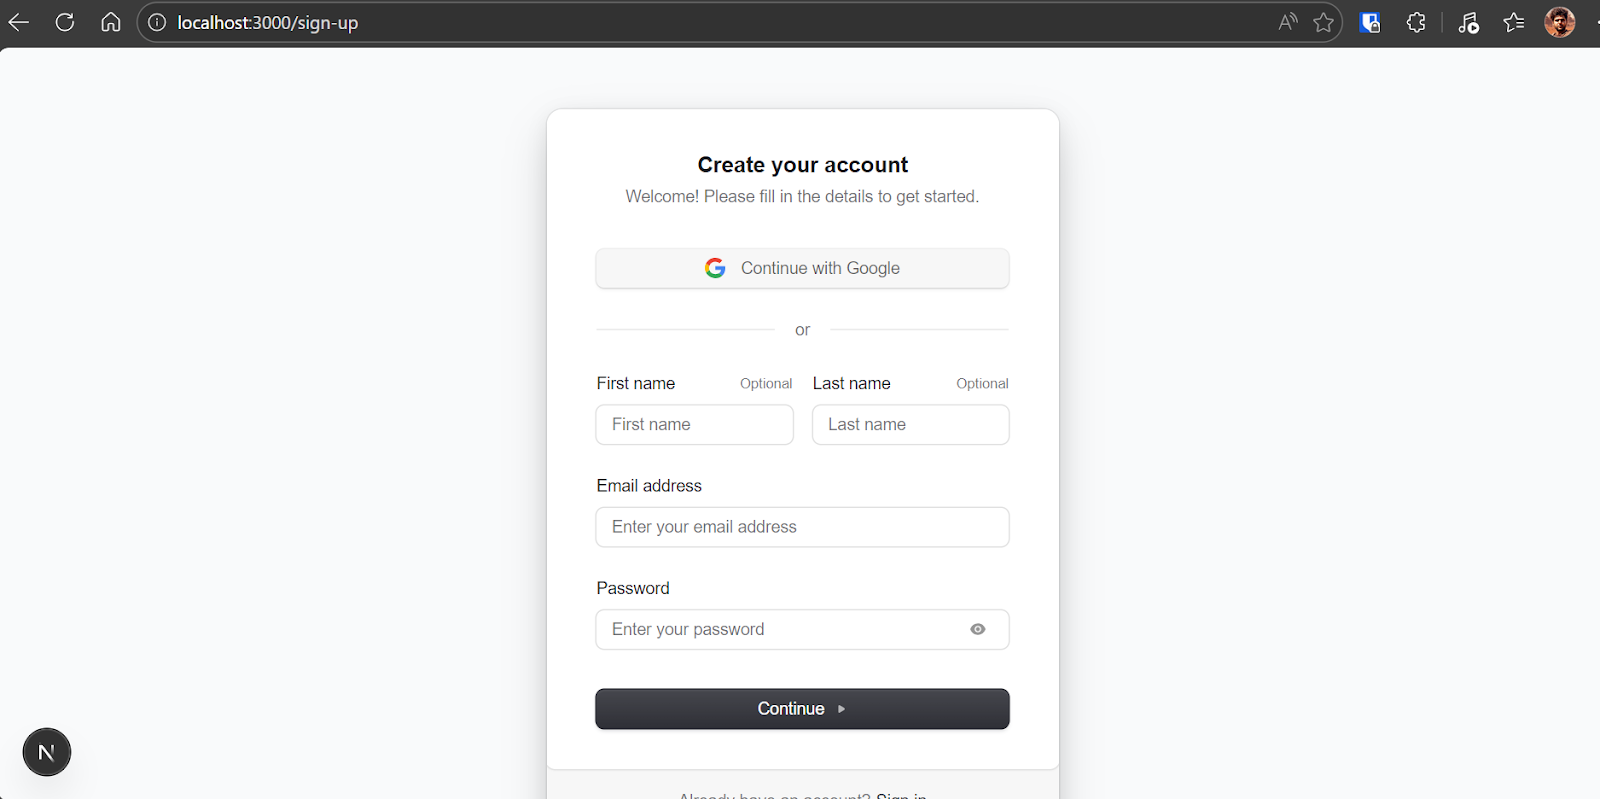
Klicke auf „Create Account“ und nutze Google Sign-in für das schnellste Setup.
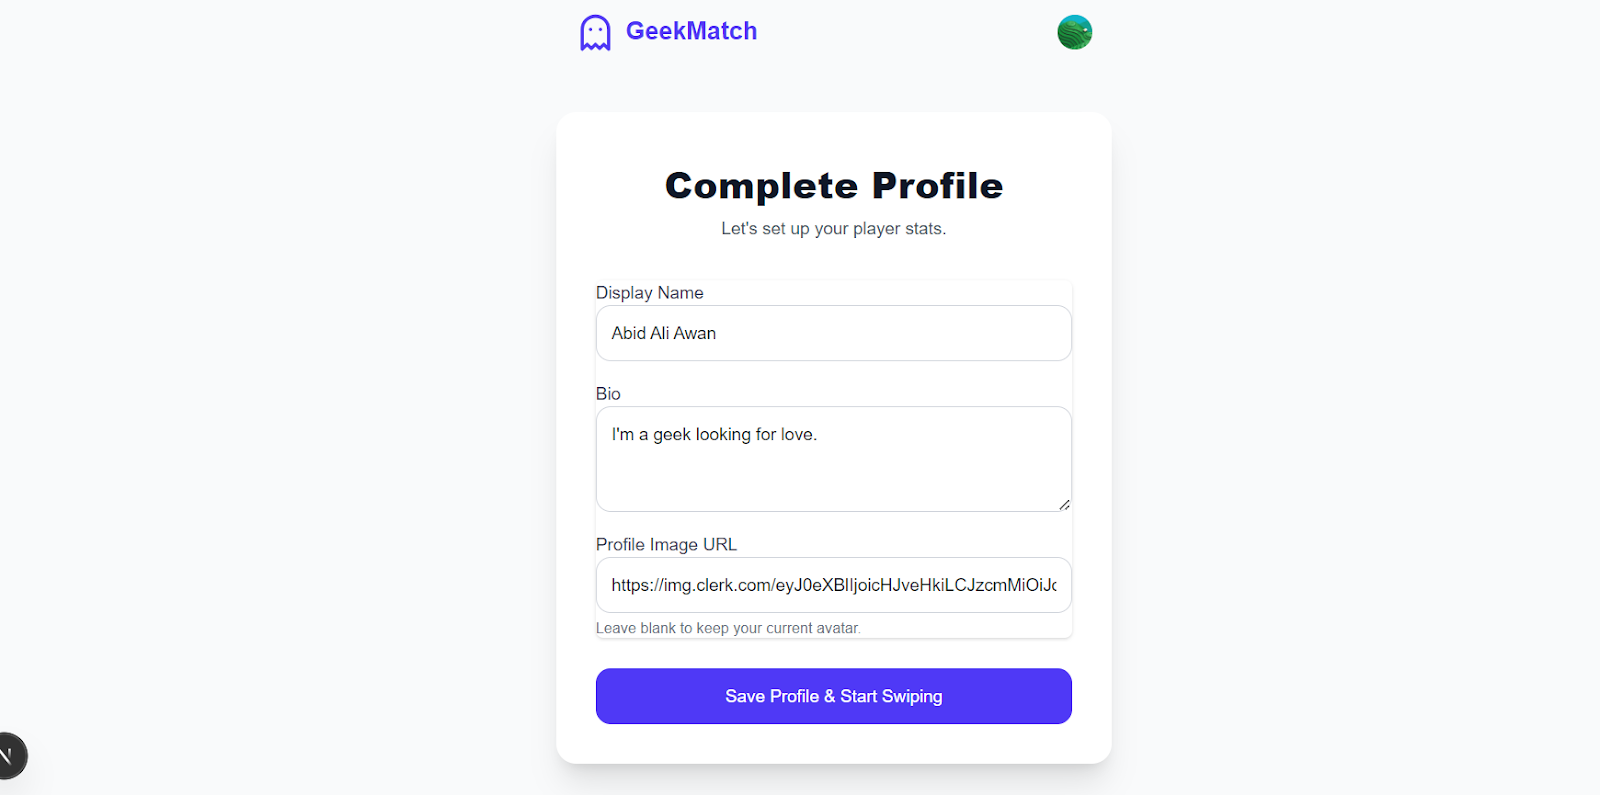
Nach der Authentifizierung vervollständigst du dein Profil mit Name, Bio und Bild.
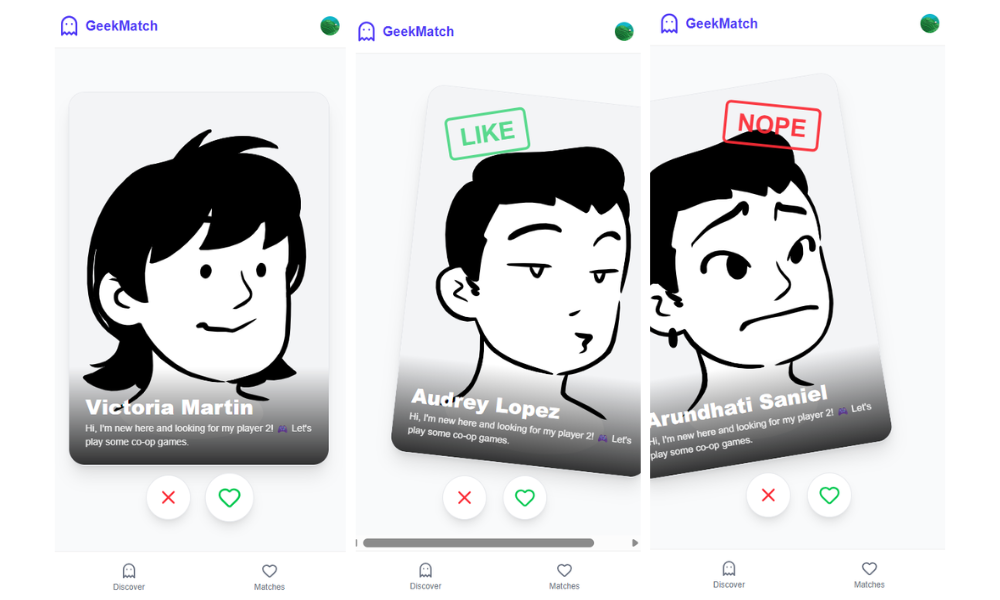
Danach wirst du zur Swipe-Oberfläche weitergeleitet. Links wischen lehnt ein Profil ab, rechts wischen markiert es als Like. Wenn sich zwei Nutzer:innen gegenseitig liken, entsteht ein Match, das auf der Matches-Seite angezeigt wird.
Nach wenigen Minuten hast du eine vollständig funktionsfähige, authentifizierte, datenbankgestützte Web-App lokal am Laufen.
Das ist die Stärke agentischen Codings mit Gemini 3.1 Pro: Was sonst Stunden an Setup und Debugging braucht, wird zu einem strukturierten, geführten Workflow – schnell und verlässlich zur lauffähigen, deploybaren App.
Nachdem die App lokal läuft, ist es Zeit fürs Production-Deployment. Dank der zuvor eingerichteten Git-Automation ist das jetzt unkompliziert.
Weise die Gemini CLI zunächst an:
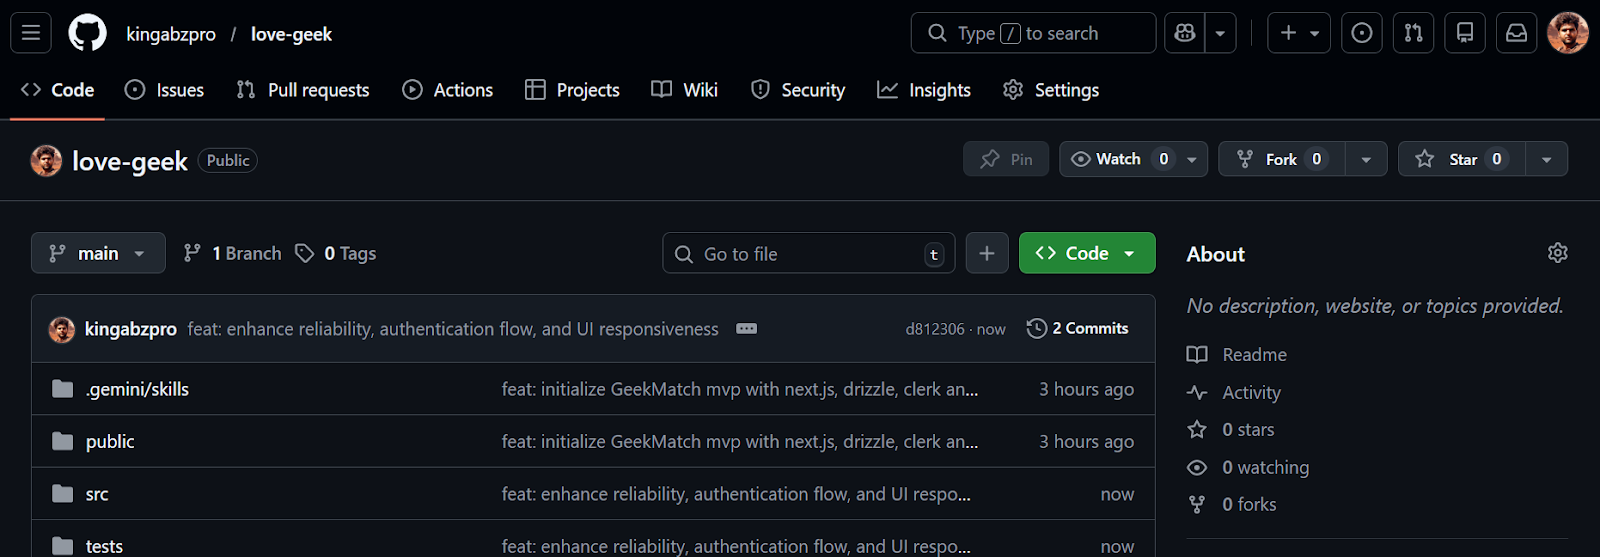
„Alle Änderungen committen und nach GitHub pushen.“
Das stellt sicher:
Dein Repository sollte jetzt auf GitHub verfügbar sein: kingabzpro/love-geek.
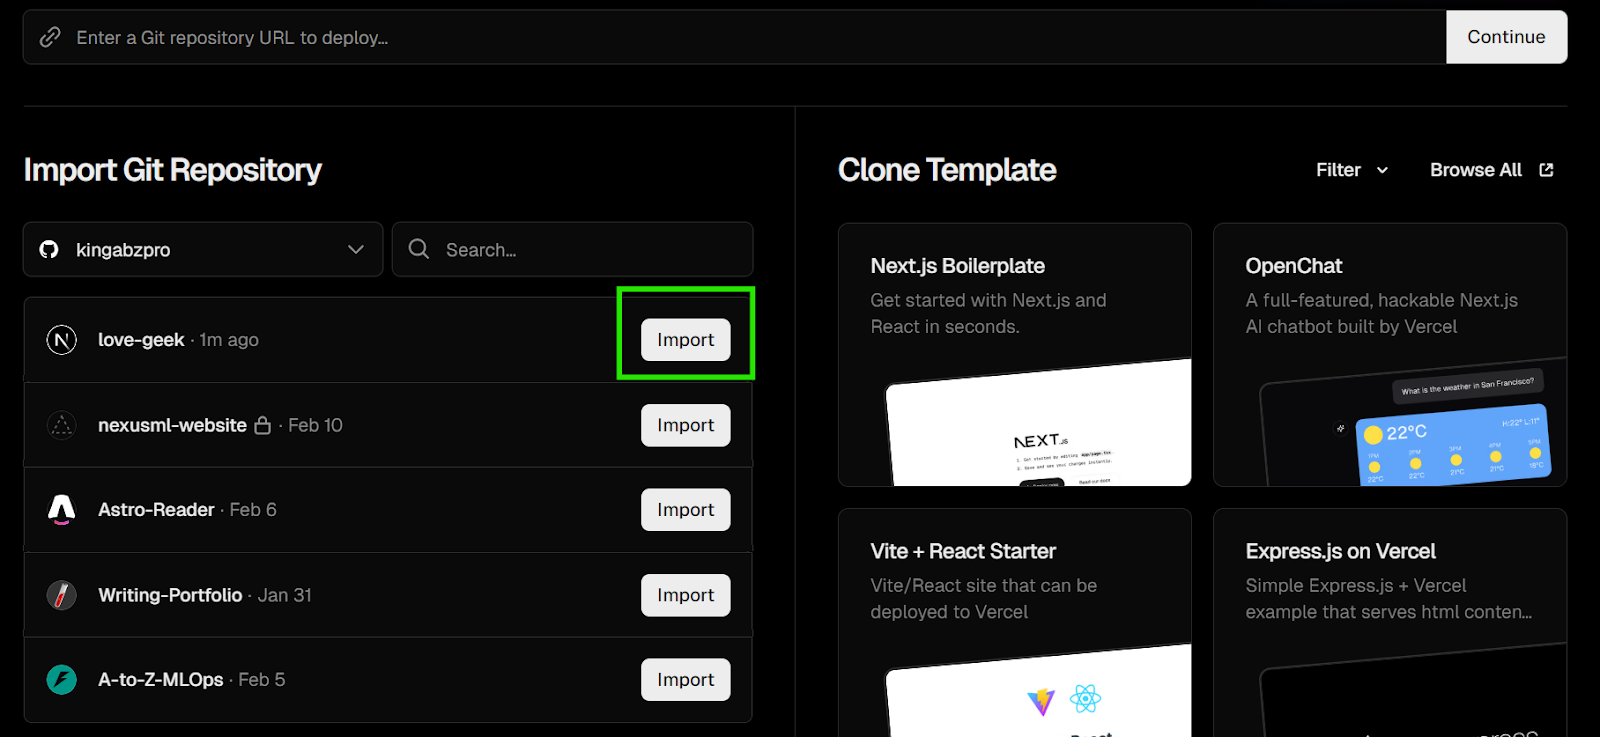
Gehe zu https://vercel.com und lege ein kostenloses Konto an. Verbinde dein GitHub-Konto. Vercel integriert sich direkt mit Repositories und führt Deployments bei jedem Push automatisch aus.
Nach der Verbindung:
love-geek auswählenVercel erkennt automatisch eine Next.js-App und konfiguriert den Build passend.
Vor dem Deployment scrolle zum Bereich Environment Variables.
Klicke „Import .env“ oder füge manuell hinzu:
Stelle sicher, dass alle Produktionsvariablen deinen .env.local-Werten entsprechen.
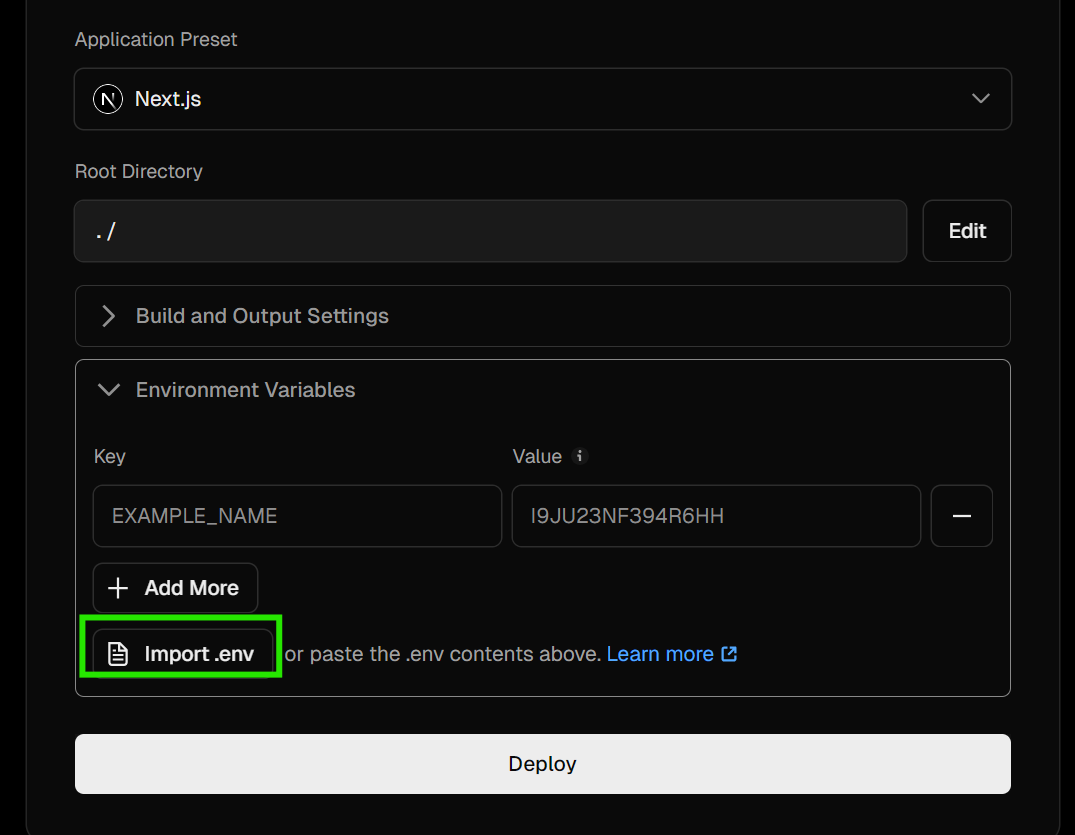
Klicke Deploy.
Vercel wird:
Ist alles durch, ist deine App live unter https://love-geek.vercel.app.
Öffne die Live-URL und teste:
Wenn alles funktioniert, läuft jetzt eine vollständig deployte, authentifizierte, datenbankgestützte Web-App in Produktion.
Von der Idee zum Live-Produkt in unter 30 Minuten.
Ab jetzt wird Vercel bei jedem Push nach GitHub automatisch neu deployen. Mit Gemini 3.1 Pro für Struktur, Memory und Guardrails kannst du zügig Features ergänzen und in wenigen Tagen ein produktionsreifes Startup-Fundament aufbauen.
Ehrlich gesagt: Der erste Build hat mich beeindruckt. Die App lief End-to-End – mit Auth, Datenbankintegration, Swipe-Logik und Deployment – alles strukturiert umgesetzt. Ein paar Kleinigkeiten im Test, etwa dass ich temporäre Seed-Profile manuell anfordern musste, um das Swipen sauber zu testen. Das lag nicht am Modell, sondern daran, dass ich es präziser hätte spezifizieren müssen.
Besonders herausgestochen hat die Debugging-Fähigkeit von Gemini 3.1 Pro. Tritt ein Fehler auf oder gibt es Konfigurationsprobleme, spürt es die Ursache effektiv auf, schlägt Fixes vor und validiert die Lösung Schritt für Schritt. Kein blindes Patchen – sondern gründliches Reasoning.
Das Ökosystem drumherum macht viel aus. Die Kombination aus Gemini CLI, Custom Skills, Extensions, persistentem Memory und YOLO-Modus ergibt einen starken Entwicklungs-Workflow. Das Memory reduziert Wiederholungen, Custom Skills sorgen für Architekturdisziplin, die Extensions verbessern Doku- und Suchtreffer.
Beim Costing lag der Build inklusive Debugging und Deployment bei rund 5 Dollar API-Kosten. Im Vergleich zu höherpreisigen Coding-Modellen sehr fair.
Ich habe zudem bewusst nicht auf begrenzte Free-Tiers oder Abo-Coding-Plattformen gesetzt, die oft trennen oder drosseln. Für eine stabile, hochwertige Erfahrung zu zahlen, hat sich gelohnt.
Unterm Strich war das mehr als nur eine App zu bauen – es war ein Learning in agentischer Entwicklung. Zu verstehen, wie man Memory managt, Custom Skills erstellt, Gemini-Extensions nutzt und strategisch in den YOLO-Modus wechselt, verändert die Herangehensweise an KI-unterstütztes Engineering.
Diesen Workflow empfehle ich sehr – besonders für Vibe Coder, die über schnelle Prototypen hinaus strukturierte, produktionsreife Anwendungen schneller und mit weniger Debugging-Stress bauen wollen.
Wenn du mehr über das Bauen mit agentischer KI lernen willst, empfehle ich dir den Kurs Designing Agentic Systems with LangChain.
Top-Kurse zu Agentic AI
Kurs
Kurs
Kurs
Blog
Blog
Hesam Sheikh Hassani
15 Min.
Tutorial
Kurtis Pykes
Tutorial
Laiba Siddiqui
Tutorial
Sejal Jaiswal
Tutorial
Moez Ali