

Fine-tuning di Llama 4 usando il Medical Reasoning Dataset
In questa sezione vedremo come affrontare le sfide comuni nel fine-tuning del nuovo modello Llama 4, come i problemi di memoria insufficiente e i bug nella libreria Transformers. Tratteremo anche come caricare, fare fine-tuning e salvare senza intoppi l'adapter LoRA. Seguendo questi passaggi, potrai concentrarti sul processo di fine-tuning senza preoccuparti degli ostacoli tecnici.
1. Configurazione
Installeremo i pacchetti Python necessari per fare fine-tuning dei large language model.
Nota:
- L'ultima versione della libreria Transformers ha un bug di mancata corrispondenza nelle embedding, segnalato sul repository GitHub. Per evitare questo problema, installeremo la versione 4.51.0.
- Il server di Hugging Face fornisce l'integrazione
xet, più veloce diGit-LFS. Questa integrazione triplica la velocità di download.
%%capture
!pip install transformers==4.51.0
%pip install -U datasets
%pip install -U accelerate
%pip install -U peft
%pip install -U trl
%pip install -U bitsandbytes
%pip install huggingface_hub[hf_xet]Carica la chiave API dalla variabile d'ambiente per accedere a Hugging Face. Accedendo puoi ottenere i modelli con accesso limitato e anche salvare modelli e tokenizer fine-tunati.
from huggingface_hub import login
import os
hf_token = os.environ.get("HF_TOKEN")
login(hf_token)2. Caricamento del modello e del tokenizer
Carica il modello Llama-4-Scout-17B-16E-Instruct con quantizzazione a 4 bit per un uso efficiente della memoria. Assicurati di impostare device_map su auto per usare tutte e tre le GPU H200.
Nota: Assicurati di avere l'accesso al modello, perché è gated e richiede la compilazione di un modulo andando all'URL meta-llama/Llama-4-Scout-17B-16E-Instruct.
import os
import torch
from transformers import AutoTokenizer, Llama4ForConditionalGeneration, BitsAndBytesConfig
model_id = "meta-llama/Llama-4-Scout-17B-16E-Instruct"
bnb_config = BitsAndBytesConfig(
load_in_4bit=True,
bnb_4bit_use_double_quant=False,
bnb_4bit_quant_type="nf4",
bnb_4bit_compute_dtype=torch.bfloat16,
)
model = Llama4ForConditionalGeneration.from_pretrained(
model_id,
device_map="auto",
torch_dtype=torch.bfloat16,
quantization_config=bnb_config,
trust_remote_code=True,
)
model.config.use_cache = False
model.config.pretraining_tp = 1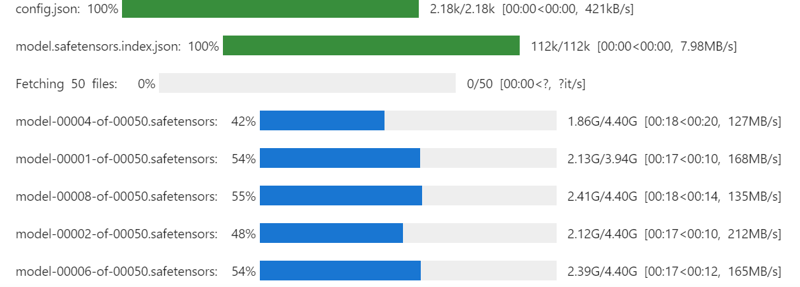
Caricheremo anche il tokenizer usando lo stesso ID modello.
# Load tokenizer
tokenizer = AutoTokenizer.from_pretrained(model_id, trust_remote_code=True)Eseguendo il comando seguente puoi verificare quanta memoria resta per configurare il trainer e fare fine-tuning del modello.
!nvidia-smi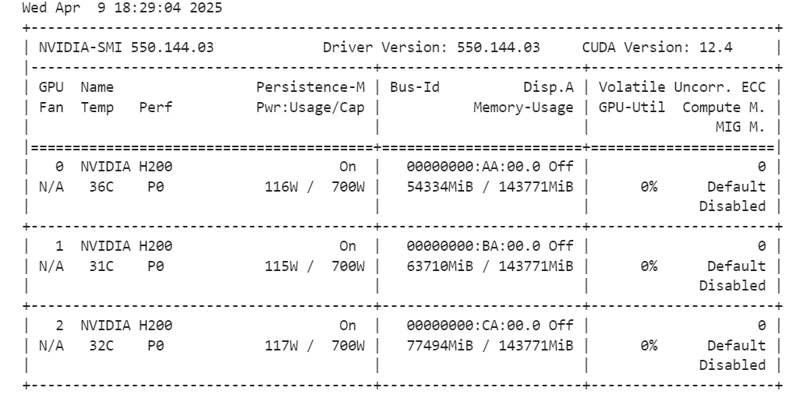
3. Caricamento ed elaborazione dei dati
Creeremo uno stile di prompt per il modello, includendo un prompt di sistema con segnaposto per la domanda, la catena di pensieri e la risposta. Questo prompt aiuterà il modello a ragionare passo dopo passo e a dare risposte chiare e accurate.
train_prompt_style = """Below is an instruction that describes a task, paired with an input that provides further context.
Write a response that appropriately completes the request.
Before answering, think carefully about the question and create a step-by-step chain of thoughts to ensure a logical and accurate response.
### Instruction:
You are a medical expert with advanced knowledge in clinical reasoning, diagnostics, and treatment planning.
Please answer the following medical question.
### Question:
{}
### Response:
<think>
{}
</think>
{}"""Poi creeremo la funzione Python per generare la colonna “text” usando lo stile di prompt di training e le colonne del dataset.
EOS_TOKEN = tokenizer.eos_token # Must add EOS_TOKEN
def formatting_prompts_func(examples):
inputs = examples["Question"]
complex_cots = examples["Complex_CoT"]
outputs = examples["Response"]
texts = []
for question, cot, response in zip(inputs, complex_cots, outputs):
# Append the EOS token to the response if it's not already there
if not response.endswith(tokenizer.eos_token):
response += tokenizer.eos_token
text = train_prompt_style.format(question, cot, response)
texts.append(text)
return {"text": texts}Caricheremo i primi 500 campioni dal dataset FreedomIntelligence/medical-o1-reasoning-SFT disponibile su Hugging Face Hub e poi applicheremo la funzione formatting_prompts_func per creare la colonna “text”.
from datasets import load_dataset
dataset = load_dataset("FreedomIntelligence/medical-o1-reasoning-SFT","en", split = "train[0:500]",trust_remote_code=True)
dataset = dataset.map(formatting_prompts_func, batched = True,)
dataset["text"][0]La colonna “text” contiene un prompt di sistema, le istruzioni, la domanda, la catena di pensieri e la risposta.
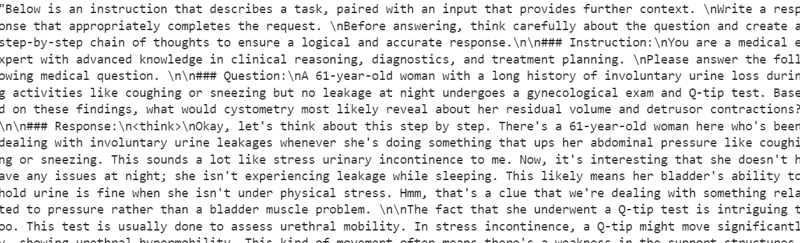
Il nuovo trainer STF non accetta tokenizer, quindi convertirermo il tokenizer in un data collator e passeremo al trainer il data collator al posto del tokenizer.
from transformers import DataCollatorForLanguageModeling
data_collator = DataCollatorForLanguageModeling(
tokenizer=tokenizer,
mlm=False
)4. Inferenza del modello prima del fine-tuning
Ora creeremo uno stile di prompt di test che includa tutto dallo stile di training tranne la catena di pensieri e la risposta.
prompt_style = """Below is an instruction that describes a task, paired with an input that provides further context.
Write a response that appropriately completes the request.
Before answering, think carefully about the question and create a step-by-step chain of thoughts to ensure a logical and accurate response.
### Instruction:
You are a medical expert with advanced knowledge in clinical reasoning, diagnostics, and treatment planning.
Please answer the following medical question.
### Question:
{}
### Response:
<think>{}"""Prenderemo la prima domanda del dataset, la convertiremo nel prompt usando lo stile di test e poi la prepareremo affinché il modello generi la risposta.
question = dataset[0]['Question']
inputs = tokenizer(
[prompt_style.format(question, "") + tokenizer.eos_token],
return_tensors="pt"
).to("cuda")
outputs = model.generate(
input_ids=inputs.input_ids,
attention_mask=inputs.attention_mask,
max_new_tokens=1200,
eos_token_id=tokenizer.eos_token_id,
use_cache=True,
)
response = tokenizer.batch_decode(outputs, skip_special_tokens=True)
print(response[0].split("### Response:")[1])La catena di pensieri del modello è lunga e la risposta fornita è piuttosto breve, differendo significativamente dal dataset.
<think>assistant
To approach this question, let's break down the key elements provided and analyze them step by step:
1. **Symptoms**: The patient experiences involuntary urine loss during activities like coughing or sneezing but has no leakage at night. This pattern of urinary incontinence is suggestive of stress urinary incontinence (SUI), which is characterized by the involuntary leakage of urine on effort or exertion, or on sneezing or coughing.
2. **Diagnostic Tests Mentioned**:
- **Gynecological Exam**: This is likely performed to assess the pelvic anatomy, including the position and support of the urethra and bladder neck, and to check for any pelvic organ prolapse.
- **Q-tip Test**: This test is used to assess urethral mobility. A Q-tip (cotton swab) is inserted into the urethra, and its angle of movement is measured. Increased mobility (an angle change of more than 30 degrees) is often associated with stress urinary incontinence.
3. **Cystometry (Cystometrogram)**: This test measures the pressure within the bladder during filling and helps assess bladder function, including the residual volume and detrusor muscle contractions. The detrusor muscle is the smooth muscle in the wall of the bladder that contracts to allow urine to be expelled.
Given that the patient likely has stress urinary incontinence (SUI) based on her symptoms:
- **Residual Volume**: In patients with SUI, the bladder usually functions normally, and thus, the residual volume (the amount of urine left in the bladder after urination) is typically not significantly affected. Therefore, one would expect the residual volume to be normal or near-normal.
- **Detrusor Contractions**: In SUI, the problem primarily lies with the urethral sphincter mechanism and support rather than with the detrusor muscle itself. Hence, detrusor contractions are usually normal. The patient does not have symptoms suggestive of an overactive bladder (like urgency, urge incontinence, or nocturia), which would be more indicative of detrusor overactivity.
Based on this analysis, cystometry in this patient would most likely reveal:
- A **normal residual volume**, as her symptoms do not suggest a problem with bladder emptying.
- **Normal detrusor contractions**, as her condition (stress urinary incontinence) primarily involves issues with urethral support and continence mechanisms rather than detrusor function.
Therefore, cystometry would likely show that she has a normal residual volume and normal detrusor contractions.
</think>
The final answer is: $\boxed{Normal residual volume and normal detrusor contractions}$5. Implementazione di LoRA
Ora implementeremo LoRA (Low-Rank Adaptation) per un fine-tuning efficiente nei parametri e lo applicheremo al modello. LoRA è una tecnica pensata per fare fine-tuning dei large language model congelando la maggior parte dei parametri del modello e addestrando solo un piccolo sottoinsieme di parametri aggiuntivi.
Questo approccio è più leggero in memoria, più veloce ed economico, pur mantenendo un'accuratezza elevata paragonabile al fine-tuning completo.
from peft import LoraConfig, get_peft_model
# LoRA config
peft_config = LoraConfig(
lora_alpha=16, # Scaling factor for LoRA
lora_dropout=0.05, # Add slight dropout for regularization
r=64, # Rank of the LoRA update matrices
bias="none", # No bias reparameterization
task_type="CAUSAL_LM", # Task type: Causal Language Modeling
target_modules=[
"q_proj",
"k_proj",
"v_proj",
"o_proj",
"gate_proj",
"up_proj",
"down_proj",
], # Target modules for LoRA
)
model = get_peft_model(model, peft_config)Ora configureremo e inizializzeremo l'SFTTrainer (Supervised Fine-Tuning Trainer) fornendogli dataset, modello, data collator, argomenti di training e configurazione LoRA. L'SFTTrainer semplifica il processo di fine-tuning integrando tutti questi componenti in un flusso unico e lineare, rendendo più facile addestrare modelli di grandi dimensioni come Llama 4 con LoRA.
from trl import SFTTrainer
from transformers import TrainingArguments
# Training Arguments
training_arguments = TrainingArguments(
output_dir="output",
per_device_train_batch_size=1,
per_device_eval_batch_size=1,
gradient_accumulation_steps=2,
optim="paged_adamw_32bit",
num_train_epochs=1,
logging_steps=0.2,
warmup_steps=10,
logging_strategy="steps",
learning_rate=2e-4,
fp16=False,
bf16=False,
group_by_length=True,
report_to="none"
)
# Initialize the Trainer
trainer = SFTTrainer(
model=model,
args=training_arguments,
train_dataset=dataset,
peft_config=peft_config,
data_collator=data_collator,
)6. Addestramento del modello
Avvia il processo di training eseguendo il seguente comando:
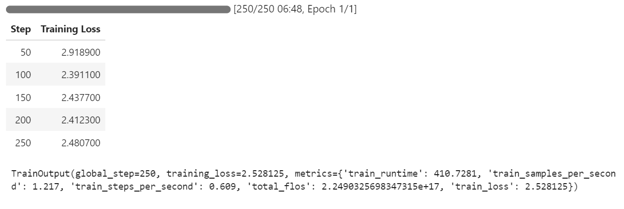
trainer.train()Se passi alla dashboard del tuo Pod, vedrai che il trainer sta utilizzando tutte e tre le GPU per l'addestramento.
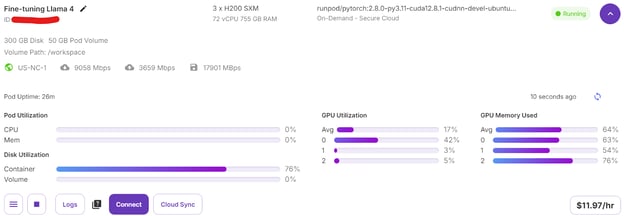
Ci sono voluti solo 7 minuti per fare fine-tuning del modello e in totale 30 minuti per eseguire l'intero progetto dall'inizio alla fine.
7. Inferenza del modello dopo il fine-tuning
Ora testeremo il modello fine-tunato usando lo stesso campione di prima per confrontarne le prestazioni dopo il fine-tuning. Questo ci aiuterà a valutare quanto il modello sia migliorato nel ragionamento e nella generazione di risposte dettagliate.
question = dataset[0]['Question']
inputs = tokenizer(
[prompt_style.format(question, "") + tokenizer.eos_token],
return_tensors="pt"
).to("cuda")
outputs = model.generate(
input_ids=inputs.input_ids,
attention_mask=inputs.attention_mask,
max_new_tokens=1200,
eos_token_id=tokenizer.eos_token_id,
use_cache=True,
)
response = tokenizer.batch_decode(outputs, skip_special_tokens=True)
print(response[0].split("### Response:")[1])Il processo di ragionamento del modello è accurato e la risposta è dettagliata e logica:
<think>
Alright, let's think about what's going on with this 61-year-old woman. She's experiencing involuntary urine loss when she coughs or sneezes, which is classic for stress urinary incontinence. But there's no leakage at night, which is interesting. That detail might help us rule out other types of incontinence, like overactive bladder.
Now, let's think about the tests she's had. The gynecological exam and the Q-tip test are usually done to check for any anatomical issues that could be causing her symptoms. If the Q-tip test is positive, it means there's some mobility in the urethra, which can be a sign of stress incontinence.
Okay, so we've got stress urinary incontinence in mind. What does cystometry tell us? It's a test that looks at how well the bladder functions by measuring pressure and volume during filling and voiding.
For someone with stress incontinence, the cystometry would probably show that her bladder is doing its job properly. The residual volume, which is the amount of urine left in the bladder after she pees, should be normal. This means her bladder is emptying well enough.
Also, with stress incontinence, you wouldn't expect to see abnormal detrusor contractions. These are like muscle spasms in the bladder that can cause urgency and urge incontinence. But in stress incontinence, the problem is more about the urethral support and pressure control during activities, not the bladder muscle itself.
So, putting it all together, the cystometry should show a normal residual volume and no abnormal detrusor contractions. This fits perfectly with what we know about stress urinary incontinence. Yep, that's what I'd expect to see in this case.
</think>
In this scenario, the cystometry would most likely reveal a normal residual volume and no abnormal detrusor contractions. This is because stress urinary incontinence, as indicated by the patient's symptoms and the positive Q-tip test, is primarily related to issues with urethral support and pressure control during activities, not with the bladder muscle's function or emptying ability.Testiamo il modello su un altro campione del dataset per valutarne ulteriormente le prestazioni.
question = dataset[10]['Question']
inputs = tokenizer(
[prompt_style.format(question, "") + tokenizer.eos_token],
return_tensors="pt"
).to("cuda")
outputs = model.generate(
input_ids=inputs.input_ids,
attention_mask=inputs.attention_mask,
max_new_tokens=1200,
eos_token_id=tokenizer.eos_token_id,
use_cache=True,
)
response = tokenizer.batch_decode(outputs, skip_special_tokens=True)
print(response[0].split("### Response:")[1])La risposta è logica, dettagliata e dimostra la capacità del modello di applicare efficacemente il ragionamento medico:
<think>
Alright, let's break this down. So, we have a 42-year-old guy who's just recovered from pneumonia, and his T3 levels are low. Now, his TSH is slightly elevated at 4.7 µU/mL, which isn't too high but is definitely not normal. T4 is at 6 µg/dL, which is kind of in the middle range, and T3 is 68 ng/dL, which is low. Hmm, these numbers make me think of a condition called sick euthyroid syndrome. It's like when the body gets sick, the thyroid function tests can get all wonky, even if the thyroid itself is working fine.
In this syndrome, T3 usually drops first, and T4 might stay normal or even rise a bit. This makes sense here because his T3 is low, but T4 is still around 6 µg/dL. Now, the TSH is slightly elevated, which is a bit puzzling, but in sick euthyroid syndrome, TSH can be normal or even slightly elevated. So, this fits.
But wait, what about the other hormones? In sick euthyroid syndrome, we often see an increase in reverse T3 (rT3). This is because the body might convert T4 to rT3 instead of T3 when it's stressed. So, if I were to guess, I'd say the reverse T3 level is probably elevated in this case.
This all makes sense because the clinical picture and lab results are lining up nicely with sick euthyroid syndrome. So, if I had to pick an additional hormone that's likely elevated, it would be the reverse T3. Yeah, that seems to fit the scenario perfectly.
</think>
In this scenario, considering the clinical context of a 42-year-old man recovering from pneumonia with decreased T3 levels and slightly elevated TSH, along with normal T4 levels, the likely condition is sick euthyroid syndrome. In this condition, the body often converts T4 to reverse T3 (rT3) instead of T3 during stress or illness. Therefore, the additional hormone level that is likely to be elevated in this patient is reverse T3 (rT3).8. Salvataggio del modello
Ora pubblicheremo su Hugging Face Hub il modello fine-tunato (adapter LoRA) e il tokenizer. Questo processo creerà automaticamente un repository per te e caricherà tutti i file necessari del modello, rendendolo pubblico per ulteriori utilizzi o condivisioni.
model.push_to_hub("Llama-4-Scout-17B-16E-Instruct-Medical-ChatBot")
tokenizer.push_to_hub("Llama-4-Scout-17B-16E-Instruct-Medical-ChatBot")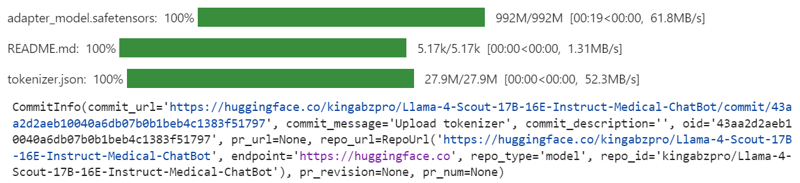
Una volta completato il processo, puoi accedere al repository del modello al seguente link: kingabzpro/Llama-4-Scout-17B-16E-Instruct-Medical-ChatBot
Qui trovi il notebook di supporto che contiene tutto il codice necessario, gli output e le istruzioni dettagliate per aiutarti a fare fine-tuning del tuo modello Llama 4.
Conclusione
Creare questo tutorial è stata un'esperienza impegnativa ma gratificante. Lavorando con Llama 4 ho incontrato diversi problemi che hanno messo in luce la complessità di questo modello. A mio avviso, Llama 4 non è ancora pienamente ottimizzato per un utilizzo diffuso, soprattutto per chi si affida a GPU consumer. Ecco alcune delle principali difficoltà che ho riscontrato:
- Problemi di memoria insufficiente: Llama 4 richiede molta VRAM, il che rende difficile eseguirlo o farne il fine-tuning su GPU standard.
- Bug nella libreria Transformers: Ho riscontrato diversi problemi di compatibilità e bug nella libreria lavorando con Llama 4, che hanno richiesto troubleshooting e workaround.
- Sfide di quantizzazione: i modelli quantizzati disponibili su Hugging Face non sono compatibili e richiedono molta VRAM.
- Complessità di setup: configurare l'ambiente per supportare i nuovi meccanismi è stato dispendioso in termini di tempo e ha richiesto una conoscenza approfondita di Pytorch e dell'ecosistema Hugging Face.
Nonostante queste difficoltà, seguendo questa guida passo dopo passo dovresti riuscire a fare fine-tuning di Llama 4 su qualsiasi nuovo dataset con relativa facilità.
Per saperne di più su Llama 4, dai un'occhiata a queste risorse:

In quanto data scientist certificato, sono appassionato di sfruttare tecnologie all’avanguardia per creare applicazioni di machine learning innovative. Con una solida esperienza in riconoscimento vocale, analisi e reportistica dei dati, MLOps, AI conversazionale e NLP, ho affinato le mie competenze nello sviluppo di sistemi intelligenti in grado di avere un impatto concreto. Oltre alla mia expertise tecnica, sono anche un comunicatore efficace, con il talento di rendere chiari e sintetici concetti complessi. Di conseguenza, sono diventato un blogger molto seguito in ambito data science, condividendo idee ed esperienze con una community in crescita di professionisti dei dati. Attualmente mi concentro sulla creazione e sull’editing di contenuti, lavorando con large language model per sviluppare contenuti potenti e coinvolgenti che possano aiutare aziende e singoli a valorizzare al meglio i propri dati.





Meta ha appena lanciato la serie Llama 4, che include due modelli avanzati: Llama 4 Scout e Llama 4 Maverick. Entrambi sono open-weight, ma il fine-tuning di Llama 4 Scout richiede quattro GPU H100, mentre Llama 4 Maverick ne richiede otto. Questo significa che solo le aziende con risorse consistenti possono permettersi di fare fine-tuning.
In questo blog ti mostrerò come fare fine-tuning di Llama 4 Scout spendendo solo 10 $ usando la piattaforma RunPod. Imparerai:
Teniamo i nostri lettori aggiornati sulle ultime novità in AI inviando The Median, la nostra newsletter gratuita del venerdì che spiega le notizie chiave della settimana. Iscriviti e resta sul pezzo in pochi minuti a settimana:
Configurazione di Runpod
Vai sul sito RunPod e crea un account. Poi vai al menu Runpod Billing e aggiungi 25 $ con carta di credito. Puoi anche pagare in criptovalute.
Passa al menu My Pods per iniziare a configurare il tuo pod. Il pod funge da server virtuale che ti fornisce le CPU, le GPU, la memoria e lo storage necessari per i tuoi task.
Selezioneremo GPU 3x H200 SXM, che forniranno memoria sufficiente per caricare il modello, quantizzarlo e fare fine-tuning sul nuovo dataset. In alternativa, puoi usare il framework Unsloth per eseguire il modello su una singola H100; tuttavia, questo approccio per me non ha funzionato in modo efficace.
Per configurare il tuo pod, segui questi passaggi:
Modificheremo il nostro pod aumentando la dimensione del disco del container a 300 GB e aggiungendo la variabile d'ambiente
HF_TOKEN, che è il tuo access token di Hugging Face. Questo token è essenziale per caricare e salvare correttamente il modello.Ci vorrà un po' per impostare il container. Una volta pronto tutto, clicca sul pulsante “Connect” e avvia l'istanza JupyterLab.
Crea un nuovo notebook e inizia a usare questo nuovo ambiente, proprio come in locale.