Track
Deep Learning in Python
18 hr
Optimization algorithms play a crucial role in deep learning: they fine-tune model weights to minimize loss functions during training. One such algorithm is the Adam optimizer.
Adam became extremely popular in deep learning due to its ability to combine the advantages of momentum and adaptive learning rates. This made it highly efficient for training deep neural networks. It also requires minimal tuning of hyperparameters, thus making it widely accessible and effective across various tasks.
In 2017, Ilya Loshchilov and Frank Hutter introduced a more advanced version of the popular Adam algorithm in their paper "Decoupled Weight Decay Regularization." They named it AdamW, which stands out for decoupling weight decay from the gradient update process. This separation is a crucial improvement over Adam and helps with better model generalization.
AdamW has become increasingly important in modern deep learning applications, particularly in handling large-scale models. Its superior ability to regulate weight updates has contributed to its adoption in tasks that demand high performance and stability.
In this tutorial, we are going to touch on the key differences between Adam and AdamW, and the different use cases, and we will be implementing a step-by-step guide to implementing AdamW in PyTorch.
Adam and AdamW are both adaptive optimizers widely used in deep learning. The big difference between them is how they handle weight regularization, which impacts their effectiveness in different scenarios.
While Adam combines momentum and adaptive learning rates to offer efficient optimization, it incorporates L2 regularization in a way that can hinder performance. AdamW addresses this by decoupling weight decay from the learning rate update, providing a more effective approach for large models and improving generalization. Weight decay, a form of L2 regularization, penalizes large weights in the model. Adam incorporates weight decay into the gradient update process, while AdamW applies it separately after the gradient update
Here are some other ways they differ:
Although both optimizers are designed to manage momentum and adjust learning rates dynamically, they differ fundamentally in their treatment of weight decay.
In Adam, weight decay is applied indirectly as part of the gradient update, which can unintentionally modify the learning dynamics and interfere with the optimization process. AdamW, however, separates weight decay from the gradient step, ensuring regularization directly impacts the parameters without altering the adaptive learning mechanism.
This design leads to more precise regularization, helping models generalize better, particularly in tasks that involve large and complex datasets. As a result, the two optimizers often have very different use cases.
Adam performs better in tasks where regularization is less critical or when computational efficiency is prioritized over-generalization. Examples include:
AdamW excels in scenarios where overfitting is a concern and model size is substantial. For example:
But why would anyone want to use AdamW over Adam? Simple. AdamW offers several key benefits that enhance its performance, particularly in complex modeling scenarios.
It addresses some of the limitations found in the Adam optimizer, thus making it more effective at optimization and contributing to improved model training and robustness.
Here are some more of the standout advantages:
AdamW's core strength lies in its approach to weight decay, which is decoupled from the adaptive gradient updates typical of Adam. This adjustment ensures regularization is applied directly to the model's weights, improving generalization without negatively impacting the learning rate dynamics.
The optimizer builds upon Adam's adaptive nature, maintaining the benefits of momentum and per-parameter learning rate adjustments. Applying weight decay independently addresses one of Adam’s key shortcomings: its tendency to affect gradient updates during regularization. This separation allows AdamW to maintain stable learning, even in complex and large-scale models, while keeping overfitting in check.
In the following sections, we’ll explore the theory behind weight decay and regularization and the mathematics that underpin AdamW’s optimization process.
L2 regularization is a technique used to prevent overfitting. It achieves this objective by adding a penalty term to the loss function, discouraging large weight values. This technique helps create simpler models that generalize better to new data.
In traditional optimizers, such as Adam, weight decay is applied as part of the gradient update, which inadvertently affects learning rates and can lead to suboptimal performance.
AdamW improves upon this by decoupling weight decay from the gradient computation. In other words, rather than applying weight decay during the gradient update, AdamW treats it as a separate step, applying it directly to the weights after the gradient update. This prevents weight decay from interfering with the optimization process, leading to more stable training and better generalization.
AdamW modifies the traditional Adam optimizer by changing how weight decay is applied. The core equations for AdamW can be represented as follows:
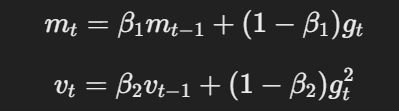
The equation for momentum and adaptive learning rate
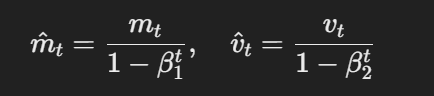
The formula for bias-corrected estimates
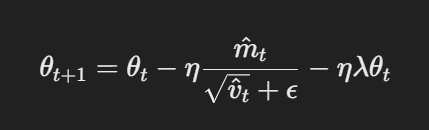
Parameter update with decoupled weight decay
Here, η is the learning rate, λ is the weight decay factor, and θt represents the parameters. This decoupled weight decay term λθt ensures that regularization is applied independently of the gradient update, which is the key difference from Adam.
Implementing AdamW in PyTorch is straightforward; this section provides a comprehensive guide to setting it up. Follow these steps to learn how to fine-tune models effectively with Adam Optimizer.
Note: this tutorial assumes you already have PyTorch installed. Refer to the Documentation for any guidance.
Step 1: Import the necessary libraries
import torch
import torch.nn as nn
import torch.optim as optim
Import torch.nn.functional as F
Step 2: Define the model
class SimpleCNN(nn.Module):
    def __init__(self):
        super(SimpleCNN, self).__init__()
        self.conv1 = nn.Conv2d(3, 32, kernel_size=3, stride=1, padding=1)
        self.pool = nn.MaxPool2d(kernel_size=2, stride=2, padding=0)
        self.conv2 = nn.Conv2d(32, 64, kernel_size=3, stride=1, padding=1)
        self.fc1 = nn.Linear(64 * 8 * 8, 128)
        self.fc2 = nn.Linear(128, 10)

    def forward(self, x):
        x = self.pool(F.relu(self.conv1(x)))
        x = self.pool(F.relu(self.conv2(x)))
        x = x.view(-1, 64 * 8 * 8)
        x = F.relu(self.fc1(x))
        x = self.fc2(x)
Step 3: Set the hyperparameters
learning_rate = 1e-4
weight_decay = 1e-2
num_epochs = 10 # number of epochs
Step 4: Initialize the AdamW optimizer and set up the loss function
optimizer = optim.AdamW(model.parameters(), lr=learning_rate, weight_decay=weight_decay)
criterion = nn.CrossEntropyLoss()
Voila!
Now, you are ready to start training your CNN model, and that’s what we will do in the next section.
Above, we defined the model, set the hyperparamters,initializied the optimizer (AdamW), and set up the loss function.
To train the model, we will need to import a few more modules;
from torch.utils.data import DataLoader # provides an iterable of the dataset
import torchvision
import torchvision.transforms as transforms
Next, define the dataset and dataloaders. For this example, we will use the CIFAR-10 dataset:
# Define transformations for the training set
transform = transforms.Compose([
    transforms.ToTensor(),
    transforms.Normalize((0.5, 0.5, 0.5), (0.5, 0.5, 0.5)),
])
# Load CIFAR-10 dataset
train_dataset = torchvision.datasets.CIFAR10(root='./data', train=True, download=True, transform=transform)
val_dataset = torchvision.datasets.CIFAR10(root='./data', train=False, download=True, transform=transform)
# Create data loaders
train_loader = DataLoader(train_dataset, batch_size=32, shuffle=True)
val_loader = DataLoader(val_dataset, batch_size=32, shuffle=False)
Since we’ve already defined our model, the next step is to implement the training loop to optimize the model using AdamW.
Here is how it looks:
for epoch in range(num_epochs):
    model.train()  # Set the model to training mode
    running_loss = 0.0
    for inputs, labels in train_loader:
        optimizer.zero_grad()  # Clear gradients
        outputs = model(inputs)  # Forward pass
        loss = criterion(outputs, labels)  # Calculate loss
        loss.backward()  # Backward pass
        optimizer.step()  # Update weights
        running_loss += loss.item()
    print(f'Epoch [{epoch+1}/{num_epochs}], Loss: {running_loss/len(train_loader):.4f}')
The last step is to validate the model’s performance on the validation dataset we created earlier.
Here’s the code:
model.eval()  # Set the model to evaluation mode
correct = 0
total = 0
with torch.no_grad():
    for inputs, labels in val_loader:
        outputs = model(inputs)  # Forward pass
        _, predicted = torch.max(outputs.data, 1)  # Get predicted class
        total += labels.size(0)  # Update total samples
        correct += (predicted == labels).sum().item()  # Update correct predictions
accuracy = 100 * correct / total
print(f'Validation Accuracy: {accuracy:.2f}%')
And there you have it.
You now know how to implement AdamW in PyTorch.
Okay, so we’ve established that AdamW gained popularity due to its more effective management of weight decay than its predecessor, Adam.
But what are some common use cases for this optimizer?
We will get into that in this section…
AdamW is particularly beneficial in training large models like BERT, GPT, and other transformer architectures. Such models typically have millions or even billions of parameters, which often means they demand efficient optimization algorithms that handle complex weight updates and generalization challenges.
AdamW has become the optimizer of choice in computer vision tasks involving CNNs and NLP tasks involving transformers. Its ability to prevent overfitting makes it ideal for tasks involving large datasets and complex architectures. The decoupling of weight decay means AdamW avoids the issues encountered by Adam in over-regularizing models.
Hyperparameter tuning is the process of selecting the best values for parameters that govern the training of a machine learning model but are not learned from the data itself. These parameters directly influence how the model optimizes and converges.
Proper tuning of these hyperparameters in AdamW is essential for achieving efficient training, avoiding overfitting, and ensuring the model generalizes well to unseen data.
In this section, we’ll explore how to fine-tune AdamW’s key hyperparameters for optimal performance.
The learning rate is a hyperparameter that controls how much to adjust the model weights with respect to the loss gradient during each training step. A higher learning rate speeds up training but may cause the model to overshoot optimal weights, while a lower rate allows for more fine-tuned adjustments but can make training slower or get stuck in local minima.
Weight decay, on the other hand, is a regularization technique used to prevent overfitting by penalizing large weights in the model. Namely, Weight decay adds a small penalty proportional to the size of the model weights during training, helping to reduce model complexity and improve generalization to new data.
To choose optimal learning rates and weight decay values for AdamW:
AdamW has emerged as one of the most effective optimizers in deep learning, especially for large-scale models. This is due to its ability to decouple weight decay from gradient updates. Namely, the design of AdamW improves regularization and helps models generalize better, particularly when dealing with complex architectures and extensive datasets.
As demonstrated in this tutorial, implementing AdamW in PyTorch is straightforward—it just requires a few adjustments from Adam. However, hyperparameter tuning remains a crucial step for maximizing the effectiveness of AdamW. Finding the right balance between learning rate and weight decay is essential for ensuring the optimizer works efficiently without overfitting or underfitting the model.
Now you know enough to implement AdamW in your own models. To continue your learning, check out some of these resources:
Top DataCamp Courses
Track
Course
Course
Tutorial
Bex Tuychiev
Tutorial
Satyam Tripathi
Tutorial
Bex Tuychiev
Tutorial
Bex Tuychiev
Tutorial
Arjun Sarkar
Tutorial
Sayak Paul