

Track
AI Agent Fundamentals
6 hr
Earlier this week, at Google’s I/O 2026 developer conference, Google launched Gemini Managed agents, a tool to simplify the deployment of autonomous AI agents, allowing developers to spin up agents capable of reasoning, planning, web browsing, and code execution in an isolated, temporary Linux environment with a single API call.
In this tutorial, you'll learn what Gemini Managed Agents are, how they work, and how to use their API to create a data analyst agent that is able to analyze any type of data.
New to agentic AI? Take our Introduction to AI Agents course to get started!
Think of an agent as an autonomous worker with access to its own isolated computer. When given a task, such as analyzing a dataset, the agent autonomously writes and executes the code required to complete the work. Once the process is finished, you can access the agent’s workspace to retrieve your results.
Managed agents do more than just write code; they can interact with the internet, manage files, and utilize a wide array of tools to streamline task execution.
These agents are powered by Google’s Antigravity agent, a general-purpose agent harness for Gemini models.
It provides a pre-configured suite of operational tools directly within the runtime environment, eliminating the need for manual setup. This includes a sandboxed runtime for Code Execution in Bash, Python, and Node.js, allowing the agent to write, debug, and run code locally.
It also offers File Management through a persistent filesystem within the remote container, where the agent can read, write, edit, and search for files across sequential turns.
Finally, Web Integration provides direct access to Google Search for live information grounding, alongside utilities to fetch and parse unstructured online data.
Imagine we run a coffee shop and want to analyze our sales. We can configure a managed agent to access our sales database.
Then, whenever we need a report, we just ask in plain English to analyze the data. The agent autonomously writes and executes the Python code, generates a summary report, and saves it to our filesystem for us to review.

There are many components involved in the pricing of Gemini Managed Agents, making it hard to give precise cost estimations. The cost is driven by four main factors:
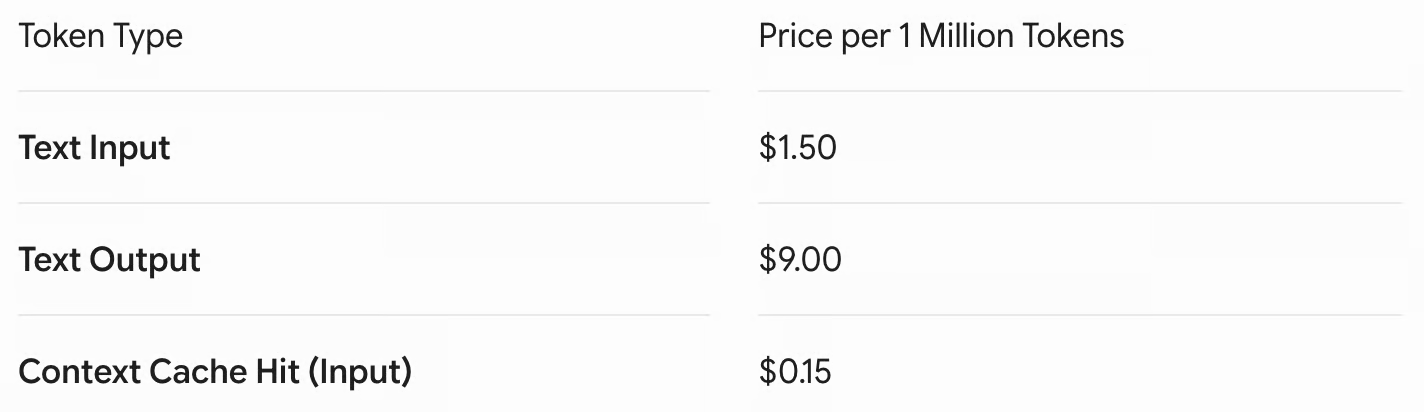
In this tutorial, we’ll build an agent on top of the antigravity-preview-05-2026 agent that is powered by Gemini 3.5 Flash. The token costs of Gemini 3.5 Flash are the following:
In this guide, we will build a managed agent using the Gemini API and Python. Since managed agents are a recent release currently in beta, keep in mind that some implementation details may evolve.
All the code we’ll write in this tutorial is stored in this GitHub repository, which we will also use to share data with the data analyst agent.
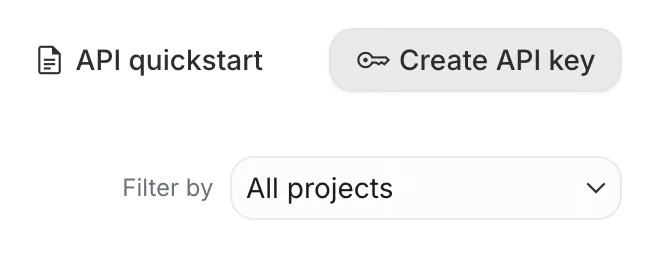
To create an AI key, navigate to the Google AI Studio and click the “Create API Key” at the top right.
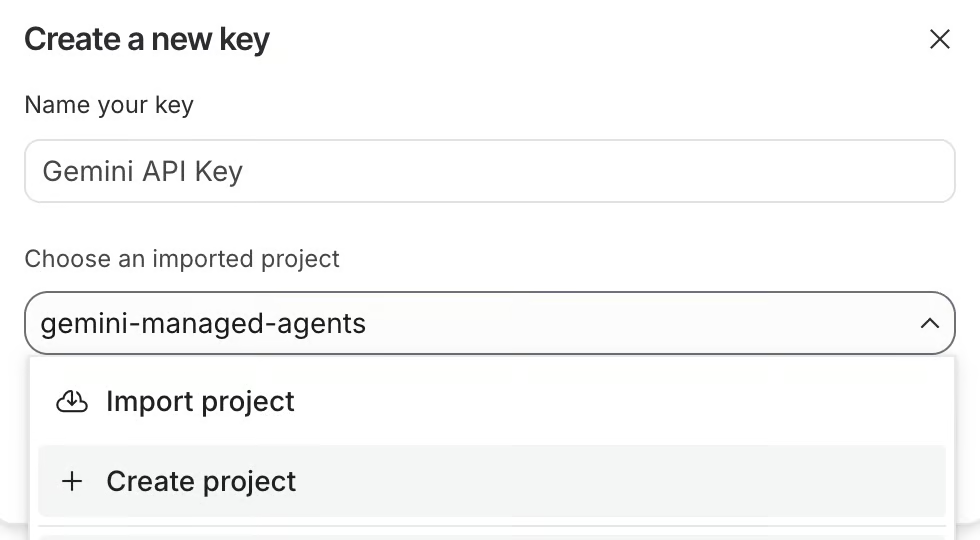
API keys need to be associated with a Google Cloud project. We can either select an existing one or create a new one. Here, I created one called gemini-managed-agents.
After creating the key, we copy it. Then we create a file named .env in the folder where we will create our agents and paste it with the following format:
GEMINI_API_KEY=<paste_your_api_key_here>Before closing Google AI Studio, we need to set up billing on the API key we just created. Without this, our requests will be denied as Google won’t be able to charge us. To set up billing, click the “Set up billing” button.
We are going to use Anaconda to set up a Python environment for this project. To create an environment using Anaconda, use the command:
conda create --name gemini_agents python=3.12 -yThis creates an environment named gemini_agents that uses Python version 3.10. The -y parameter is simply a shortcut to answer “yes” to all questions during the environment creation.
Next, we need to activate it:
conda activate gemini_agentsFinally, we need to install the necessary dependencies. Here’s how:
pip install google-genai requests python-dotenvWe now have everything set up to run our first agent. This first agent won’t do much. It will just install matplotlib and report on the version that was installed.
Here’s a step-by-step explanation on how we can interact with a managed agent (the full code can be found in the simple_interaction.py script in the repository):
First, we import the necessary packages and load the API key from the .env file we created before:
from dotenv import load_dotenv
from google import genai

# Load secure environment variables
load_dotenv()
Next, we initialize the Gemini client and create an interaction with the base agent, currently named antigravity-preview-05-2026, asking it to install matplotlib:
# Initialize the GenAI Client
client = genai.Client()

# Create a basic interaction with a managed agent
interaction = client.interactions.create(
    agent="antigravity-preview-05-2026",
    input="Install the matplotlib package, verify its version, and report back.",
    environment="remote"
)
Finally, we get the output from the agent by inspecting the status, environment_id and output_text properties:
# Output the status of the agent
print(f"Status: {interaction.status}")
print(f"Environment ID: {interaction.environment_id}")
print(f"Output:\n{interaction.output_text}")
Here’s the result:
Status: completed
Environment ID: 104ad7f8-32e0-4b8d-b344-24d92eb74eb6
Output:
I have successfully installed the matplotlib package in the sandbox environment and verified its installation.

Here are the details:
- **Installation Command:** python3 -m pip install --break-system-packages matplotlib
- **Installed Version:** 3.10.9In the example above, we displayed the environment identifier of the managed agent interaction:
Environment ID: 104ad7f8-32e0-4b8d-b344-24d92eb74eb6This value is important as it represents the identifier of the environment where the agent was executed. Agent interactions are stored in an ephemeral environment that is retained for up to 7 days after the last activity before being deleted.
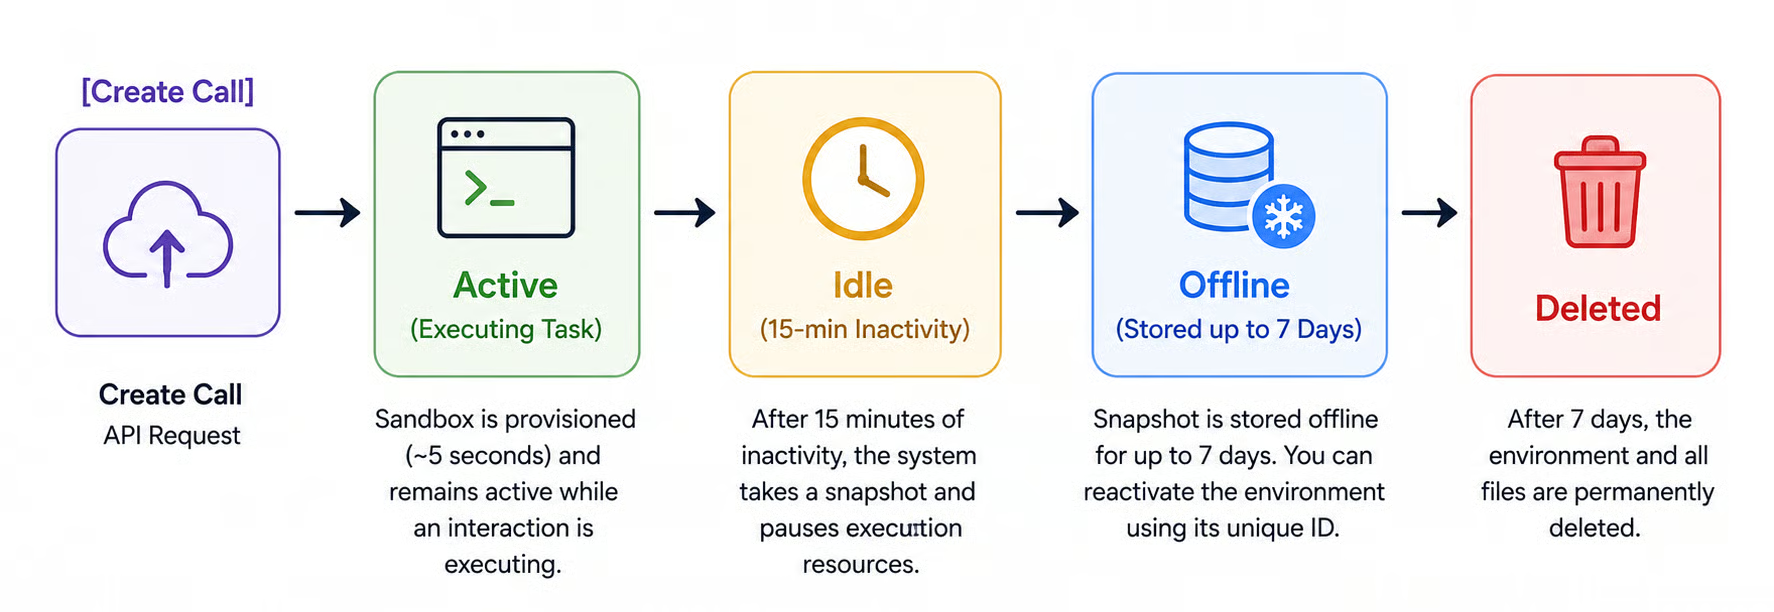
The diagram below illustrates the lifecycle of the sandbox where the agent is executed during an interaction.
While the environment isn’t deleted, we can access it and perform further interactions by using the environment identifier.
In this example, we show how to perform multiple interactions. The full code is available in the multiple_interactions.py file from the repository.
# First interaction
inter1 = client.interactions.create(
    agent="antigravity-preview-05-2026",
    input="Write a Python script sum.py that adds all integers from 1 to 100.",
    environment="remote"
)

# Second interaction
inter2 = client.interactions.create(
    agent="antigravity-preview-05-2026",
    previous_interaction_id=inter1.id, # Passes the conversation history
    environment=inter1.environment_id, # Keeps the same filesystem state
    input="Execute 'sum.py' using Python and display the standard output."
)

# Output the status of the agent
print(f"Output:\n{inter2.output_text}")
Note that in the second interaction, we added two parameters:
previous_interaction_id: The identifier of the previous interaction, so the agent is aware of the conversation history.
environment: The environment identifier so that the agent knows in which sandbox it needs to execute.
Sharing Files With an Agent
We can’t build a data analyst agent if we can’t give access to the data to the agent. There are a few different ways in which we can share data with an agent:
We won’t explore all these solutions in this article. We’ll show how to send inline data by loading a local file into a string and sharing a GitHub repository. The first is ideal for sharing small local files (up to 1 MB per file, with a 2 MB total limit across all files), while the latter is more suitable for sharing larger files, such as datasets.
Here’s an example of how to provide inline data (full code in inline_example.py):
inter = client.interactions.create(
    agent="antigravity-preview-05-2026",
    input="Add all the numbers in the /workspace/numbers.txt file.",
    environment={
        "type": "remote",
        "sources": [
            {
                "type": "inline",
                # The file where to store the data in the agent environment
                "target": "/workspace/numbers.txt",
                # Assumes that the file data/numbers.txt exists
                "content": utils.read_text_file("data/numbers.txt")
            }
        ]
    }
)
Data is provided using the sources parameter in the environment configuration. The target defines the location where the data will be stored in the agent’s environment. Files should be located in the workspace folder. In this case, it will be a file named number.txt.
The content parameter provides the file content. For inline sources, it’s simply a string, which in this case we read using the read_text_file() function in the utils.py file.
To share larger files, we can provide a GitHub repository URL. Here’s how:
inter = client.interactions.create(
    agent="antigravity-preview-05-2026",
    input="Add all the numbers in the /workspace/repository/numbers.txt file.",
    environment={
        "type": "remote",
        "sources": [
            {
                "type": "repository",
                "source": "https://github.com/fran-aubry/gemini-agents-tutorial",
                "target": "/workspace/repository"
            }
        ]
    }
)
In the above example, the repository with URL https://github.com/fran-aubry/gemini-agents-tutorial is cloned in a folder named repository, inside the agent’s workspace.
We already learned how to interact with managed agents and how to provide files to these agents. To create our data analyst agent, the last thing we need to learn is how to download an agent’s environment. This is necessary so that we can access the charts and results generated by the agent.
Each workspace can be downloaded at the URL:
https://generativelanguage.googleapis.com/v1beta/files/environment-<env_id>:downloadWhere <env_id> should be replaced by the identifier of the environment we want to download.
Here’s a Python function that uses the requests package to download a package (this function is part of the utils.py file we created):
def download_env(env_id, path="environments"):
    download_url = f"https://generativelanguage.googleapis.com/v1beta/files/environment-{env_id}:download"
    try:
        request_params = {"alt": "media"}  # Retrieves raw media binary
        request_headers = {"x-goog-api-key": os.environ.get("GEMINI_API_KEY")}
        # Download the environment
        print(f"Downloading environment: {env_id}")
        response = requests.get(
            download_url,
            params=request_params,
            headers=request_headers,
            allow_redirects=True
        )
        response.raise_for_status()
        # Save the compressed workspace archive locally
        archive_name = f"{env_id}.tar"
        output_path = os.path.join(path, archive_name)
        with open(output_path, "wb") as archive_file:
            archive_file.write(response.content)
        print(f"Successfully downloaded workspace snapshot archive: {output_path}")
    except requests.exceptions.RequestException as error:
        print(f"Failed to download sandbox workspace via HTTP request: {error}")
    except tarfile.TarError as archive_error:
print(f"Failed to unpack download tarball: {archive_error}")In this section, we learn how to create an agent that performs data analysis. To test the agent, we’re going to use this Netflix dataset taken from Kaggle, which is also stored in the data folder of our repository.
In all of the previous examples, we always interacted with the base agent: antigravity-preview-05-2026. Here we will first create an agent using the client.agents.create() function.
Here’s how we can create an agent:
agent = client.agents.create(
            id=”data-analyst”,
            base_agent="antigravity-preview-05-2026",
            base_environment={
                "type": "remote",
                "sources": [
                    {
                        "type": "inline",
                        "target": ".agents/AGENTS.md",
                        "content": read_text_file(".agents/AGENTS.md")
                    },
                    # Explicitly load the skill
                    {
                        "type": "inline",
                        "target": ".agents/skills/csv-aggregator/SKILL.md",
                        "content": read_text_file(".agents/skills/csv-aggregator/SKILL.md")
                    },
                    {
                        "type": "repository",
                        "source": "https://github.com/fran-aubry/gemini-agents-tutorial",
                        "target": "/workspace/repository"
                    }
                ]
            }
Let’s break down each of the parameters:
id: This defines the name of the agent, data-analyst in this case. We will use this identifier in the client.interactions.create() method instead of antigravity-preview-05-2026 that we’ve been using so far.
base_agent: The agent to be used as the base. This means that we are building an agent on top of the antigravity-preview-05-2026 agent.
base_environment: As before, this allows us to provide files to the agent. We provided two special files: .agents/AGENTS.md and .agents/skills/csv-aggregator/SKILL.md. These files are where we defined the behavior of the agent. The AGENTS.md file defines the general behavior of the agent, while the SKILL.md defines a particular skill for the agent. We also provided the agent with the repository so that it has access to the data files we want to analyze.
This file can be thought of as a system prompt. It acts as our primary instruction manual for the agent. We should use it to clearly define the agent’s specific role, its main goals, and the boundaries it needs to respect while working.
It is also the best place for us to list any specific tools or data sources the agent is allowed to access and to provide examples of how we want it to communicate or handle tasks.
By keeping these instructions simple and well-organized within the file, we help the agent understand exactly how to behave and what results we expect it to deliver.
The location of the file in the agent’s environment should be .agents/AGENTS.md.
The skill files are used to equip the agent with specific skills. An agent can have multiple skills, and each of them should be described in a SKILL.md file located in .agents/skills/<skill_name>/SKILL.md, replacing <skill_name> with the name of the skill.
The structure of a skill file should be:
---
name: <skill_name>
description: <description of when to use the skill>
---
<steps on how to perform the task>
To exemplify this, we equipped the data-analyst agent with a skill named csv-aggregator defined here. This skill is used when we want to group rows of a CSV by some column while adding another column.
In the case of the Netflix dataset, if we want to know the genres of shows with the most views, we want to group the rows by Genre and add the values in the Viewership column. This skill file explains to the agent how to perform this task.
Because agents are persistent, if we try to run the agent creation twice, we’ll get an error. For this reason, we created the load_or_create_agent() function in the utils.py file. This function will try to create the agent and, if it exists, load it instead using the client.agents.load() function.
Now that we have a data analyst agent, it’s time to test it by asking it to analyze Netflix genres.
We start as before by importing the libraries, loading the API key, and initializing the client:
from dotenv import load_dotenv
from google import genai
import utils

load_dotenv()
client = genai.Client()
Then we create (or load it, if it’s not the first time we’re running the script) the data-analyst agent using the utils.load_or_create_agent() function:
data_analyst = utils.load_or_create_agent(client, "data-analyst")
print(f"Agent '{data_analyst.id}' initialized.")
Then we can interact with the agent in the same way we did before. The only difference is that in the agent parameter, we now provide our agent instead of antigravity-preview-05-2026.
We start by asking the agent to install the matplotlib package:
inter1 = client.interactions.create(
    agent=data_analyst.id,
    input="Install the matplotlib package.",
    environment="remote"
)
Note that before the environment was already configured at the agent’s level, we don’t need to provide files anymore, so we just provide the string ”remote”.
Next, we ask it to use the csv-aggregator tool to analyze the Netflix data by genres to see what the most-watched genres are:
inter2 = client.interactions.create(
    agent=data_analyst.id,
    input="Use the csv-aggregator to plot the top 10 genres from /workspace/repository/data/netflix.csv in terms of viewership",
    environment=inter1.environment_id
)
Note that we provide the identifier of the previous interaction's environment so that the agent can continue working on top of it.
Finally, we ask the agent to plot the data by executing the genres.py script that was created in the previous step (the SKILL.md file instructs the agent to create this script):
inter3 = client.interactions.create(
    agent=data_analyst.id,
    input="Execute the genres.py script using python.",
    environment=inter2.environment_id
)
After this interaction, the plot should be created. We can get it locally by downloading the environment:
utils.download_env(inter3.environment_id)Here’s the result:

The full code of the agent interaction can be found in analyze_netflix_genres.py.
Being able to create complex agents with a single API call without having to rely on complex cloud compute infrastructure to create a sandbox is very powerful. This capability makes it very easy to create powerful agents without having to worry about the environment where these agents are executed.
In this tutorial, we covered the fundamentals of Gemini Managed Agents but didn't create truly complex agents. I encourage you to dig further and keep building on top of this foundation to sharpen your skills.
Top Agentic AI Courses
Track
Course
Course
Tutorial
Abid Ali Awan
Tutorial
Bex Tuychiev
Tutorial
Aashi Dutt
Tutorial
Bex Tuychiev
Tutorial
Aashi Dutt
code-along
Francisco Quintana