Track
Snowflake Foundations
7 hr
Snowflake is a cloud-native data platform widely used by data professionals due to its scalability, performance, and simplicity, making it ideal for everything from analytics to data science. However, to get the most out of the tool, mastering Snowflake data ingestion is essential. If you're new to the platform, I suggest starting with this Snowflake Tutorial for Beginners to familiarize yourself with its architecture first.
Efficient and properly developed data ingestion pipelines are critical for ensuring data is available and reliable for downstream use cases. Whether dealing with periodic batch updates or real-time data streams, choosing the right ingestion method and tools directly impacts the performance and maintainability of your data pipeline.
Before diving into the details, it's essential to understand some key concepts about data flow.:
Data ingestion refers to the process of moving data from various sources into a database for storage, processing, and analysis. Whether your data originates from cloud storage, databases, applications, or event streams, ingestion acts as the first step in the data lifecycle within Snowflake.
Snowflake’s unique architecture separates compute and storage. This allows for a simplified process of ingesting data without impacting analytical performance. Ingestion can target either internal stages (within Snowflake) or external stages (like S3 or Azure Blob Storage), depending on the data source and use case. For more insight, this article does a deep dive into Snowflake Architecture.
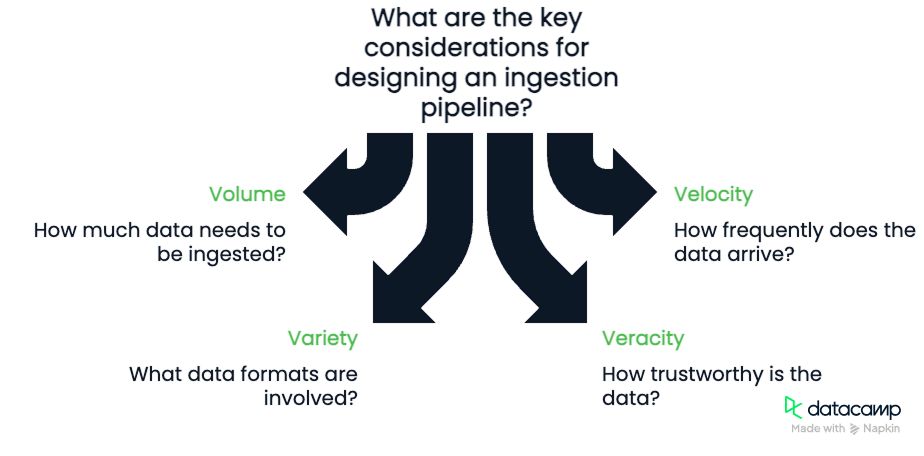
When designing an ingestion pipeline, keep in mind the Four Vs of data:
These four components are important to consider. Volume and velocity will require us to consider the bandwidth available to our pipeline and its ability to process data. Variety and veracity will require us to develop robust and flexible pipelines that are capable of quality–checking data as it flows.
Let’s discuss some of the data ingestion methods we have available in Snowflake. Some methods involve using a command like COPY INTO, Snowpipe, or Snowpipe streaming.
Snowflake’s most fundamental ingestion method is the COPY INTO command. COPY INTO loads data from files stored in external stages into Snowflake tables. It's ideal for bulk-loading historical data or regular batch updates.
You can load data from Amazon S3, Azure Blob Storage, or Google Cloud Storage by creating an external stage that connects those cloud services to Snowflake. With the correct file path and credentials, Snowflake reads and processes the files efficiently.
COPY INTO supports multiple formats: CSV, JSON, Avro, ORC, and Parquet. As part of creating the connector, there are various format type options. The list is quite extensive, but often, there are settings for defining things like the format of dates, delimiters (commas or other values), encoding, null options, and so on. I highly recommend reading the documentation on the Snowflake website for full details.
You can configure the ON_ERROR setting to skip problematic rows, abort the load, or log errors. Combine this with the VALIDATION_MODE to track and return errors. You can use metadata tables like LOAD_HISTORY, which also track the number of errors that occur during a load.
Snowpipe enables continuous ingestion by automatically detecting and loading new files as they appear in a designated stage. This functionality is built into the Snowflake platform. It offers automatic file integration, event-based triggers, and monitoring.
Snowpipe can be configured to auto-ingest files through integration with cloud storage notifications, reducing the need for manual execution. For example, Amazon S3 has event notifications that alert users to changes to a particular bucket.
Snowpipe can be connected to a user who sees these notifications. When an event notification is received by that user, Snowpipe will be triggered to start the process of ingesting data.
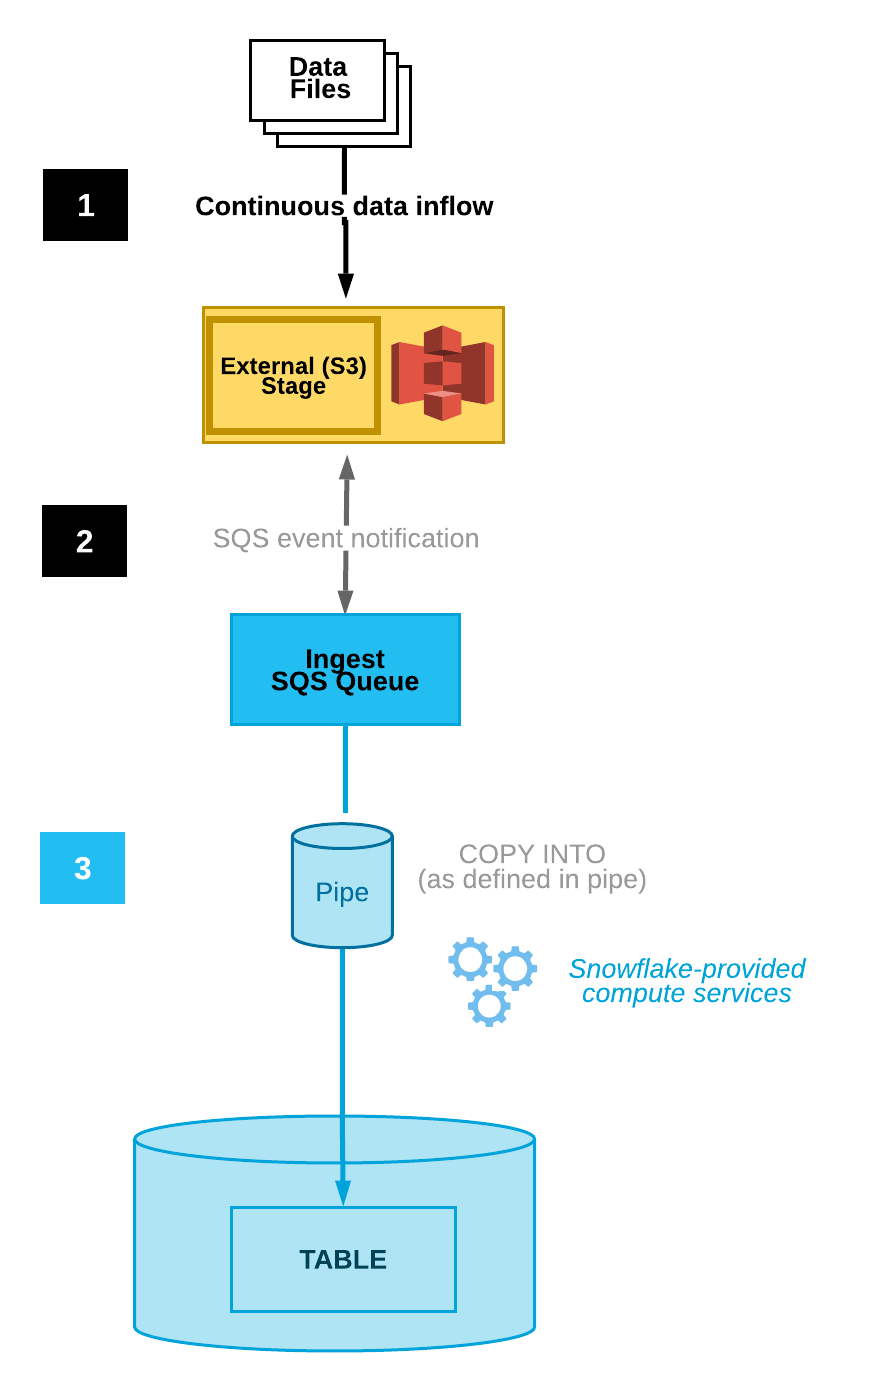
Diagram of Automated Data Ingestion (Snowflake Documentation)
Snowflake provides a few different monitoring and error management tools. The metadata table PIPE_USAGE_HISTORYallows users to view data load history such as bytes and files ingested. The table VALIDATE_PIPE_LOAD will provide information about errors that occur.
Within Snowpipe, there is the ON_ERROR setting, which allows us to skip files and send notifications that alert us to the errors.
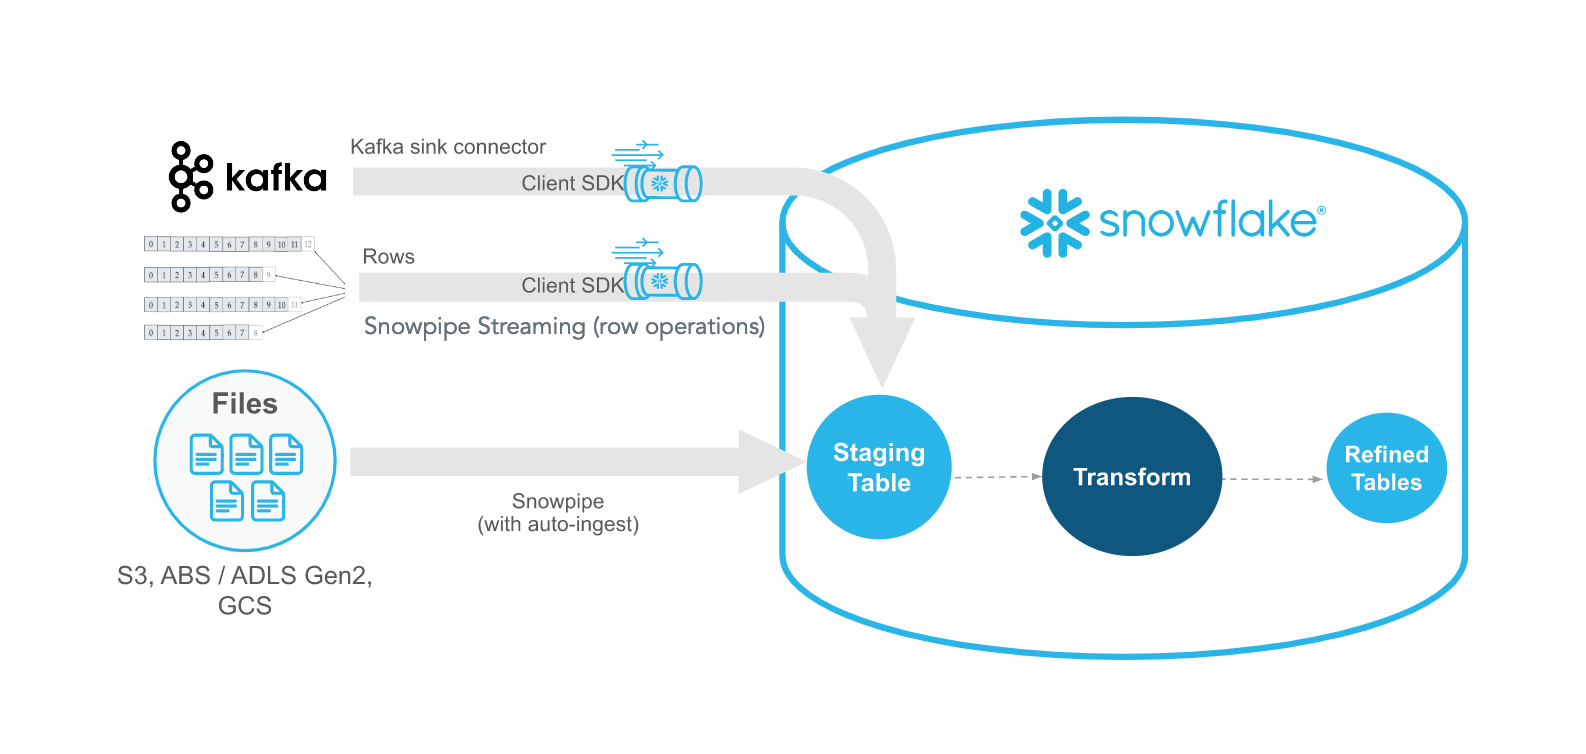
Snowpipe Streaming is Snowflake’s newest method for ingesting real-time streaming data with sub-second latency. Unlike Snowpipe, which reacts to files, Snowpipe Streaming ingests data row-by-row via an API. These methods complement each other, offering flexibility and efficiency.
The Snowflake Ingest SDK allows developers to write Java or Scala applications that push data directly into Snowflake using a memory-resident queue. These applications are designed to accept row level data from places like Apache Kafka topics and other streaming connectors.
Perfect for telemetry, clickstream, or IoT data, Snowpipe Streaming ensures near real-time availability of data with minimal storage overhead and high throughput. This ingestion method is perfect when you need data that is high velocity in near real-time.
As part of ingesting data into Snowflake using things like Snowpipe and Snowpipe Streaming, there are some tools that are needed to connect data pipelines properly. One major tool is Kafka which is commonly used as a communication tool between data sources and Snowflake. Alternatively, there are some third-party tools such as Fivetran and Matillion which can also manage ETL into Snowflake.
Snowflake offers a Kafka connector that reads from Kafka topics and writes messages directly to Snowflake storage. Data gets published to Kafka, and using Snowpipe or Snowpipe Streaming, Snowflake can pick up on this published data and transfer it to internal storage. This is an extremely flexible way of transferring data. I recommend this Introduction to Apache Kafka course, which covers Kafka's power and scalability.
You'll need to configure a Kafka Connect worker and set up parameters such as topic names, buffer sizes, and Snowflake credentials in order to properly set up the integration.
These configurations also allow us to set data types and metadata information we would like to track. The two main ways of defining these connections is either through Confluent (a third-party managed version of Apache Kafka) or manually using the open-source Apache Kafka JDK.
Regardless of which you choose, follow these best practices:
Example of using Kafka with Snowflake SDK for streaming data (Snowflake Documentation)
In addition to Kafka, there are third-party ETL platforms like Fivetran, Matillion, and Talend provide managed ETL/ELT solutions for ingesting and transforming data from hundreds of sources into Snowflake. These third-party platforms often offer low-code and simplified SaaS solutions to data management, but choosing these platforms have their own downsides.
Some aspects need careful consideration when using third-party ETL tools, such as cost and flexibility. While they are definitely simplified approaches to ingesting data into Snowflake, there may be some restrictions that will ultimately make them more challenging to use.
Knowing these constraints, when deciding on the right tool, you should consider:
While designing a pipeline is hard work, there are some general concepts and best practices you can follow to make your life easier. These are aimed to improve efficiency and minimize costs.
Minimize the size of your files to lower the cost of data storage using file formats such as gzip or Parquet. Additionally, when the data is transferred, it is often best to favor fewer, larger files instead of many smaller ones for your copy process. Singular large files have less network overhead than trying to transfer multiple smaller files. Finally, schedule large batch jobs during off-peak hours if compute and network costs are a concern.
Finally, make sure to handle schema evolution in your pipelines. Some data types such as Parquet naturally allow for schema evolution. This means that while the data schema may change from the data source, it does not impact historical data and maintains forward/backward compatibility for the data.
One more thing to consider during your data ingestion pipeline is ensuring data quality and observability. One smart way of doing so is staging the data before integrating it into your final database storage. You may want to check hashes and metadata to ensure data accuracy and lack of corruption. Also, instead of allowing users direct access to the data itself, building views that may combine disparate data sources may provide a better user experience.
Finally, you want to constantly monitor and log your data pipeline’s health. Set up dashboards using Snowflake's metadata views or external observability tools like DataDog or Monte Carlo to track ingestion success, latency, and failures.
Here we will cover some high-level examples of how you may build out pipelines in Snowflake. Note, your exact steps may be different depending on how your data administrator has configured your Snowflake environment. Make sure to follow your organization’s best practices!
First, some prerequisites. You will need a Snowflake account which allows you to manage the database. Some common access permissions you’ll need is the ability to create schema. Second, you must make sure the server you are on has access to the external cloud storage bucket or internal storage where you are storing the data. Speak with your database administrator about those.
COPY INTOLet’s go over a simple example of loading a CSV file into your Snowflake database.
1. Prepare and upload data Format your files (e.g., CSV) and upload them to your cloud storage bucket.
2. Create stage and file format
/* specify the file format */CREATE FILE FORMAT my_csv_format TYPE = 'CSV'

/* this will help if there are double quotes or apostrophes in your data */

FIELD_OPTIONALLY_ENCLOSED_BY='"';

/* Stage the data using the credentials you have */

CREATE STAGE my_stage URL='s3://my-bucket/data/' CREDENTIALS=(AWS_KEY_ID='...' AWS_SECRET_KEY='...');
3. Run COPY INTO and Verify
COPY INTO my_table FROM @my_stage FILE_FORMAT = (FORMAT_NAME = 'my_csv_format');SELECT * FROM my_table;Creating an automated ingestion using Snowpipe can be pretty simple!
1. Create Snowpipe
CREATE PIPE my_pipe

AUTO_INGEST = TRUE

   AWS_SNS_TOPIC = 'arn:aws:sns:us-west-2:001234567890:s3_mybucket'

	AS

COPY INTO my_table

FROM @my_stage

 FILE_FORMAT = (TYPE = ‘CSV’);
2. Configure cloud storage events Set up S3 bucket notification to trigger the pipe using SNS/SQS. For more details, I would follow this guide on AWS SNS from Datacamp.
3. Monitor ingestion
Make sure to query the metadata table SNOWPIPE_EXECUTION_HISTORY to view pipe activity.
Setting up Snowpipe Streaming can be quite intense and is somewhat more detailed than we can cover here. I will cover some of the fundamental steps, but I mostly recommend reading the examples from the Snowflake Streaming documentation for how to build the client SDK.
profile.json file. The required properties involve authorization credentials, URL for Snowflake, and the user. This allows the SDK to connect to your Snowflake server. Write out the rest of your Java script to handle the data coming, including the insertRows method.Snowflake offers a robust and flexible suite of data ingestion methods—from traditional batch loads to real-time streaming. By understanding the tools and techniques available, data teams can design pipelines that are reliable, performant, and cost-effective. Whether you’re just getting started or optimizing an enterprise-scale solution, mastering Snowflake data ingestion is a critical step in building a modern data stack. If you would like to learn more about Snowflake, I highly recommend the following resources:
Top Snowflake Courses
Track
Course
Course
blog
Bex Tuychiev
14 min
blog
Bex Tuychiev
12 min
blog
Tim Lu
12 min
Tutorial
Bex Tuychiev
Tutorial
Bex Tuychiev
Tutorial
Bex Tuychiev