Course
Building Agentic Workflows with LlamaIndex
2 hr
1.2K
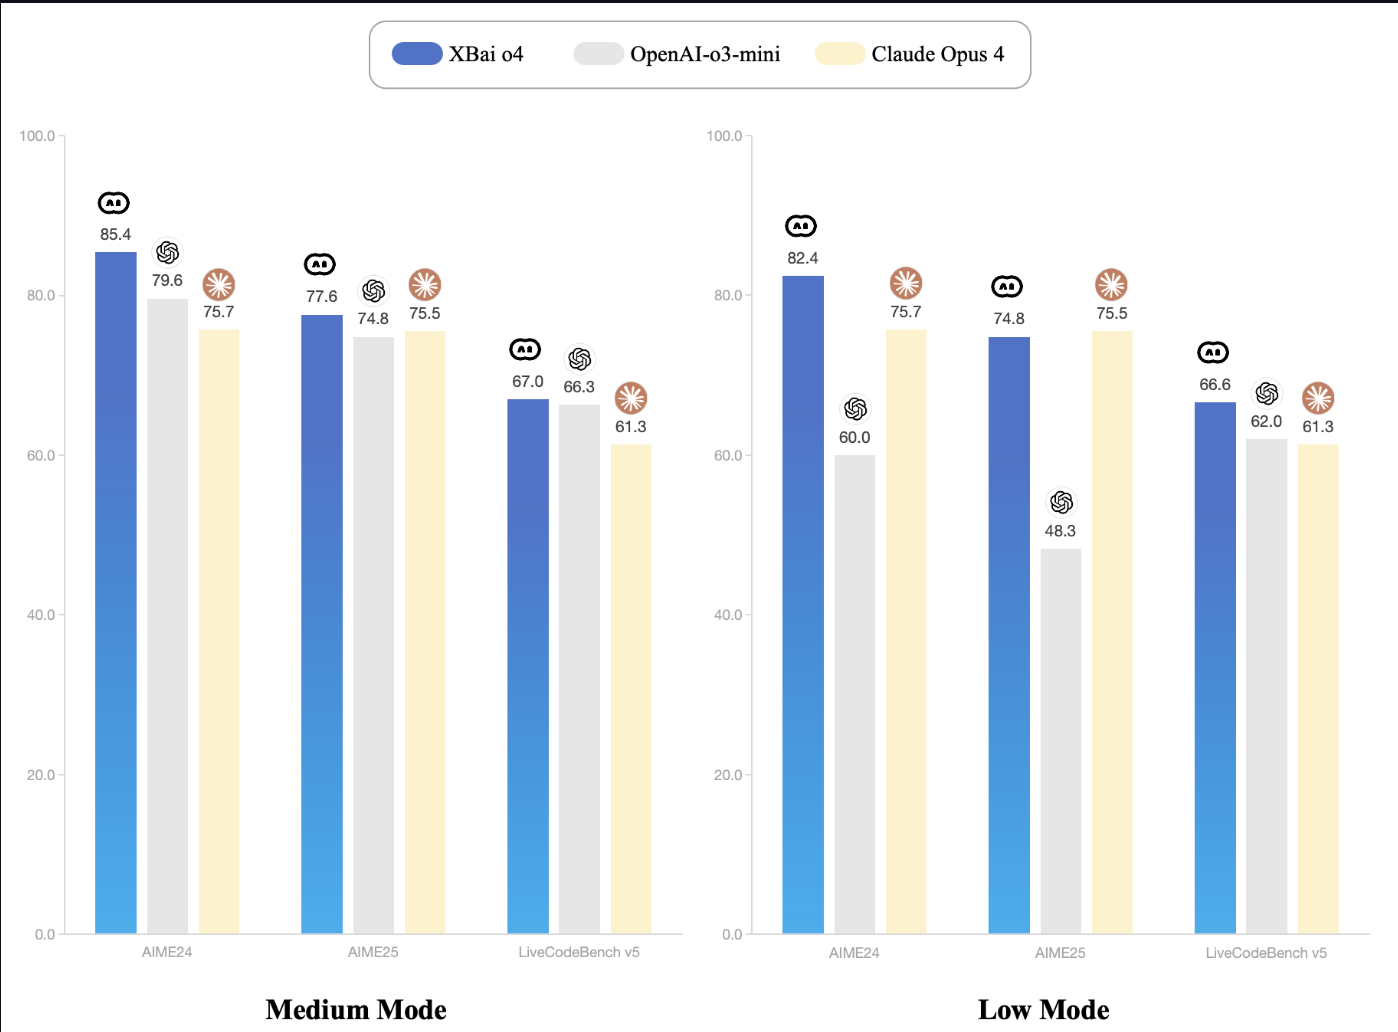
MetaStone AI recently released XBai-o4, an open-source reasoning model that introduces parallel test-time scaling and reflective generative architecture. With 32.8 billion parameters and an integrated self-evaluation head, XBai o4 outperforms OpenAI’s o3-mini (medium mode) across core mathematical reasoning benchmarks while running locally.
My focus in this blog will be on XBai o4's unique reflective reasoning capabilities, demonstrating how it generates and evaluates multiple solution trajectories for mathematical problems through a locally-deployed Streamlit interface powered by LM Studio.
In this tutorial, I'll explain step by step how to:
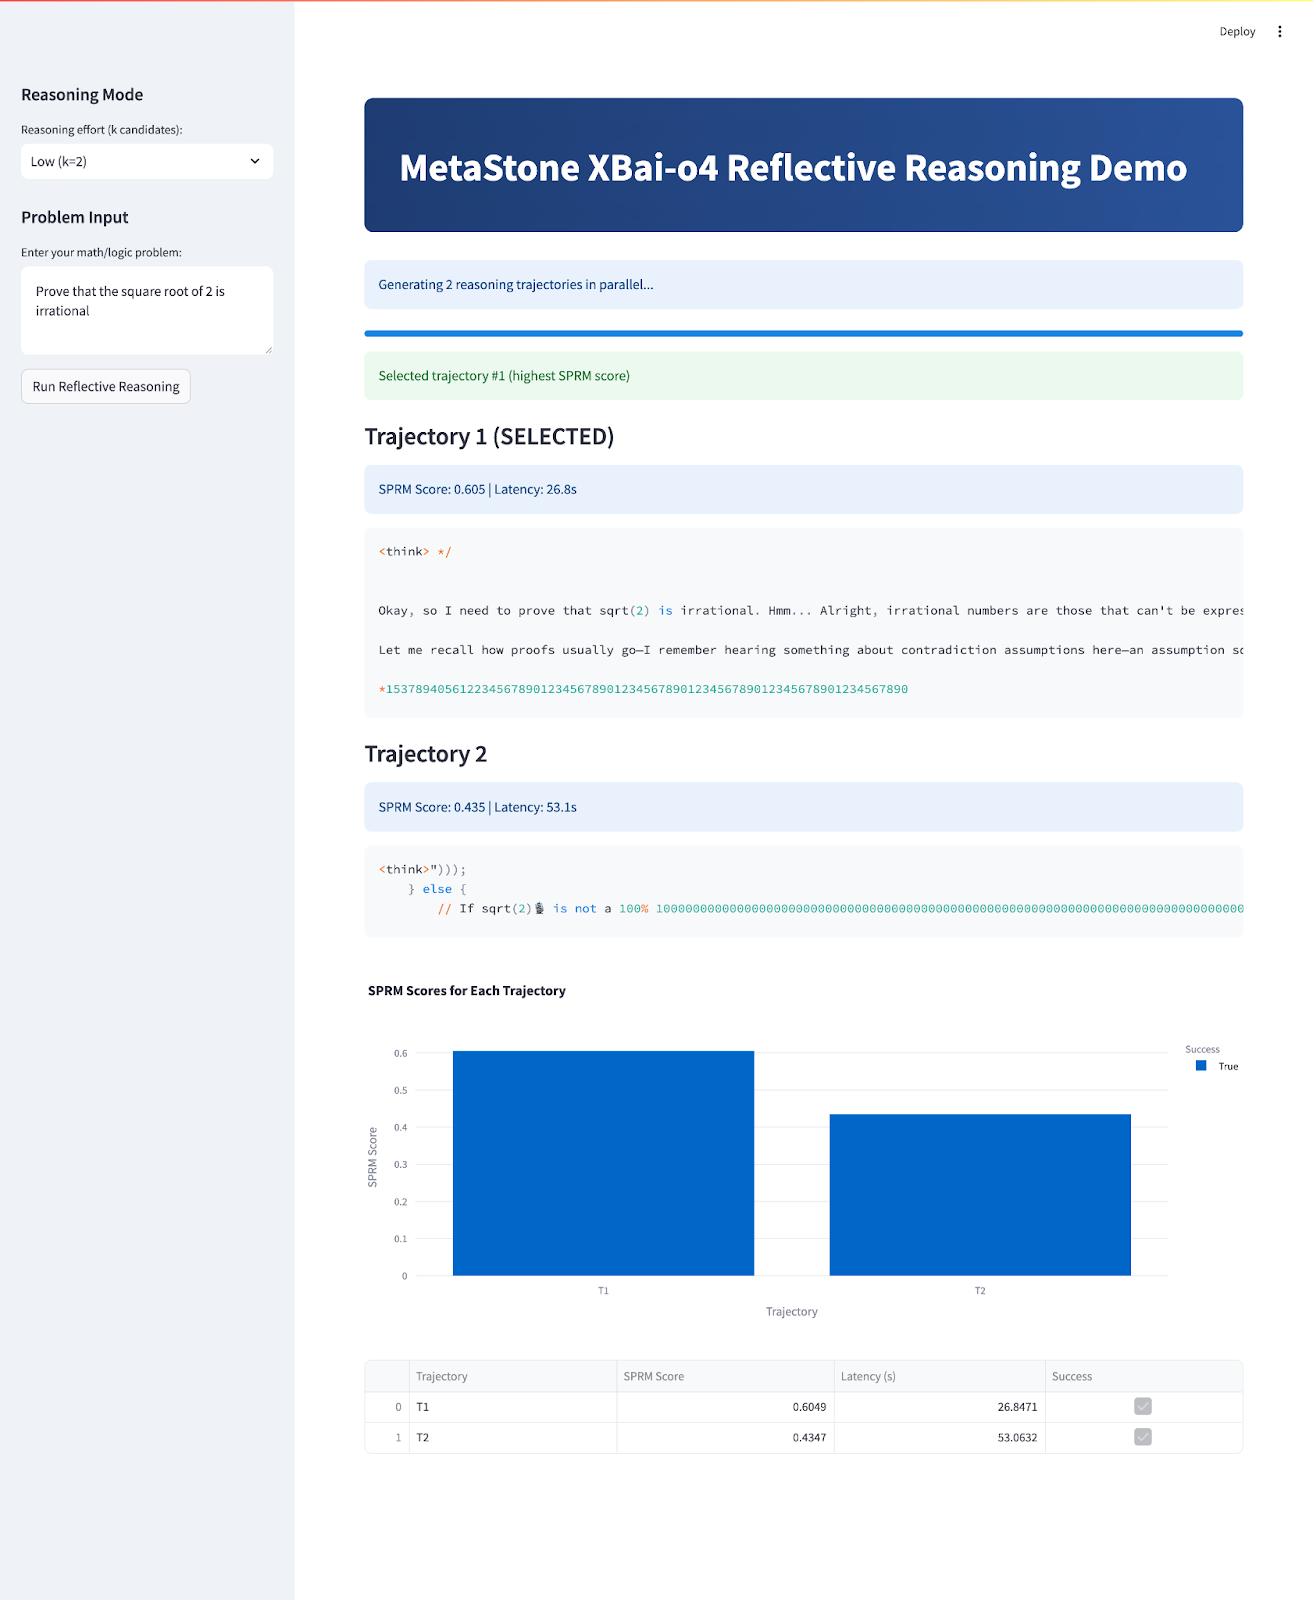
At the end, your app will look like this:
XBai-o4 is MetaStone AI’s fourth-generation open-source reasoning model, introducing a reflective generative architecture that tries to redefine how AI approaches complex problem-solving. Unlike traditional LLMs that treat answer generation and answer evaluation as two distinct processes, XBai o4 merges both into a unified model using a Shared Process Reward Model (SPRM). This design allows the model to generate, score, and select multiple reasoning paths in parallel.
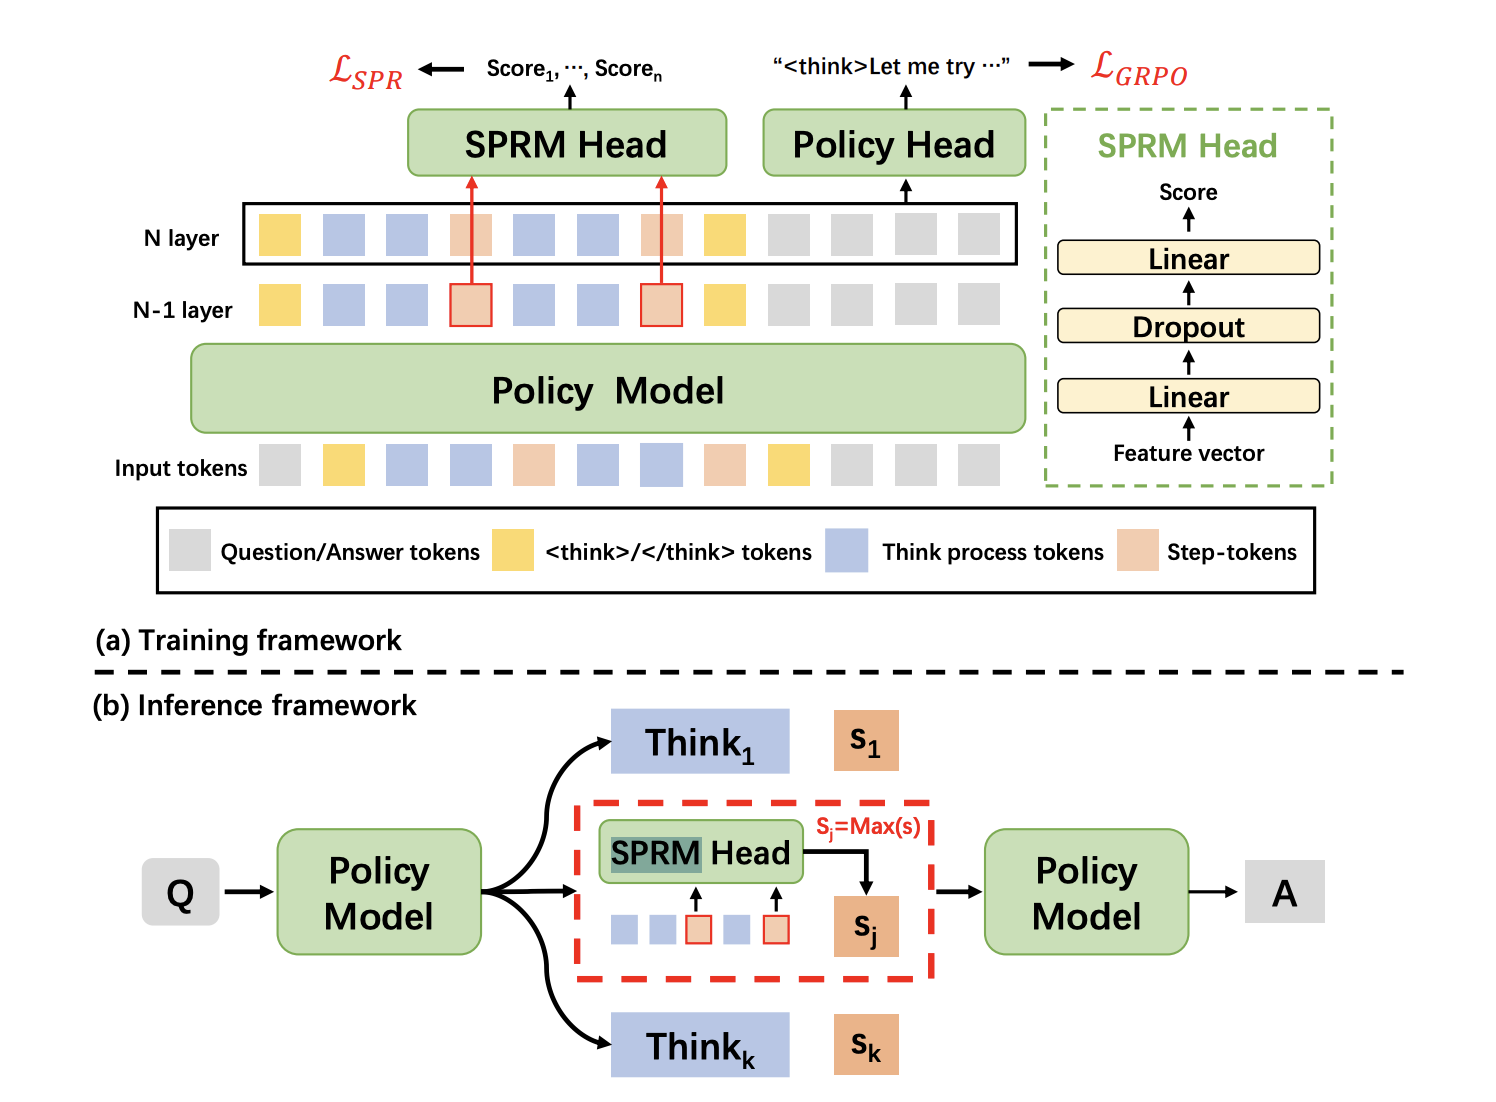
Source: SPRM Head
At its core, XBai o4 combines long chain-of-thought (Long-CoT) reinforcement learning and process reward learning into a single training pipeline. Here are some key innovations introduced in this model:
Source: XBai-O4 Documentation
You can run XBai o4 locally using LM Studio, which automatically uses your system’s GPU or Apple Silicon (Metal/MLX) acceleration when available (no manual setup required). For optimal performance and compatibility, I recommend using the GGUF quantized version of the model.
The GGUF (GPT-Generated Unified Format) standard enables highly efficient local inference by reducing the precision of model weights. In this project, we’ll use the Q3_K_S quantized variant, which is a popular choice for its excellent trade-off between quality and memory usage.
Q3_K_S format offers strong reasoning performance with minimal quality loss compared to full-precision models.Let’s walk through the step-by-step process of setting up the quantized GGUF model for efficient local inference using LM Studio.
LM Studio offers GGUF support and automatically selects the optimal inference backend for your hardware, whether that’s Metal, GPU, or CPU.
If you haven’t installed LM Studio yet, simply download it from lmstudio.ai and follow the installation instructions.
In LM Studio:
mradermacher/XBai-o4-GGUFXBai-o4.Q3_K_S.gguf variant (14.39 GB).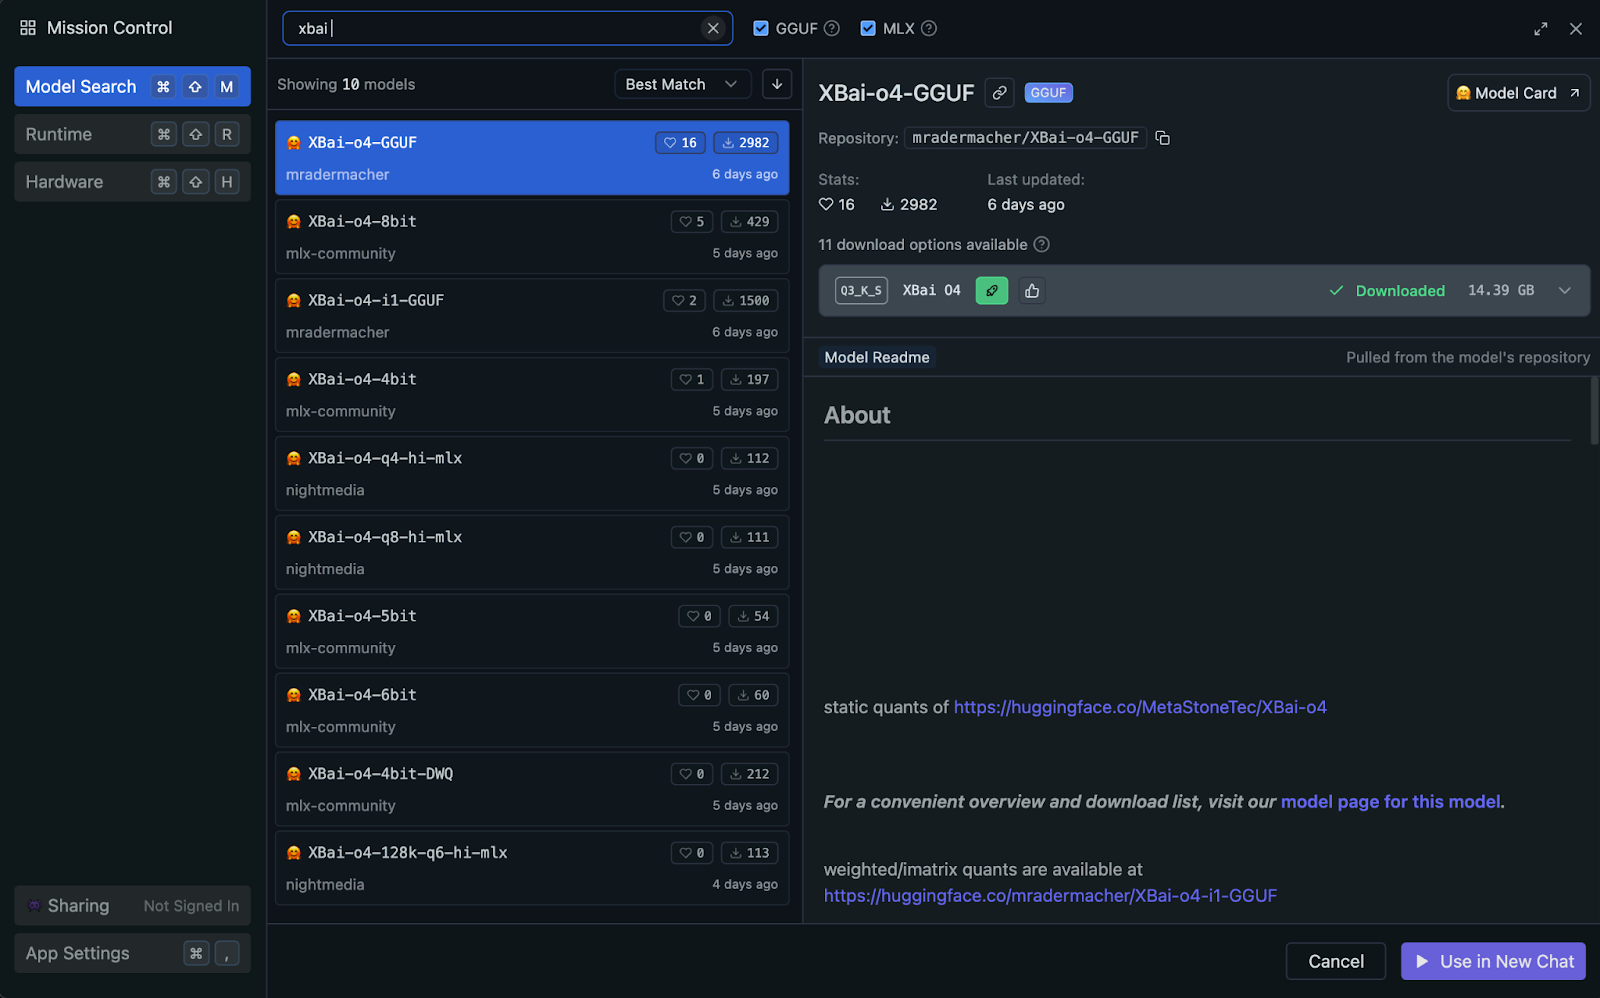
Once LM Studio is installed, we load and configure the XBai o4 model for local inference:
XBai-o4.Q3_K_S.gguf model from your downloaded models list.Once running, your system is ready for multi-trajectory reasoning with XBai o4.
We'll now build a Streamlit application that demonstrates XBai o4's reflective reasoning capabilities with real-time performance comparison.
Start by installing dependencies:
pip install streamlit plotly pandas numpy requestsThis command ensures you have all the core dependencies for UI, data handling, plotting, and API requests.
Next, import all required libraries and configure your Streamlit page layout and basic settings.
import streamlit as st
import time
import requests
import numpy as np
import pandas as pd
import plotly.express as px
from typing import List, Dict, Any
LM_STUDIO_URL = "http://localhost:1234/v1"   # change as per your server
REASONING_MODES = {"Low (k=2)": 2, "Medium (k=8)": 8, "High (k=32)": 8}
st.set_page_config(page_title="MetaStone-XBai-o4 Reflective Reasoning Demo", layout="wide")
st.markdown("""
<style>
    .main-header {
        background: linear-gradient(90deg, #1e3c72 0%, #2a5298 100%);

        border-radius: 10px;
        color: white;
        text-align: center;

    }
</style>
""", unsafe_allow_html=True)
This code block imports all the core libraries required for our demo, including Streamlit for the web UI, as well as other basic libraries such as time, requests, numpy, pandas, plotly.express, and typing tools.
It then sets the model API endpoint LM_STUDIO_URL so the app knows where to send requests, and defines reasoning modes (REASONING_MODES) so users can easily select how many solution branches to generate.
Finally, we use st.set_page_config() to configure the Streamlit UI with a custom title, wide layout, and a CSS-styled gradient header.
Note: The LM_STUDIO_URL is the LLM server base URL, which you can copy from LM Studio. It’s usually - "http://localhost:1234/v1" but it can vary. Also, choose reasoning modes according to your server's capability.
Now, let’s build out a set of helper functions that power the core “reflective reasoning” logic of our app. These functions make it easy to work with multiple trajectories, select the best solution, and score each answer.
This step introduces a simple helper function that automatically checks if our LM Studio server can handle multi-trajectory sampling. Some servers support the n parameter, which allows us to request several independent completions in one API call, thereby significantly speeding up the process.
def supports_n_param():
    payload = {
        "messages": [{"role": "user", "content": "What is 1+1?"}],
        "max_tokens": 80,
        "temperature": 0.1,
        "n": 2,
        "stream": False
    }
    try:
        resp = requests.post(f"{LM_STUDIO_URL}/chat/completions", json=payload, timeout=120)
        if resp.status_code == 200 and len(resp.json().get("choices", [])) == 2:
            return True
    except Exception:
        pass
    return False
This function checks whether your LM Studio server supports generating multiple answers (“trajectories”) in a single API call using the n parameter. It sends a quick test request and returns True if the feature is available, thus enabling true “Best-of-N” sampling for faster, more scalable reasoning.
Once we've determined whether our backend supports multi-trajectory sampling, the next step is to generate multiple reasoning paths for a given problem. This section introduces a set of helper functions that either use server-side multi-sampling (when available) or efficiently parallelize single completions, ensuring the app remains fast and scalable.
def lm_studio_generate_multiple(problem, k, temperature=0.8, seed=2025):
    prompt = f"<think> {problem}\n</think>"
    payload = {
        "messages": [{"role": "user", "content": prompt}],
        "max_tokens": 196,
        "temperature": temperature,
        "top_p": 0.9,
        "top_k": 30,
        "n": k,
        "stream": False,
        "seed": seed
    }
    start = time.time()
    resp = requests.post(f"{LM_STUDIO_URL}/chat/completions", json=payload, timeout=120)
    latency = time.time() - start
    if resp.status_code == 200:
        result = resp.json()
        return [{
            "content": choice["message"]["content"].strip(),
            "latency": latency / k,
            "success": True,
        } for choice in result.get("choices", [])]
    else:
        raise RuntimeError(f"LM Studio error: {resp.status_code}: {resp.text}")
def lm_studio_generate_single(problem, temperature, seed=None):
    prompt = f"<think> {problem}\n</think>"
    payload = {
        "messages": [{"role": "user", "content": prompt}],
        "max_tokens": 196,
        "temperature": temperature,
        "top_p": 0.9,
        "top_k": 30,
        "stream": False,
        "seed": seed
    }
    start = time.time()
    resp = requests.post(f"{LM_STUDIO_URL}/chat/completions", json=payload, timeout=120)
    latency = time.time() - start
    if resp.status_code == 200:
        content = resp.json()["choices"][0]["message"]["content"].strip()
        return {"content": content, "latency": latency, "success": True}
    else:
        return {"success": False, "error": f"HTTP {resp.status_code}: {resp.text}", "latency": latency}
def parallel_candidate_generation(problem, k, progress_cb=None):
    import concurrent.futures
    temperatures = np.linspace(0.1, 1.0, k)
    results = []
    with concurrent.futures.ThreadPoolExecutor(max_workers=min(8, k)) as executor:
        futures = []
        for i in range(k):
            seed = 2025 + i * 31
            futures.append(executor.submit(lm_studio_generate_single, problem, temperatures[i], seed))
        for i, future in enumerate(concurrent.futures.as_completed(futures)):
            res = future.result()
            res["trajectory_id"] = i + 1
            results.append(res)
            if progress_cb:
                progress_cb(i + 1, k)
    results.sort(key=lambda x: x.get("trajectory_id", 0))
    return results
Here's how each function fits into the multi-trajectory pipeline:
lm_studio_generate_multiple() function: When the LM Studio server supports the n parameter, this function sends a single API request to generate k diverse solutions at once. This is the most efficient mode, enabling true test-time scaling.lm_studio_generate_single() function: If the server does not support multi-sampling, this function provides a fallback that generates one solution trajectory per request, allowing for different temperatures and reproducibility via seeds.parallel_candidate_generation() function: To keep performance in fallback mode, this utility fires off multiple lm_studio_generate_single() calls in parallel, each with different sampling temperatures, then aggregates all the responses. This ensures we still get a broad range of solutions quickly, even if true multi-sampling isn't available.After generating multiple reasoning paths, we need a structured way to identify the strongest solution. This step introduces scoring and selection tools that mimic the reward modeling (SPRM) techniques used in the MetaStone Reflective Reasoning paper.
def step_tokenize(trajectory: str) -> List[str]:
    steps = [step.strip() for step in trajectory.split('.\n\n') if step.strip()]
    return steps
def dummy_sprm_score(trajectory: str, problem: str) -> float:
    steps = step_tokenize(trajectory)
    n = len(steps)
    def step_score(step):
        s = 0.2
        if any(x in step.lower() for x in ["therefore", "thus", "so", "finally", "conclude"]): s += 0.15
        if any(sym in step for sym in ["=", "+", "-", "*", "/", "(", ")"]): s += 0.1
        if len(step.split()) > 10: s += 0.1
        return min(1.0, s)
    step_scores = [step_score(s) for s in steps] or [0.01]
    geometric_mean = np.exp(np.mean(np.log(np.maximum(step_scores, 1e-3))))
    return min(1.0, geometric_mean + 0.05 * np.log1p(n))
def best_of_n_selection(candidates: List[Dict]) -> int:
    best_idx = int(np.argmax([c["sprm_score"] for c in candidates]))
    return best_idx
Here’s what each function does:
step_tokenize() function: This function splits a reasoning trajectory into logical steps or segments, allowing for step-wise analysis and scoring.dummy_sprm_score() function: This function assigns a reward score to each candidate trajectory and encourages responses that are multi-step, well-structured, and use mathematical reasoning. It acts as a stand-in for the paper’s Shared Process Reward Model (SPRM), which internally evaluates its solutions.best_of_n_selection() function: Given a batch of candidate answers, this function selects the single best trajectory based on the highest SPRM score, just as the reflective model in the paper automatically picks its most robust answer at test time.In this step, we bring together all the pieces to create an interactive reasoning demo with Streamlit.
st.markdown("""
<div class="main-header">
    <h1> MetaStone XBai-o4 Reflective Reasoning Demo</h1>
</div>
""", unsafe_allow_html=True)
st.sidebar.header("Reasoning Mode")
mode = st.sidebar.selectbox("Reasoning effort (k candidates):", list(REASONING_MODES.keys()))
k = REASONING_MODES[mode]
st.sidebar.header("Problem Input")
problem = st.sidebar.text_area("Enter your math/logic problem:", "Prove that the square root of 2 is irrational")
if st.sidebar.button("Run Reflective Reasoning"):
    st.session_state.run = True
    st.session_state.results = None
    st.session_state.best_idx = None
if "run" not in st.session_state:
    st.session_state.run = False
if st.session_state.run:
    st.info(f"Generating {k} reasoning trajectories in parallel...")
    progress = st.progress(0)
    def update_progress(done, total):
        progress.progress(done / total)
    try:
        if supports_n_param():
            results = lm_studio_generate_multiple(problem, k, temperature=0.7)
            for idx, res in enumerate(results):
                res["trajectory_id"] = idx + 1
        else:
            results = parallel_candidate_generation(problem, k, progress_cb=update_progress)
        for res in results:
            if res.get("success"):
                res["sprm_score"] = dummy_sprm_score(res["content"], problem)
            else:
                res["sprm_score"] = 0.0
        best_idx = best_of_n_selection(results)
        st.session_state.results = results
        st.session_state.best_idx = best_idx
        st.session_state.run = False
    except Exception as e:
        st.error(f"Failed to generate trajectories: {str(e)}")
        st.session_state.run = False
if st.session_state.get("results"):
    results = st.session_state.results
    best_idx = st.session_state.best_idx
    st.success(f"Selected trajectory #{best_idx+1} (highest SPRM score)")
    df = pd.DataFrame({
        "Trajectory": [f"T{i+1}" for i in range(len(results))],
        "SPRM Score": [r["sprm_score"] for r in results],
        "Latency (s)": [r.get("latency", 0.0) for r in results],
        "Success": [r.get("success", False) for r in results]
    })
    for i, res in enumerate(results):
        is_best = (i == best_idx)
        st.markdown(f"### {'' if is_best else ''} Trajectory {i+1} {'(SELECTED)' if is_best else ''}")
        if res.get("success"):
            st.info(f"SPRM Score: {res['sprm_score']:.3f} | Latency: {res['latency']:.1f}s")
            st.code(res["content"])
        else:
            st.error(f"Failed: {res.get('error', 'Unknown error')}")
    fig = px.bar(df, x="Trajectory", y="SPRM Score", color="Success", title="SPRM Scores for Each Trajectory")
    st.plotly_chart(fig, use_container_width=True)
    st.dataframe(df)
The main application flow accomplishes several key goals:
dummy_sprm_score), which mimics the Shared Process Reward Model (SPRM). best_of_n_selection). All generated solutions, along with their respective SPRM scores and generation latencies, are rendered in both textual and graphical formats for side-by-side analysis.To try it yourself, save the code as xbai_demo.py and launch:
streamlit run xbai_demo.pyLearn AI with these courses!
Course
Course
Course
blog
Dr Ana Rojo-Echeburúa
8 min
Tutorial
Aashi Dutt
Tutorial
Aashi Dutt
Tutorial
François Aubry
Tutorial
François Aubry
Tutorial
Abid Ali Awan