Track
Developing AI Applications
21 hr
OpenAI’s o4-mini is the latest addition to the o-series of reasoning-focused AI models. In this tutorial, I’ll walk you through how to build a research paper reviewer using OpenAI’s o4-mini API. The tool will:
We’ll also enhance our review assistant with statistical tool support, so the model can calculate p-values, effect sizes, and confidence intervals on demand.
We keep our readers updated on the latest in AI by sending out The Median, our free Friday newsletter that breaks down the week’s key stories. Subscribe and stay sharp in just a few minutes a week:
OpenAI’s o4-mini is a cost-effective, high-performance reasoning model capable of deep analysis across tasks like coding, math, and scientific reasoning. Despite being smaller than the o3 model, it consistently achieves state-of-the-art results across benchmarks like AIME 2024/2025 and GPQA.
Thanks to its speed and affordability, it’s ideal for tasks like reviewing research papers, generating code explanations, or assisting with competitive math questions. Its key strengths are:
To learn more, check out this introductory blog on o4-mini.
We’ll build a Python-based research paper reviewer that can:
This project is fully local and uses OpenAI's API.
To use o4-mini, you’ll need an API key from OpenAI. Here’s how:
Now, you’re ready to authenticate and start calling the API from Python.
Let’s start with installing a few dependencies and setting up an environment variable for our API key.
pip install openai PyMuPDF tiktoken numpy
export OPENAI_API_KEY =” YOUR_KEY”Now that our dependencies are sorted, let’s move to our helper functions. These functions are invoked by the LLM using tool calls when needed.
These imports are used to compute t-tests, standard errors, and confidence intervals.
from scipy.stats import ttest_ind, sem, t
import numpy as npThis function performs Welch’s t-test between two independent sample groups. It tests the hypothesis that the means of the two groups are statistically different.
def recalculate_p_value(group1, group2):
    t_stat, p_value = ttest_ind(group1, group2, equal_var=False)
    return {"p_value": round(p_value, 4)}
The recalculate_p_value() function returns the p-value, rounded to four decimal places, which indicates the probability that the observed difference happened by chance. This helps the LLM validate claims of statistical significance in the research paper.
Cohen’s d is a standardized measure of effect size between two groups. It starts by computing the means and standard deviations of each group. Then, it uses the pooled standard deviation to normalize the difference between means.
def compute_cohens_d(group1, group2):
    mean1, mean2 = np.mean(group1), np.mean(group2)
    std1, std2 = np.std(group1, ddof=1), np.std(group2, ddof=1)
    pooled_std = np.sqrt((std1**2 + std2**2) / 2)
    d = (mean1 - mean2) / pooled_std
    return {"cohens_d": round(d, 4)}
The function returns the Cohen’s d value, rounded to four decimal places. This helps the LLM understand practical significance (not just statistical) of group differences. It is valuable especially, when the sample size is large and p-values alone aren’t informative.
We now define a helper to compute the confidence interval for a single sample group. Confidence intervals are useful for understanding the reliability of an estimated mean—in other words, how much uncertainty surrounds the average value.
def compute_confidence_interval(data, confidence=0.95):
    data = np.array(data)
    n = len(data)
    mean = np.mean(data)
    margin = sem(data) * t.ppf((1 + confidence) / 2., n-1)
    return {
        "mean": round(mean, 4),
        "confidence_interval": [round(mean - margin, 4), round(mean + margin, 4)],
        "confidence": confidence
    }
Here’s what this function returns:
mean: The average value of the input data.confidence_interval: A list representing the lower and upper bounds within which the true mean likely falls, based on the specified confidence level.confidence: The confidence level used for the interval.We conclude helper functions with a simple helper that summarizes the mean, standard deviation, and sample size.
def describe_group(data):
    data = np.array(data)
    return {
        "mean": round(np.mean(data), 4),
        "std_dev": round(np.std(data, ddof=1), 4),
        "n": len(data)
    }
This helps the LLM interpret the underlying data distribution, providing essential context for evaluating results. By exposing statistical descriptors like mean, standard deviation, and count, our helper tools strengthen the model’s ability to reason through experiments and claims found in research papers.
In this section, we'll build the Python-based research paper reviewer that uses OpenAI’s o4-mini API and includes tool support for statistical analysis, enabling the model to perform rigorous evaluations and data-backed critiques.
We start our main code with some essential libraries to extract PDF content, tokenize it, and talk to the OpenAI API.
import os
import fitz
import openai
import json
import tiktoken
from statistics_helper import (
    recalculate_p_value,
    compute_cohens_d,
    compute_confidence_interval,
    describe_group
)
openai.api_key = os.getenv("OPENAI_API_KEY")
Let’s now build the full pipeline step-by-step.
We begin by reading raw text from the research paper. The fitz library lets us iterate over all pages and concatenate the extracted text into one string.
def extract_text_from_pdf(path):
    doc = fitz.open(path)
    full_text = "\n".join(page.get_text() for page in doc)
    return full_text
This sets the foundation. We’ll now tokenize and chunk the raw text before sending it to the model.
Note: I’ve generated a fake research paper for demo purposes that intentionally contains flaws in logic and experimental design.
LLMs have context limits, so we break long documents into manageable chunks. We use Tiktoken to tokenize the text based on the model’s encoding scheme.
def chunk_text(text, max_tokens=12000, model="o4-mini"):
    encoding = tiktoken.get_encoding("cl100k_base")
    tokens = encoding.encode(text)
    chunks = []
    for i in range(0, len(tokens), max_tokens):
        chunk = tokens[i:i + max_tokens]
        chunk_text = encoding.decode(chunk)
        chunks.append(chunk_text)
    return chunks
Here’s how it works:
tiktoken to tokenize the full document text using the cl100k_base tokenizer, which is compatible with modern OpenAI models like GPT-4, GPT-4o, and o4-mini.max_tokens length. This ensures that each chunk stays within the maximum input size allowed by the model, which is essential for preventing token overflow errors during inference.encoding.decode(). This preserves natural phrasing and formatting so the model receives coherent context during processing.This chunking step is essential for preventing cutoff errors during inference and guarantees that no important text is dropped due to overflow.
Before the model can invoke any external functions, we need to define a mapping between function names (as seen by the model) and the actual Python functions that will be executed. This mapping acts as a bridge between the model’s tool calls and our local codebase.
tool_function_map = {
    "recalculate_p_value": recalculate_p_value,
    "compute_cohens_d": compute_cohens_d,
    "compute_confidence_interval": compute_confidence_interval,
    "describe_group": describe_group,
}
Each key in this dictionary corresponds to a function name that the model might reference during its tool invocation, and each value is the actual Python function imported from the statistics_helper module.
To enhance model reasoning, we register tools that the LLM can call via function calling. These tools handle statistical analysis like p-value recalculation, confidence intervals, and effect sizes.
tools = [
            {
                "type": "function",
                "name": "recalculate_p_value",
                "description": "Calculate p-value between two sample groups",
                "parameters": {
                    "type": "object",
                    "properties": {
                        "group1": {"type": "array", "items": {"type": "number"}},
                        "group2": {"type": "array", "items": {"type": "number"}}
                    },
                    "required": ["group1", "group2"]
                }
            },
            {
                "type": "function",
                "name": "compute_cohens_d",
                "description": "Compute effect size (Cohen's d) between two groups",
                "parameters": {
                    "type": "object",
                    "properties": {
                        "group1": {"type": "array", "items": {"type": "number"}},
                        "group2": {"type": "array", "items": {"type": "number"}}
                    },
                    "required": ["group1", "group2"]
                }
            },
            {
                "type": "function",
                "name": "compute_confidence_interval",
                "description": "Compute confidence interval for a sample group",
                "parameters": {
                    "type": "object",
                    "properties": {
                        "data": {"type": "array", "items": {"type": "number"}},
                        "confidence": {"type": "number", "default": 0.95}
                    },
                    "required": ["data"]
                }
            },
            {
                "type": "function",
                "name": "describe_group",
                "description": "Summarize sample mean, std deviation, and count",
                "parameters": {
                    "type": "object",
                    "properties": {
                        "data": {"type": "array", "items": {"type": "number"}}
                    },
                    "required": ["data"]
                }
            }
        ]
The above tool definition allows the LLM to understand:
description)name)The LLM intelligently decides when to invoke a tool, such as recalculating a p-value, based on the context of the review. When it encounters a statistical claim or questionable result, it can call the appropriate helper function, receive the output, and continue its reasoning using that result. This enables a more rigorous and grounded analysis, where the model not only critiques but also verifies the underlying data.
We now define the core logic that sends each text chunk to the o4-mini model. If it calls a tool, we handle the function call and continue the conversation.
def review_text_chunk(chunk):
    try:
        response = client.responses.create(
            model="o4-mini",
            reasoning={"effort": "high"},
            input=[
                {
                    "role": "system",
                    "content": (
                        "You are an expert AI research reviewer. Read the given chunk of a research paper and highlight weak arguments."
                        "unsupported claims, or flawed methodology. You can request tools to: Recalculate p-values, Compute confidence intervals, "
                        "Estimate effect size (Cohen's d), Describe sample statistics. Be rigorous and explain your reasoning. "
                        "Conclude with suggestions and a verdict."
                    )
                },
                {
                    "role": "user",
                    "content": chunk
                }
            ],
            tools = tools,
        )
        # Check for tool calls
        for item in response.output:
            if getattr(item, "type", None) == "function_call":
                fn_call = getattr(item, "function_call", {})
                fn_name = getattr(fn_call, "name", "")
                args = getattr(fn_call, "arguments", {})
                if fn_name in tool_function_map:
                    tool_result = tool_function_map[fn_name](**args)
                    # Send back tool result as continuation input
                    tool_response = client.responses.create(
                        model="o4-mini",
                        reasoning={"effort": "high"},
                        input=[
                            *response.output,
                            {
                                "role": "tool",
                                "name": fn_name,
                                "content": str(tool_result)
                            }
                        ],
                        max_output_tokens=3000
                    )
                    if hasattr(tool_response, "output_text") and tool_response.output_text:
                        return tool_response.output_text.strip()
        # If no tool was called, return original response
        if hasattr(response, "output_text") and response.output_text:
            return response.output_text.strip()
        if response.status == "incomplete":
            reason = getattr(response.incomplete_details, "reason", "unknown")
            return f" Incomplete response: {reason}"
        return " No valid output returned by the model."
    except Exception as e:
        return f" Error during chunk review: {e}"
The review_text_chunk function is responsible for sending each chunk of the research paper to the LLM, along with a system prompt and tool registry. Here's how it works step by step:
client.responses.create() function that uses the Responses API for reasoning. In this call:
"o4-mini", and the reasoning={"effort": "high"} flag is set to high, which encourages detailed multi-step internal reasoning. This setting tells the model how deeply it should “think” before generating a final answer. It adjusts the number of internal reasoning tokens the model is allowed to use.tool_choice="auto" is needed as the Responses API decides tool usage automatically.responses.create method, appending the tool result as a "tool" role message. This simulates a continuation of the reasoning process.This multi-step reasoning and verification mechanism is what gives the model rigorous review capability. It mimics how a human reviewer might spot an issue, perform a quick calculation, and adjust their feedback accordingly
Once all components are in place, we use this function to process an entire PDF. It ties everything together.
def review_full_pdf(pdf_path):
    raw_text = extract_text_from_pdf(pdf_path)
    chunks = chunk_text(raw_text)
    print(f"\n Extracted {len(chunks)} chunks from PDF\n")
    all_reviews = []
    for idx, chunk in enumerate(chunks):
        print(f"\n  Reviewing Chunk {idx + 1}/{len(chunks)}...")
        review = review_text_chunk(chunk)
        all_reviews.append(f"### Chunk {idx + 1} Review\n{review}")
    full_review = "\n\n".join(all_reviews)
    return full_review
This function acts as the wrapper to review an entire research paper:
We now define the entry point of the script. This allows the program to be run directly from the terminal with a PDF file path as input.
if __name__ == "__main__":
    import argparse
    parser = argparse.ArgumentParser(description="Review an academic paper PDF for weak arguments.")
    parser.add_argument("pdf_path", type=str, help="Path to the research paper PDF")
    args = parser.parse_args()
    review_output = review_full_pdf(args.pdf_path)
    print("\n Final Aggregated Review:\n")
    print(review_output)
    with open("paper_review_output.md", "w") as f:
        f.write(review_output)
    print("\n Review saved to paper_review_output.md")
This block does the following:
argparse to accept the path to a PDF as a command-line argument.review_full_pdf() function to generate the full review.paper_review_output.md) for future use or integration.To run this code, type the following command in the terminal:
python pdf_reviewer_assistant.py Fake_paper.pdf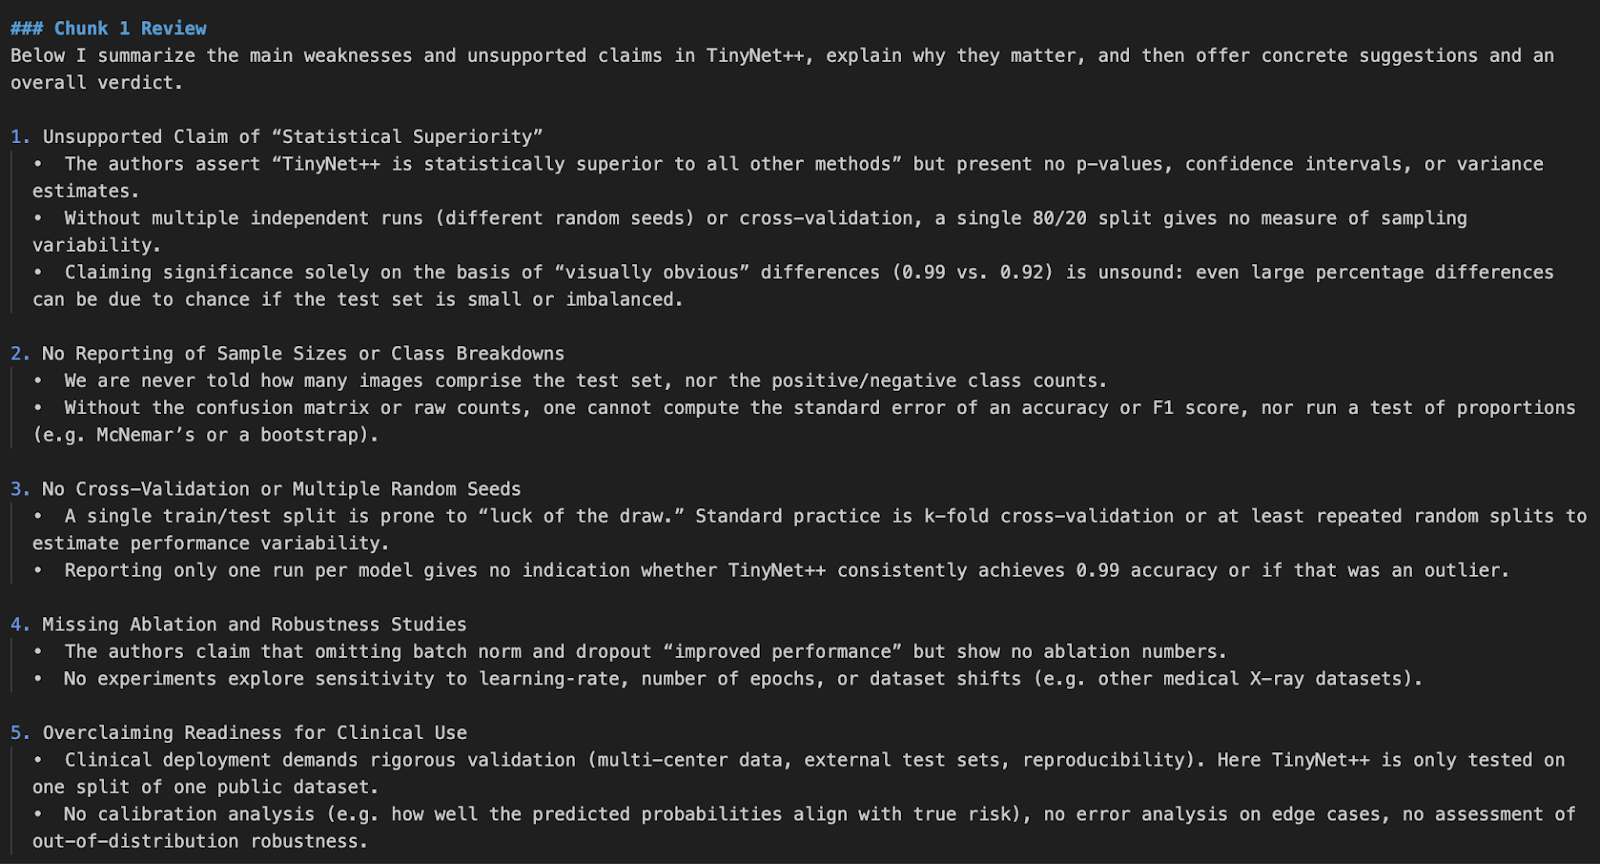
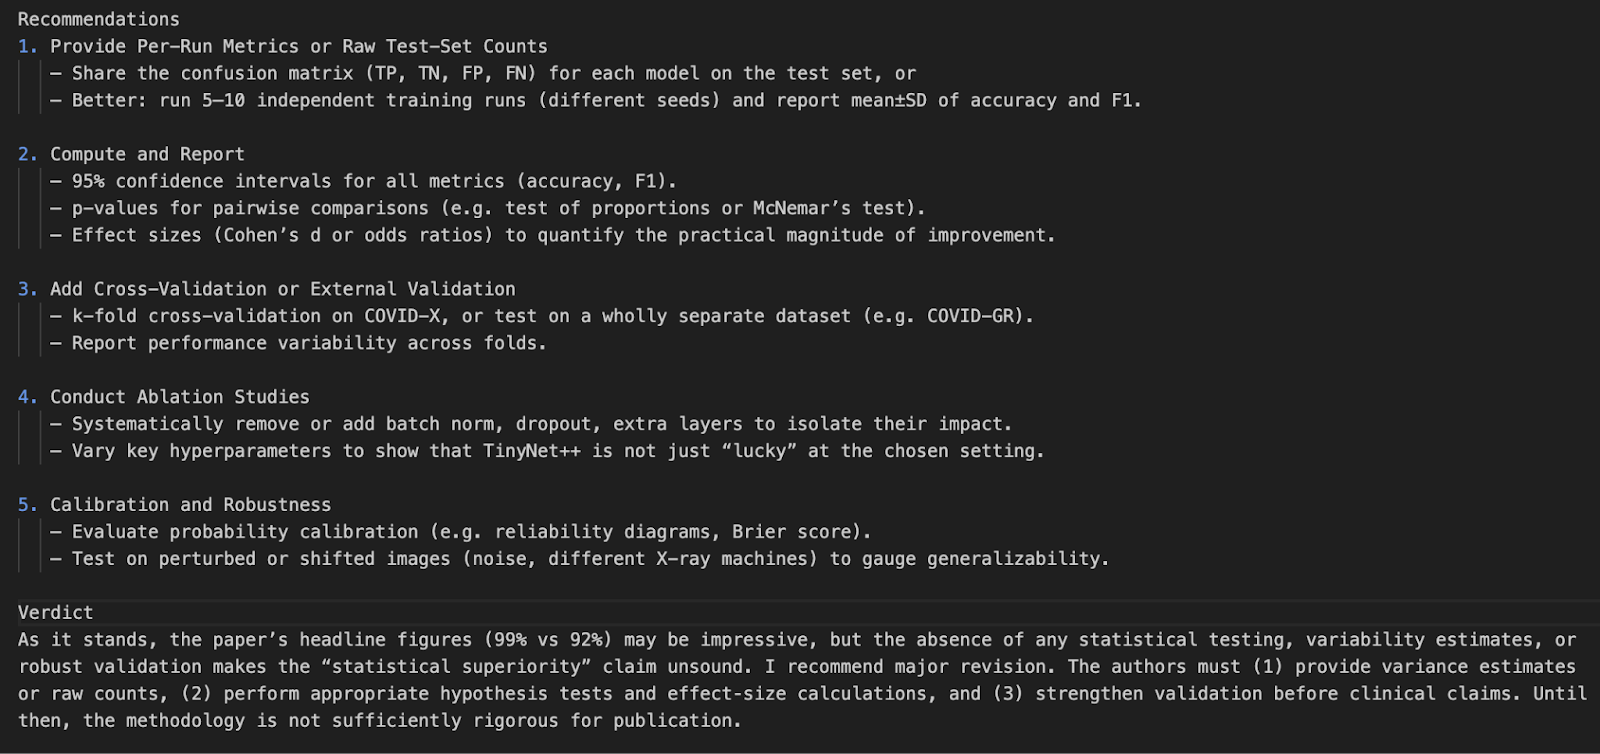
In this project, we created a research paper reviewer using OpenAI’s o4-mini model API. We enhanced the model’s ability by integrating real-time statistical tools, letting it reanalyze p-values, confidence intervals, and effect sizes.
This demo sets the stage for future integrations with PDF UIs, citation checkers, or even multimodal research assistant tools.
To learn more about recent OpenAI releases, check out these blogs:
Learn AI with these courses!
Track
Course
Course
blog
Alex Olteanu
8 min
blog
Alex Olteanu
8 min
Tutorial
Abid Ali Awan
Tutorial
Abid Ali Awan
Tutorial
Aashi Dutt
Tutorial
François Aubry