
Course
Working with DeepSeek in Python
3 hr
1.2K
DeepSeek just released v3.2-Exp, an experimental model that cuts API costs by more than half. If you've been working with large language models, you know that long-context processing gets expensive fast. This new release addresses that problem with a technique called DeepSeek Sparse Attention.
In this tutorial, I’ll explain what makes v3.2 different from previous DeepSeek versions, how sparse attention works under the hood, and how to use the model in your projects. We'll cover the basics of making API calls and build a demo project that shows where this model works best.
By the end, you’ll build a Streamlit app that compares costs across different LLMs, including DeepSeek v3.2:
I also recommend checking out our demo project covering the new DeepSeek-V3.2-Speciale variant.
Let’s start with some background on DeepSeek and what changed in this release.
DeepSeek is an open-source AI company based in China that builds large language models under the MIT license. Their models compete with GPT-5 and Claude across reasoning, coding, and general-purpose tasks. The company has released several versions over the past year, including DeepSeek-V3 and DeepSeek-R1, which gained attention for strong performance at lower costs than closed-source alternatives.
Before v3.2, the most recent release was v3.1-Terminus, a 685-billion parameter model. While it delivered solid performance, processing long contexts remained expensive. This is where the new experimental release comes in.
DeepSeek released v3.2-Exp on September 29, 2025 (2025-09-29). The "Exp" stands for experimental, which means the model is still being tested and refined. Don't expect production-level stability yet, but you can use it for research and projects where you want to test the latest features.
The model is built on top of v3.1-Terminus and maintains the same 685B parameter architecture. What sets it apart is how it processes information internally. It uses an OpenAI-compatible API format, so if you've used the OpenAI SDK before, you already know how to work with DeepSeek (I’ll also explain in this article how to make your first API call).
Here’s the big change: DeepSeek dropped API prices by more than 50% compared to v3.1. And performance stayed the same. You're getting the same quality of responses at half the cost.
This price drop came from a technical improvement called DeepSeek Sparse Attention (DSA). Instead of having the model pay attention to every single token in your input (which is computationally expensive), DSA selectively focuses on what matters. We’ll look at how this works in the next section.
If you want the full technical details, DeepSeek published a technical report on GitHub that explains the architecture changes and benchmark results.
Before we get into the code, let’s talk about what makes v3.2 cheaper and faster. The answer is in how the model processes your input.
When you send text to a language model, it breaks your input into tokens (roughly words or parts of words). The model then needs to figure out which tokens are related to each other. This process is called attention.
In traditional transformers, every token looks at every other token. If you have 1,000 tokens, each one checks all 999 others. That’s 1 million comparisons. At 10,000 tokens, you’re at 100 million comparisons. The math is quadratic: double your input length, and you quadruple the compute cost.
This is why long-context processing gets expensive. Your API bill grows fast as your documents get longer.
Not all tokens need to look at all other tokens. When you’re reading this sentence right now, you’re not constantly re-reading every word that came before. You focus on what’s relevant.
Sparse attention does the same thing. Instead of comparing every token to every other token, the model selectively picks which comparisons matter. Some older approaches to this include:
These methods save compute, but they’re rigid. They decide ahead of time which tokens can interact, regardless of what your actual text says. Sometimes you need a word at the start of a document to connect to something at the end. Fixed patterns can miss that.
DSA takes a different path. Instead of using fixed patterns, it learns which tokens actually need to attend to each other based on the content itself. The model picks relevant connections on the fly.
Here’s how it works at a high level. During training, DeepSeek added a selection mechanism to each attention layer. This mechanism looks at your tokens and decides which attention connections are worth computing. It keeps the important ones and skips the rest.
The selection isn’t random. The model learned during training which types of connections matter for different tasks. When you send a prompt about code, it focuses on different patterns than when you send a legal document.
The result: DSA reduces the number of attention operations without hurting output quality. In the technical report, DeepSeek shows that v3.2 performs nearly identically to v3.1-Terminus on benchmarks while doing less computation per token. You get the same model quality at roughly half the API cost.
Here’s what DSA means in practice:
The benefits show up most in these use cases:
If your application deals with long inputs, DSA makes a real difference. You’re not just saving money. You’re getting better performance on tasks where traditional attention struggles.
Now that you understand how DSA works, let’s use the model through its API.
You’ll need Python 3.8 or newer installed on your machine. If you’re new to working with LLMs via APIs, you might want to check out DataCamp’s guide on how to learn AI to get familiar with the basics. We also have a more detailed DeepSeek API tutorial that covers earlier versions if you want to go deeper.
The good news: if you’ve used OpenAI’s API before, you already know how to use DeepSeek. The API format is identical.
First, get your API key from platform.deepseek.com. You’ll need to create an account if you don’t have one already.
Install the required packages:
uv add openai python-dotenvCreate a .env file in your project directory and add your API key:
DEEPSEEK_API_KEY=your_api_key_hereHere’s a basic example using the OpenAI SDK. The only difference from using OpenAI’s API is the base_url parameter and your API key:
from openai import OpenAI
from dotenv import load_dotenv
import os

# Load environment variables from .env file
load_dotenv()

# Initialize OpenAI-compatible client with DeepSeek endpoint
client = OpenAI(
   api_key=os.getenv("DEEPSEEK_API_KEY"),
   base_url="https://api.deepseek.com"
)

# Send a chat completion request to DeepSeek v3.2
response = client.chat.completions.create(
   model="deepseek-chat",
   messages=[
       {"role": "user", "content": "Explain sparse attention in one sentence."}
   ]
)

# Print the model's response
print(response.choices[0].message.content)
When you run this, you’ll get a response like:
Sparse attention reduces computational cost by having each token attend to only a subset of relevant tokens rather than all tokens in a sequence.The deepseek-chat model is the non-thinking mode of v3.2-Exp. It processes your request and returns a response without showing its reasoning steps.
If you want to see the model’s reasoning process, use deepseek-reasoner. This model shows its chain of thought before giving you the final answer:
# Use deepseek-reasoner to see the model's reasoning process
response = client.chat.completions.create(
   model="deepseek-reasoner",
   messages=[
       {"role": "user", "content": "Which is larger: 9.11 or 9.8?"}
   ]
)

# Print both reasoning and final answer
print("Reasoning:", response.choices[0].message.reasoning_content)
print("Answer:", response.choices[0].message.content)
This will output something like:
Reasoning: To compare 9.11 and 9.8, I need to look at the digits after the decimal point. 9.11 has digits 1 and 1 after the decimal, making it 9 + 0.11. Meanwhile, 9.8 is 9 + 0.8. Since 0.8 is greater than 0.11, 9.8 is the larger number.

Answer: 9.8 is larger than 9.11.
The reasoning model can generate up to 64K tokens of reasoning content (defaults to 32K) before producing the final answer. Note that it doesn’t support some parameters like temperature or top_p. DeepSeek's official API doesn't yet support a reasoning_effort parameter to control reasoning depth (though some third-party providers like LangChain have added it to their integrations).
The response object follows OpenAI’s structure. You can access the content through response.choices[0].message.content, check token usage with response.usage, and see the model used with response.model.
The API isn’t your only option. DeepSeek releases its models as open source, so you can run them yourself.
Hugging Face: The model is available at huggingface.co/deepseek-ai/DeepSeek-V3.2-Exp. You can use Hugging Face’s inference providers to run the model without managing infrastructure yourself, or download the weights for local inference. The local route works well if you have the hardware (think data center budgets or a small GPU farm in your closet for a 685B parameter model).
vLLM: For self-hosted deployments at scale, vLLM offers optimized inference with v3.2 support. It’s faster than running the model through standard transformers and handles batching well. Use this if you’re serving the model in production and have serious infrastructure to back it up.
For most developers getting started, the API is the right choice. You pay only for what you use, and DeepSeek handles scaling and maintenance.
You’ve seen how DeepSeek v3.2’s API works and made your first calls. Now let’s put it to the test with a real-world comparison.
Does DeepSeek’s sparse attention actually save money when processing long contexts? And how does it perform compared to GPT-5 and Claude Sonnet 4.5?
To answer this, we’ll build a comparison tool that loads multiple research papers into a single context and sends the same query to all four models. You’ll see exactly how much each model costs, how fast it responds, and what kind of answers it gives.
Most document analysis systems use RAG: they chunk your documents into small pieces, embed them, and retrieve only the relevant chunks when you ask a question. This works well for simple lookups, but you lose connections between different parts of your documents. What if the answer requires understanding relationships across multiple papers?
Long-context models solve this by reading everything at once. No chunking, no retrieval, no missing context. You load all your documents into a single prompt and let the model see the full picture. The problem is cost. With traditional attention, processing 50,000+ tokens gets expensive fast.
This is where we test DeepSeek’s sparse attention. We’ll build an application that loads three research papers (approximately 57,000 tokens total) into a single context and compares how four models handle the same query: GPT-5, Claude Sonnet 4.5, DeepSeek v3.2-Exp (with sparse attention), and DeepSeek v3.1-Terminus (the previous version without sparse attention). You’ll see cost differences, response times, and output quality side by side.
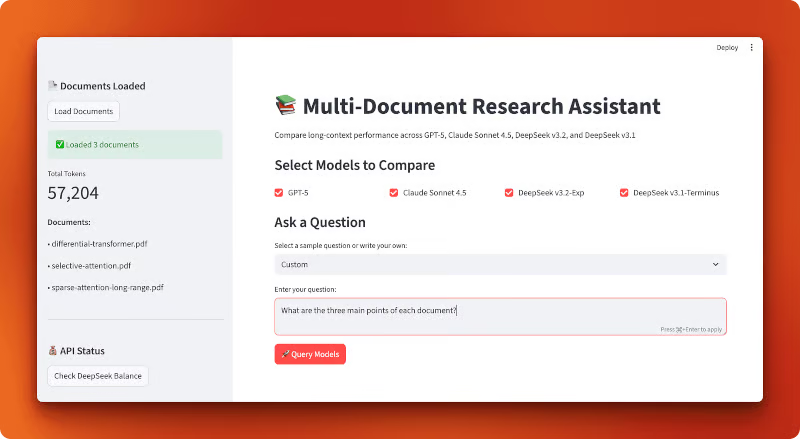
Here’s what the finished application looks like:
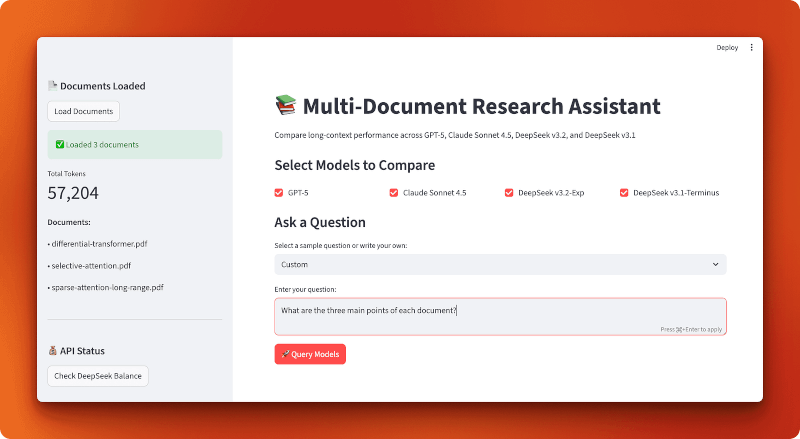

Note: The rest of this section contains a detailed breakdown of how to build this application from scratch. You don’t need to build it to understand the comparison results, but walking through the code gives you practical patterns for building your own long-context applications with DeepSeek.
We’ll build this as a Streamlit app with three supporting modules: one for loading documents, one for model configuration, and one for query handling. The application flow is simple: load PDFs, select models, ask a question, and compare results.
Start by creating a project directory and installing dependencies:
mkdir multi-document-qa
cd multi-document-qa
uv add streamlit langchain langchain-openai langchain-anthropic langchain-community pypdf tiktoken python-dotenv matplotlib pandas
Create a .env file with your API keys:
OPENAI_API_KEY=your_openai_key
ANTHROPIC_API_KEY=your_anthropic_key
DEEPSEEK_API_KEY=your_deepseek_key
Download three research papers on attention mechanisms:
mkdir documents
cd documents
curl -L -o selective-attention.pdf "https://arxiv.org/pdf/2410.02703"
curl -L -o differential-transformer.pdf "https://arxiv.org/pdf/2410.05258"
curl -L -o sparse-attention-long-range.pdf "https://arxiv.org/pdf/2406.16747"
cd ..
These three papers total 57,204 tokens when loaded.
Create document_loader.py:
from langchain_community.document_loaders import PyPDFLoader
import tiktoken
from pathlib import Path


def load_documents(documents_dir="documents"):
   docs_path = Path(documents_dir)
   pdf_files = list(docs_path.glob("*.pdf"))

   all_text = ""
   document_names = []

   # Load each PDF and concatenate with separators
   for pdf_file in sorted(pdf_files):
       loader = PyPDFLoader(str(pdf_file))
       pages = loader.load()
       doc_text = "\n\n".join([page.page_content for page in pages])
       all_text += f"\n\n=== Document: {pdf_file.name} ===\n\n{doc_text}"
       document_names.append(pdf_file.name)
The function loads all PDFs from a directory, extracts text from each page, and concatenates everything with document separators.
# Count tokens using GPT-4 encoding (accurate across providers)
   encoding = tiktoken.encoding_for_model("gpt-4")
   token_count = len(encoding.encode(all_text))

   return all_text, token_count, document_names
Token counting uses tiktoken with GPT-4 encoding, which provides accurate estimates across all providers since they use similar tokenization. View the complete document_loader.py on GitHub.
Create model_config.py:
from langchain_openai import ChatOpenAI
from langchain_anthropic import ChatAnthropic
import os


# Pricing per million tokens (as of October 2025)
MODEL_PRICING = {
   "gpt-5": {"input": 2.50, "output": 10.00, "name": "GPT-5"},
   "claude-sonnet-4-5-20250929": {"input": 3.00, "output": 15.00, "name": "Claude Sonnet 4.5"},
   "deepseek-chat": {"input": 0.28, "output": 0.42, "name": "DeepSeek v3.2-Exp"},
   "deepseek-chat-v3.1": {"input": 0.55, "output": 2.19, "name": "DeepSeek v3.1-Terminus"},
}
The pricing dictionary stores costs per million tokens (as of October 2025). DeepSeek v3.2 with sparse attention is about 10x cheaper than GPT-5 and Claude, while v3.1 sits in the middle at 2x the cost of v3.2.
def get_model(model_name):
   """Initialize a chat model by name using LangChain's unified interface."""
   if model_name == "gpt-5":
       return ChatOpenAI(model="gpt-5", temperature=0, api_key=os.getenv("OPENAI_API_KEY"))
   elif model_name == "claude-sonnet-4-5-20250929":
       return ChatAnthropic(model="claude-sonnet-4-5-20250929", temperature=0,
                          api_key=os.getenv("ANTHROPIC_API_KEY"))
   elif model_name == "deepseek-chat":
       return ChatOpenAI(model="deepseek-chat", temperature=0,
                        api_key=os.getenv("DEEPSEEK_API_KEY"),
                        base_url="https://api.deepseek.com")
   elif model_name == "deepseek-chat-v3.1":
       # Note: v3.1-Terminus endpoint expires on October 15, 2025
       return ChatOpenAI(model="deepseek-chat", temperature=0,
                        api_key=os.getenv("DEEPSEEK_API_KEY"),
                        base_url="https://api.deepseek.com/v3.1_terminus_expires_on_20251015")


def calculate_cost(model_name, input_tokens, output_tokens):
   """Calculate total cost based on input and output token usage."""
   pricing = MODEL_PRICING[model_name]
   input_cost = (input_tokens / 1_000_000) * pricing["input"]
   output_cost = (output_tokens / 1_000_000) * pricing["output"]
   return input_cost + output_cost
The get_model() function initializes each model using LangChain's unified interface. DeepSeek models use OpenAI-compatible endpoints with custom base URLs. Note: The v3.1-Terminus endpoint expires on October 15, 2025. The full model_config.py script is on GitHub.
Create query_handler.py:
import time
from langchain_core.messages import SystemMessage, HumanMessage
from model_config import get_model, calculate_cost, MODEL_PRICING


def query_model(model_name, context, question):
   """Query a model with document context and track performance metrics."""
   model = get_model(model_name)

   # Embed full document context in system prompt
   system_prompt = f"""Use the given context to answer the question.
If you don't know the answer, say you don't know. Keep the answer concise.

Context:
{context}"""

   messages = [
       SystemMessage(content=system_prompt),
       HumanMessage(content=question)
   ]

   # Track response time
   start_time = time.time()
The system prompt embeds all 57,000 tokens of documents. Traditional attention processes every token against every other token. DeepSeek v3.2’s sparse attention skips irrelevant connections, reducing cost.
try:
       response = model.invoke(messages)
       elapsed_time = time.time() - start_time

       # Extract token usage (different providers use different formats)
       if hasattr(response, 'response_metadata') and 'token_usage' in response.response_metadata:
           token_usage = response.response_metadata['token_usage']
           input_tokens = token_usage.get('prompt_tokens', 0)
           output_tokens = token_usage.get('completion_tokens', 0)
       elif hasattr(response, 'usage_metadata'):
           input_tokens = response.usage_metadata.get('input_tokens', 0)
           output_tokens = response.usage_metadata.get('output_tokens', 0)

       # Calculate total cost
       cost = calculate_cost(model_name, input_tokens, output_tokens)

       return {
           "model": MODEL_PRICING[model_name]["name"],
           "response": response.content,
           "input_tokens": input_tokens,
           "output_tokens": output_tokens,
           "total_tokens": input_tokens + output_tokens,
           "cost": cost,
           "time": elapsed_time,
           "error": None
       }
Different LangChain integrations return token usage in different formats (OpenAI uses response_metadata, Anthropic uses usage_metadata), so we check both. The function tracks time, extracts token counts, calculates costs, and returns a dictionary with all metrics. Check out the complete query_handler.py on GitHub.
Create app.py:
import streamlit as st
import pandas as pd
import matplotlib.pyplot as plt
from document_loader import load_documents
from query_handler import query_model
from dotenv import load_dotenv

# Load API keys from .env file
load_dotenv()

# Configure Streamlit page with wide layout
st.set_page_config(
   page_title="Multi-Document Research Assistant",
   page_icon="📚",
   layout="wide"
)

st.title("📚 Multi-Document Research Assistant")
st.markdown("Compare long-context performance across GPT-5, Claude Sonnet 4.5, DeepSeek v3.2, and DeepSeek v3.1")
Standard Streamlit setup with a wide layout for side-by-side comparisons.
# Sidebar for document loading
with st.sidebar:
   st.header("📄 Documents Loaded")

   if st.button("Load Documents"):
       with st.spinner("Loading documents..."):
           # Load all PDFs and count tokens
           context, token_count, doc_names = load_documents("documents")
           st.session_state.context = context
           st.session_state.token_count = token_count
           st.session_state.doc_names = doc_names

   # Display loaded documents info
   if "token_count" in st.session_state:
       st.success(f"✅ Loaded {len(st.session_state.doc_names)} documents")
       st.metric("Total Tokens", f"{st.session_state.token_count:,}")
       st.write("**Documents:**")
       for name in st.session_state.doc_names:
           st.write(f"• {name}")
The sidebar loads documents and displays token counts. Streamlit’s session state keeps documents loaded between interactions.
# Main content area
if "context" not in st.session_state:
   st.info("👈 Click 'Load Documents' in the sidebar to begin")
else:
   st.subheader("Select Models to Compare")
   col1, col2, col3, col4 = st.columns(4)

   # Model selection checkboxes
   with col1:
       use_gpt5 = st.checkbox("GPT-5", value=True)
   with col2:
       use_claude = st.checkbox("Claude Sonnet 4.5", value=True)
   with col3:
       use_deepseek_v32 = st.checkbox("DeepSeek v3.2-Exp", value=True)
   with col4:
       use_deepseek_v31 = st.checkbox("DeepSeek v3.1-Terminus", value=True)

   # Sample questions for quick testing
   sample_questions = [
       "Compare the main approaches to attention mechanisms described in these documents",
       "What are the key differences between sparse and dense attention?",
       "Summarize the common themes across all documents"
   ]
Four checkboxes for model selection and predefined sample questions.
# Question input with samples
   question_choice = st.selectbox(
       "Select a sample question or write your own:",
       ["Custom"] + sample_questions
   )

   if question_choice == "Custom":
       question = st.text_area("Enter your question:", height=100)
   else:
       question = st.text_area("Enter your question:", value=question_choice, height=100)

   # Query button and model execution
   if st.button("🚀 Query Models", type="primary"):
       if not question:
           st.error("Please enter a question")
       else:
           # Build list of selected models
           selected_models = []
           if use_gpt5:
               selected_models.append("gpt-5")
           if use_claude:
               selected_models.append("claude-sonnet-4-5-20250929")
           if use_deepseek_v32:
               selected_models.append("deepseek-chat")
           if use_deepseek_v31:
               selected_models.append("deepseek-chat-v3.1")
Users pick a question or write their own, then click “Query Models” to run the comparison on selected models.
results = []

           # Query each model sequentially with progress indicator
           for model_name in selected_models:
               with st.spinner(f"Querying {model_name}..."):
                   result = query_model(
                       model_name,
                       st.session_state.context,
                       question
                   )
                   results.append(result)

           # Store results in session state for persistence
           st.session_state.results = results
Each model gets queried sequentially with a spinner showing progress.
# Display results if available
if "results" in st.session_state:
   st.divider()
   st.subheader("📊 Results")

   results = st.session_state.results

   # Show model responses in expandable panels
   st.markdown("### Responses")
   for result in results:
       with st.expander(f"**{result['model']}** - ${result['cost']:.4f} | {result['time']:.2f}s"):
           if result['error']:
               st.error(f"Error: {result['error']}")
           else:
               st.write(result['response'])

   # Create metrics comparison table
   metrics_df = pd.DataFrame([
       {
           "Model": r['model'],
           "Input Tokens": r['input_tokens'],
           "Output Tokens": r['output_tokens'],
           "Total Tokens": r['total_tokens'],
           "Cost ($)": f"${r['cost']:.4f}",
           "Time (s)": f"{r['time']:.2f}"
       }
       for r in results
   ])

   st.dataframe(metrics_df, use_container_width=True)
Results display each model’s response in expandable panels with cost and time in the header, followed by a sortable metrics table.
# Create visualization charts
   fig, axes = plt.subplots(2, 2, figsize=(12, 10))

   # Chart 1: Cost comparison bar chart
   axes[0, 0].bar([r['model'] for r in results], [r['cost'] for r in results],
                  color=['#1f77b4', '#ff7f0e', '#2ca02c', '#d62728'][:len(results)])
   axes[0, 0].set_title('Cost Comparison')
   axes[0, 0].set_ylabel('Cost ($)')
   axes[0, 0].tick_params(axis='x', rotation=45)

   # Chart 2: Response time bar chart
   axes[0, 1].bar([r['model'] for r in results], [r['time'] for r in results],
                  color=['#1f77b4', '#ff7f0e', '#2ca02c', '#d62728'][:len(results)])
   axes[0, 1].set_title('Response Time Comparison')
   axes[0, 1].set_ylabel('Time (seconds)')

   # Chart 3: Token usage grouped bar chart
   models = [r['model'] for r in results]
   input_tokens = [r['input_tokens'] for r in results]
   output_tokens = [r['output_tokens'] for r in results]
   x = range(len(models))
   width = 0.35
   axes[1, 0].bar([i - width/2 for i in x], input_tokens, width, label='Input', color='#1f77b4')
   axes[1, 0].bar([i + width/2 for i in x], output_tokens, width, label='Output', color='#ff7f0e')
   axes[1, 0].set_title('Token Usage Comparison')
   axes[1, 0].legend()
Four matplotlib charts in a 2x2 grid: cost bars, time bars, grouped token usage bars, and a cost-versus-time scatter plot.
# Chart 4: Cost vs time tradeoff scatter plot
   axes[1, 1].scatter([r['cost'] for r in results], [r['time'] for r in results],
                      s=100, alpha=0.6, color=['#1f77b4', '#ff7f0e', '#2ca02c', '#d62728'][:len(results)])
   for i, r in enumerate(results):
       axes[1, 1].annotate(r['model'], (r['cost'], r['time']), fontsize=8, ha='right')
   axes[1, 1].set_title('Cost vs Time Trade-off')
   axes[1, 1].set_xlabel('Cost ($)')
   axes[1, 1].set_ylabel('Time (seconds)')
   axes[1, 1].grid(True, alpha=0.3)

   plt.tight_layout()
   st.pyplot(fig)

   # Display key findings
   if len(results) > 1:
       cheapest = min(results, key=lambda x: x['cost'])
       fastest = min(results, key=lambda x: x['time'])

       col1, col2 = st.columns(2)
       with col1:
           st.metric("Most Cost-Effective", cheapest['model'], f"${cheapest['cost']:.4f}")
       with col2:
           st.metric("Fastest Response", fastest['model'], f"{fastest['time']:.2f}s")
Key findings automatically highlight the cheapest and fastest models. View the complete app.py on GitHub.
Start the app:
streamlit run app.pyClick “Load Documents” to load the three PDFs (57,204 tokens total). Select models to compare (all four by default), pick or write a question, then click “Query Models”.
Expected response times for 57,000-token context:

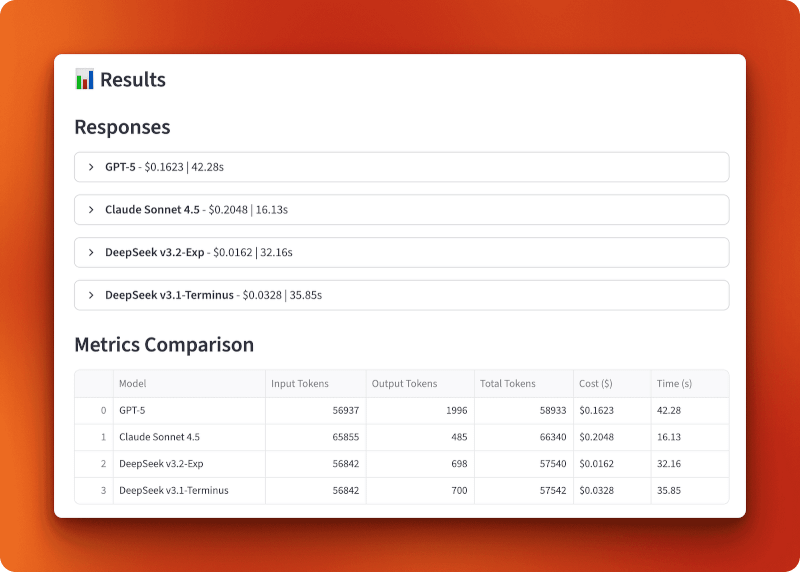
GPT-5 processed 56,937 input tokens and generated 1,996 output tokens for $0.1623 in 42.28 seconds. Claude Sonnet 4.5 processed 65,855 input tokens and generated 485 output tokens for $0.2048 in 16.13 seconds — fastest but most expensive. DeepSeek v3.2-Exp processed 56,842 input tokens and generated 698 output tokens for only $0.0162 in 32.16 seconds. DeepSeek v3.1-Terminus processed 56,842 input tokens and generated 700 output tokens for $0.0328 in 35.85 seconds.
The comparison between v3.1 and v3.2 shows the impact of sparse attention. Both processed identical inputs and produced nearly identical outputs (698 vs 700 tokens), but v3.2 cost half as much ($0.0162 vs $0.0328) and ran slightly faster (32.16s vs 35.85s). That’s a 2x cost reduction from sparse attention alone.
Compared to GPT-5 and Claude, v3.2 is 10x cheaper than GPT-5 ($0.0162 vs $0.1623) and 13x cheaper than Claude ($0.0162 vs $0.2048). Over 100 queries of this length, you’d spend $16.20 with DeepSeek v3.2 versus $162.30 with GPT-5 or $204.80 with Claude.
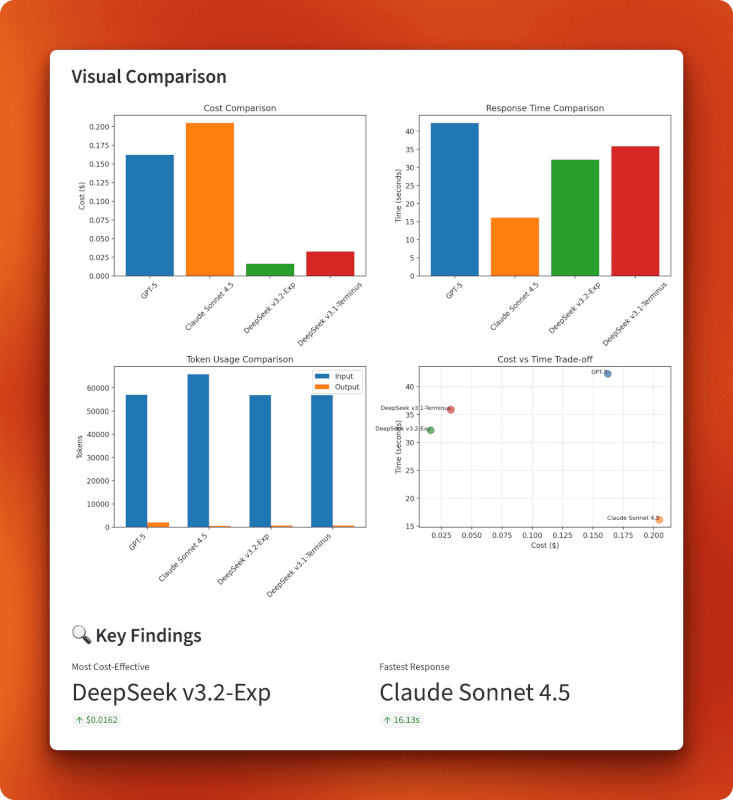
The charts confirm DeepSeek v3.2’s position in the bottom-left quadrant of the cost-versus-time tradeoff: cheapest overall at $0.0162 while maintaining reasonable speed at 32 seconds. Claude trades cost for speed (expensive but fastest), GPT-5 falls behind on both metrics (expensive and slowest), and v3.1 sits in the middle. The token usage chart shows all models process similar input sizes, but output lengths vary — GPT-5 generated the longest response at 1,996 tokens, Claude kept it brief at 485 tokens, and both DeepSeek versions produced similar outputs around 700 tokens.
Loading full documents into context works best when you need cross-document understanding. If your question requires connecting ideas across three different papers, chunking and retrieval might miss those connections. The model needs to see everything at once.
This pattern fits several use cases:
The approach doesn’t work well when:
DeepSeek’s sparse attention changes the economics of long-context processing. What used to cost $0.15–0.20 per query now costs $0.01–0.02. That makes full-context approaches practical for applications that run hundreds or thousands of queries per day.
DeepSeek v3.2’s sparse attention delivers the same model quality at half the cost of v3.1. The multi-document comparison we built showed this in practice. Processing 57,000 tokens cost $0.0162 with v3.2 versus $0.0328 with v3.1, and both produced nearly identical outputs. Compared to GPT-5 and Claude, v3.2 is 10–13x cheaper while maintaining reasonable response times. For applications that process long contexts regularly, those savings add up fast.
If you’re working on document analysis, research tools, or any application that deals with long contexts, v3.2 is worth testing. Just remember it’s still experimental, so test it before putting it in production.
To learn more about the latest in AI, check out these blogs:
Learn AI with these courses!
Course
Course
Course
blog
François Aubry
8 min
Tutorial
Aashi Dutt
Tutorial
Aashi Dutt
Tutorial
Dr Ana Rojo-Echeburúa
Tutorial
Aashi Dutt
Tutorial
Aashi Dutt