
Track
Snowflake Foundations
7 hr
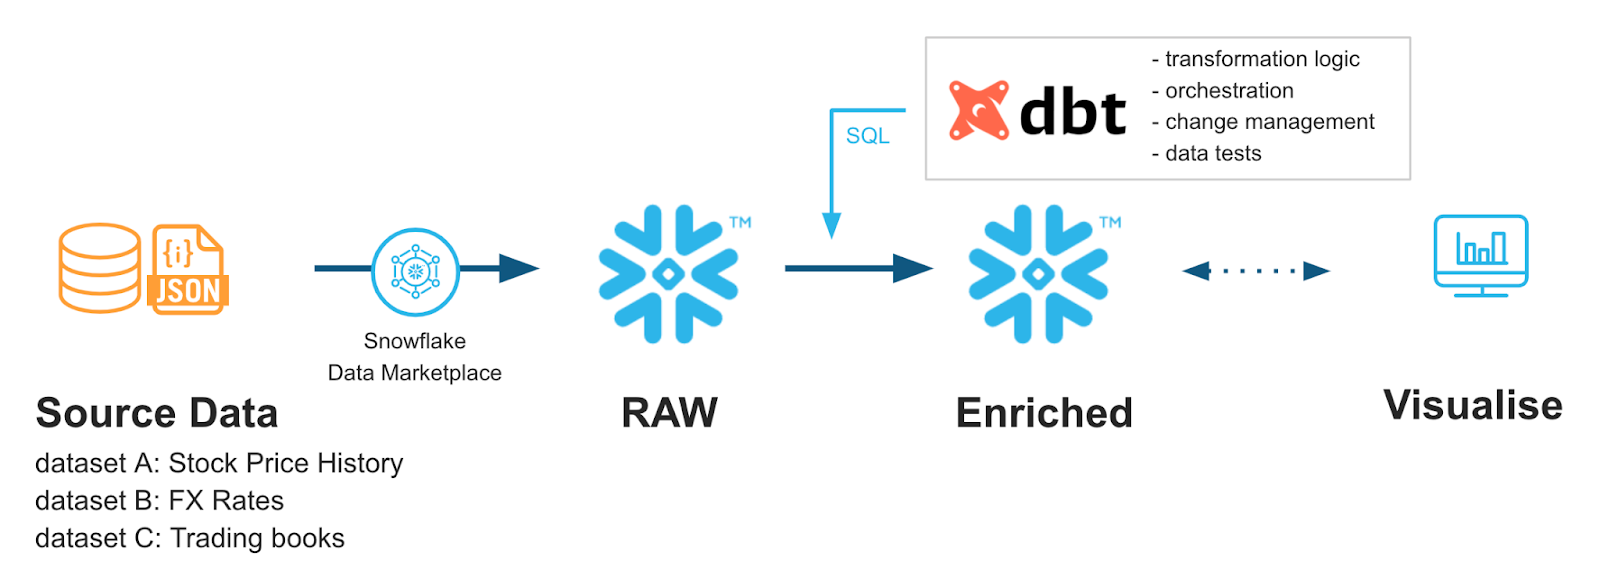
As modern data teams adopt increasingly complex analytical stacks, there has been a shift to creating standard practices within data engineering workflows. Tools like dbt (Data Build Tool) are an open-source framework that brings software engineering best practices—like version control, testing, and documentation—to analytics workflows.
The combination of dbt and Snowflake (a cloud-native data warehouse) has emerged as a cornerstone of analytics engineering workflows. This guide explores the foundational concepts, setup, and advanced implementation strategies for integrating dbt with Snowflake, helping data teams achieve more maintainable, secure, and performant data pipelines.
If you’re just starting out with these tools, I recommend you take our Snowflake Foundations skill track and Introduction to dbt course.
Let’s talk about how dbt and Snowflake work together. This section introduces dbt’s capabilities and highlights its compatibility with Snowflake and the benefits of integrating them together.
dbt (Data Build Tool) is an open-source framework that enables data teams to transform, test, and document data directly in their warehouse using SQL enhanced with Jinja templating.
dbt is not a programming language itself; it acts as a compiler, taking modular SQL models and converting them into executable SQL queries that run in the warehouse (e.g., Snowflake).
By incorporating version control, automated testing, and documentation, dbt brings proven software engineering practices to analytics engineering, making transformation pipelines more reliable, maintainable, and scalable as part of an ELT workflow.
Its core components include a compiler and a runner. Here are their functions:
For dbt to function, there are a few underlying components that help everything flow:
select statements saved as .sql files.For more details on dbt, I recommend this excellent introduction to dbt course.
Using dbt’s Jinja-based templating combined with Snowflake’s powerful datatypes, like Streams, we can get very creative with our transformation workflows.
For instance, maybe we want to transform only newly loaded data or different transformations in our staging tables versus our prod tables so we can perform data health checks.
The two are quickly becoming a common pairing to help data engineers get more control and flexibility out of their data pipelines with more companies adopting dbt regularly.
There are many benefits to dbt: traditional software development methodology, automated testing, and productivity enhancements.
We can treat our data and SQL more like traditional code. It gives us access to modularity, testability, and version-control. By taking advantage of templates and Pythonic flow-control statements, we get some powerful functionality from dbt.
Using dbt’s built-in data_test configuration, we can regularly run tests against our data without convoluted SQL pipelines. In fact, dbt already comes with some powerful base-line tests that we can implement easily in our configuration files.
Within dbt are things like documentation generators and pipeline visualizers. New team members can get onboarded more quickly and existing members a deeper understanding of data flows. This helps reduce ramp-up time and improves everyone’s overall understanding of the workflow.
There are many benefits to using Snowflake’s cloud-based platform. It has a great architecture which separates storage and compute resources to minimize resource conflict and improve costs. It utilizes zero-copy cloning, which allows users to create clones of databases without additional storage.
Plus, it supports some complex table data types, such as dynamic tables and Streams, which allow for incremental refresh logic. For more details on Snowflake as a platform, check out this article explaining how Snowflake functions.
Most importantly, these features are highly complimentary to dbt. We can take advantage of incremental refresh to help dbt trigger transformations based on new data. We can also take advantage of Snowflake’s separation of compute and storage which allows dbt perform more computationally intense transformations without impacting the ability to upload and store data.
All of this comes with Snowflake’s ability to scale rapidly and its pay-per-use cost model. As the complexity of our dbt scripts increase, we can easily size up our Snowflake compute warehouses to meet those demands. At the same time, we can use Snowflake’s monitoring to lean down our warehouses and use dbt to streamline our query performance.
When combined, Snowflake and dbt play off of each other very well. Snowflake’s constant tuning helps keep the cloud-based costs low. dbt can take advantage of table partitioning methods like clustering keys and Snowflake’s caching to improve data overhead.
Snowflake does not lend itself to being easily managed using things like Git. Since dbt is built upon the same principles as other coding languages, we can use Git-based workflows to help manage our development processes more easily with things like CI/CD pipelines. This can help with version controlling our pipelines, which would be challenging if done completely in Snowflake.
To help developers collaborate more easily, dbt also has a UI which showcases all your dbt jobs in one place. This helps teams track processes together and make sure they are running appropriately. Also, dbt has recently introduced a Studio IDE which allows for easy Git and database integration with testing workflows. Some teams may even choose to use Snowflake’s UI for full integration.
Many data teams have started utilizing dbt and Snowflake together in order to get the most out of their databases. Continue to learn more about dbt in this hands-on introduction to dbt for data engineers and get a sense for how Snowflake data modeling works with this course.
From Snowflake Quickstarts: Accelerating with dbt Core & Snowflake
Let’s go over some basics of how to configure Snowflake and dbt for proper integration. We will also cover some basics on project structure design best practices.
We’ll begin with Snowflake database set-up then go over dbt set-up.
You will need a dedicated database, schema, and virtual warehouse that will store your dbt data. On top of that, you’ll want a specific dbt user role that dbt can access. When setting up dbt, you’ll provide it with the credentials of that user so that it can communicate with Snowflake. In this section, I’ll give you a few basic guidelines, but for more details on how to manage Snowflake databases and user roles, please go through this Introduction to Snowflake course.
	CREATE DATABASE analytics_db;
	CREATE SCHEMA analytics_db.transformations;
	CREATE WAREHOUSE dbt_wh
	  WITH WAREHOUSE_SIZE = 'XSMALL'
	  AUTO_SUSPEND = 60
	  AUTO_RESUME = TRUE
	  INITIALLY_SUSPENDED = TRUE;
	CREATE ROLE dbt_role;
	GRANT USAGE ON WAREHOUSE dbt_wh TO ROLE dbt_role;
	GRANT USAGE ON DATABASE analytics_db TO ROLE dbt_role;
	GRANT USAGE, CREATE SCHEMA ON DATABASE analytics_db TO ROLE dbt_role;
	GRANT ALL PRIVILEGES ON SCHEMA analytics_db.transformations TO ROLE dbt_role;

	CREATE USER dbt_user PASSWORD='StrongPassword123'
	  DEFAULT_ROLE = dbt_role
	  DEFAULT_WAREHOUSE = dbt_wh
	  DEFAULT_NAMESPACE = analytics_db.transformations;
	GRANT ROLE dbt_role TO USER dbt_user;
In order to run dbt, we’ll need to install it using pip and then configure our profiles.yml file.
dbt-core and dbt-snowflake packagespip install dbt-core dbt-snowflakeprofiles.yml file and save it to ~/.dbt/profiles.ymlsnowflake-db:
target:dev
outputs:
dev:
type: snowflake
account: [account_id from earlier]
user: [dbt_user]
password: [dbt_pw]
role: [dbt_role]
warehouse:[dbt_warehouse]
database: [dbt_database]
schema: [dbt_schema]
threads: 4
client_session_keep_alive: False
query_tag: [anything]dbt init --profile snowflake-dbdbt init snowflake-profile-nameThis will go through a step-by-step initialization that generates a profiles.yml file if needed!
debug function:dbt debug --connectionThis command will check to see if your connection settings are valid and will throw an error if they are not.
Something to consider: instead of having your user and password directly in the profiles.yml file, try using environment variables. For instance, the dbt_password could be saved to a SNOWFLAKE_PASSWORD environment variable. Then in the profiles.yml you would write password: “{{env_var(‘SNOWFLAKE_PASSWORD’)}}”. This helps prevent people from seeing credentials in the configuration file and adds a little extra security.
Connecting to Git helps get the most out of your dbt configuration. The exact steps may vary if you are doing this as a part of your enterprise. The general premise is straightforward forward though. Create a repository on either something like GitHub or GitLab. Then link your dbt account to the GitHub/GitLab account. Once that is done, you can git clone your repository! For more information on connecting Git to dbt, look through dbt’s Git documentation for your particular platform.
A consistent and templated project structure helps new projects get going more quickly by providing fixed places where everything should go.
Structure your project into folders between staging, intermediate, and marts. Within each, you can specify different departments that each have their own models and SQL.
	models/
	│   ├── intermediate
	│   │   └── finance
	│   │       ├── _int_finance__models.yml
	│   │       └── int_payments_pivoted_to_orders.sql
	│   ├── marts
	│   │   ├── finance
	│   │   │   ├── _finance__models.yml
	│   │   │   ├── orders.sql
	│   │   │   └── payments.sql
	│   │   └── marketing
	│   │       ├── _marketing__models.yml
	│   │       └── customers.sql
	│   ├── staging
	│   │   ├── jaffle_shop
	│   │   │   ├── _jaffle_shop__docs.md
	│   │   │   ├── _jaffle_shop__models.yml
	│   │   │   ├── _jaffle_shop__sources.yml
	│   │   │   ├── base
	│   │   │   │   ├── base_jaffle_shop__customers.sql
	│   │   │   │   └── base_jaffle_shop__deleted_customers.sql
	│   │   │   ├── stg_jaffle_shop__customers.sql
	│   │   │   └── stg_jaffle_shop__orders.sql
	│   │   └── stripe
	│   │       ├── _stripe__models.yml
	│   │       ├── _stripe__sources.yml
	│   │       └── stg_stripe__payments.sql
	│   └── utilities
	│       └── all_dates.sql/
Each folder within the models has a purpose:
For each of the staging, intermediate, and marts models’ configuration files, you may want to set the +materialized configuration to define how the SQL output is created in Snowflake. We can choose either views, tables, or incremental datasets.:
That may look something like this:
# The following dbt_project.yml configures a project that looks like this:
# .
# └── models
#     ├── csvs
#     │   ├── employees.sql
#     │   └── goals.sql
#     └── events
#         ├── stg_event_log.sql
#         └── stg_event_sessions.sql

name: my_project
version: 1.0.0
config-version: 2

models:
  my_project:
    events:
      # materialize all models in models/events as tables
      +materialized: table
    csvs:
      # this is redundant, and does not need to be set
+materialized: viewOne huge advantage of integrating dbt and Snowflake is the fact that we get optimizations from both platforms. For Snowflake, we can use different ways of handling queries to make them run faster. For dbt, we can optimize our coding with macros and materialization techniques.
There are some unique Snowflake features we can take advantage of to improve our query performance.
Two big ways we optimize in Snowflake is predicate pushdown and clustering keys.
Predicate pushdown is the idea of changing when Snowflake filters in order to have it read less data. For instance, imagine we were querying our data with two layers of filtering: one security filter and one categorical filter.
The security filter defines who can see certain parts of our table based on security roles. The categorical filter sits in our WHERE statement in the query. Snowflake will choose the filter that goes first, which will require reading the least amount of data.
To help this predicate pushdown, we might consider clustering keys. While Snowflake does a decent job at clustering tables, when data hits multiple TB, it gets challenging for Snowflake to maintain sensible partitions.
By defining clustering keys, we can help Snowflake partition the data in a way that fits how we often query the table. For instance, maybe we select two columns that always go together, like dates and property types. Each property type might have a small enough number of dates that makes repartitioning sensible and data location effective.
Combining clustering keys with Snowflake’s predicate pushdown optimization can make navigating large tables much more efficient.
Resource usage in a pay-per-use system like Snowflake is important! You want to keep to a few simple principles:
auto-suspend to suspend warehouses when your pipelines are offline for an extended period of timeauto-resume will allow you to restart the warehouse as neededThese simple warehouse adjustments will make your Snowflake usage more efficient in the long-run.
On the dbt side, we can leverage dynamic tables and incremental models to simplify update logic.
Dynamic Tables are a Snowflake table type that automatically refreshes based on defined lag times.. dbt has the ability to materialize dynamic tables as part of its configuration and set them up similarly to how it would be done in Snowflake.
models:
  <resource-path>:
    +materialized: dynamic_table
    +on_configuration_change: apply | continue | fail
    +target_lag: downstream | <time-delta>
    +snowflake_warehouse: <warehouse-name>
    +refresh_mode: AUTO | FULL | INCREMENTAL
    +initialize: ON_CREATE | ON_SCHEDULE
This is convenient for having simple data transfer pipelines that do not require complex SQL. The best part is that we can connect to these dynamic tables and have fresh data as needed.
Another flexible way to build tables is to use the incremental model. When writing our SQL, we filter on a column which lets us know what data is new. Then, we utilize the is_incremental() macro to let dbt know to only use that filter when we configure for a materialized incremental table.
Your sample SQL may look something like this, from the dbt documentation:
{{
    config(
        materialized='incremental'
    )
}}

select
    *,
    my_slow_function(my_column)

from {{ ref('app_data_events') }}

{% if is_incremental() %}

  -- this filter will only be applied on an incremental run
  -- (uses >= to include records whose timestamp occurred since the last run of this model)
  -- (If event_time is NULL or the table is truncated, the condition will always be true and load all records)
where event_time >= (select coalesce(max(event_time),'1900-01-01') from {{ this }} )

{% endif %}You saw me just alluding to something called a “macro”. These are snippets of code that are reusable in dbt. This could be calculations that are recycled or transformations that occur frequently.
We create macros using Jinja templating. A common use case may be to clone databases prior to working on them.
	{% macro clone_tables(table_to_clone) -%}

	–- shows all tables within a schema
	    {% set all_tables_query %}
	        show tables in schema {{ clone_tables }}
	    {% endset %}

	-- take the set results and use the run_query macro
	    {% set results = run_query(all_tables_query) %}

	    {{ "create or replace schema " ~ generate_schema_name(var("custom_tables_list")) ~ ";" }}

	--execute the cloning function
	    {% if execute %}
	        {% for result_row in results %}
	            {{ log("create table " ~ generate_schema_name(var("custom_tables_list")) ~ "." ~ result_row[1] ~ " clone " ~ clone_tables~ "." ~ result_row[1] ~ ";") }}
	            {{ "create table " ~ generate_schema_name(var("custom_tables_list")) ~ "." ~ result_row[1] ~ " clone " ~ clone_tables~ "." ~ result_row[1] ~ ";" }}
	        {% endfor %}
	    {% endif %}
	{%- endmacro %}
This template takes a provided schema, generates a list of tables, and then clones them to the warehouse/schema provided in your dbt config. You can then use this macro in your dbt code or when starting up dbt.
To get more practice with Jinja in dbt, I really recommend this case study on building e-commerce data models with dbt. It walks through some complex Jinja templating with dbt and gets you some pretty advanced hands-on experience!
As we work with customer information, it is possible we get introduced to personally identifiable information (PII) and need to hide it in our database. This is simple to do with Snowflake! We can use CREATE MASKING POLICY to let Snowflake know what columns and data types need to be masked when queries are run. These policies ensure no PII is leaked while querying sensitive information.
We can then use dbt tests with custom SQL that checks that tables are masking properly. For instance, if we define a masking policy that only allows the ANALYST role to see PII, like so:
	CREATE OR REPLACE MASKING POLICY email_mask AS (val string) returns string ->
	  CASE
	    WHEN current_role() IN ('ANALYST') THEN VAL
	    ELSE '*********'
	  END;
Then, using our dbt_account user role to query the data should return a string '*********'.
If our test does something simple like:
	SELECT *
	FROM schema.table
	WHERE email <> '*********'
If this test returns results, then it should be considered a failure. No emails should come back as anything other than the masked string. We should then check the masking policy on Snowflake and keep testing until it is working properly.
As always, security is a key pillar of cloud access. We’ll go over some basics for security and data protection in this section.
Snowflake’s main security framework is role-based access control (RBAC) and the usage of service accounts.
Defining RBAC privileges allows us to apply security settings to a broad group of users without having to manually assign them individually. This makes it easier to maintain.
As noted above, we create roles using the CREATE ROLE statement. To give permissions we use GRANT <privilege> … TO ROLE and likewise remove them through REVOKE <privilege> … FROM ROLE.
Here are some best practices:
dbt_reader, table creation access to dbt_writer, and delete access only to an admin account like dbt_admin.Service accounts are special machine-based accounts that interact without human interaction. These accounts don’t have usernames and passwords. Instead, they use public keys and network restrictions to minimize risk.
Creating a service account might look like this:
CREATE USER dbt_service
RSA_PUBLIC_KEY = <keysring>
This way, you have a singular account that is managed by admins, and you no longer have to worry about individual users. It is recommended to regularly rotate the keys so that they cannot get leaked. Also, make sure to keep a close eye on network activity using Snowflake’s LOGIN_HISTORY.
Protect your data and logins. Although we might have hardcoded our credentials as an example, it is actually poor practice in reality. Use secret managers like AWS Secrets Manager or GitHub Secrets to hold onto important credentials.
These allow you to store credentials online that are only accessible to users with the proper RSA/Security keys. Nobody gets to see the actual value and rotating passwords/keys is easy with their automated management.
Make sure any connections are properly secured and users are on the appropriate enterprise network to access data. This is often established by using VPNs like GlobalProtect. Since we are connecting to Snowflake, a lot of the end-to-end encryption is handled by the cloud. Just another benefit of being on Snowflake!
Finally, we want to audit our activity. Snowflake has query logging through tables like QUERY_HISTORY and QUERY_HISTORY_BY_USER. We can monitor usage, errors, and any security abuse in these logs. Through dbt, we can track new runs, changes, or edits to projects by using our version control pipelines.
Version control and coding templates help maintain change tracking and compliance. Any issues introduced by changes can be easily noted during mandatory pull requests and addressed before they become a concern.
Let’s talk about how we can save some money! In dbt, of course. Monitoring our model performance is vital. It’s easy for models that used to run without issue to get slower and less performant as table size increases.
With dbt, the best way to monitor performance is to use built-in packages like dbt-snowflake-monitoring or external tools like Looker and Datafold to help with visualization and data comparisons.
Getting started with dbt-snowflake-monitoring is pretty easy! In your dbt packages.yml add the following:
packages:
  - package: get-select/dbt_snowflake_monitoring
    version: [">=5.0.0", "<6.0.0"] # We'll never make a breaking change without creating a new major version.
Then, in each project’s YAML file, add the following:
dispatch:
  - macro_namespace: dbt
    search_order:
      - <YOUR_PROJECT_NAME>
      - dbt_snowflake_monitoring
      - dbt
query-comment:
  comment: '{{ dbt_snowflake_monitoring.get_query_comment(node) }}'
  append: true # Snowflake removes prefixed comments.
Now you’re ready to use the package for monitoring things like your warehouse usage, query durations, and failed models! It uses your dbt user’s existing access to write tables to Snowflake, which contain useful information. For example, if I wanted to see my monthly warehouse spend, I could use the following SQL:
select
    date_trunc(month, date)::date as month,
    warehouse_name,
    sum(spend_net_cloud_services) as spend
from daily_spend
where service in ('Compute', 'Cloud Services')
group by 1, 2
External tools like Looker or Tableau can be integrated directly with dbt for easy visualization of data and performance. For alerts, dbt can send emails or Slack notifications.
For deeper comparisons, external stacks like Datafold provide deeper insight into how data quality is impacted by changes. Datafold automates data diffs with every code change you make. This lets other team members easily review your code and the impact it will have on data. This sort of automated regression testing allows us to maintain quality data without having to constantly build new checks and tools.
We can’t avoid running our ETL processes, but we can definitely plan ahead to minimize the cost impact of computation and storage. Thanks to the split design of Snowflake, we can optimize our warehouses and storage separately to bring a more flexible cost optimized environment.
For warehouses, the best way is to minimize idle time. Spread out your automated pipelines as much as possible to reduce idle time, spikes in computational needs, and competing resources.
Monitor regularly using the WAREHOUSE_LOAD_HISTORY and QUERY_HISTORY tables to understand how resources are being used. The best practice is to start with XS. If queries are running too slowly, then it is time to size up based on your team’s SLA.
For storage, the best practice is to get rid of unnecessary tables. While Snowflake itself doesn’t have cold-tiers like AWS and Google, you can choose to move your data from Snowflake to AWS/Google for these cold-tiers and reduce storage cost.
Data retention policies can clearly outline a timeline for tables that are rarely used and when they will be moved to cold storage.
For large tables that grow frequently, monitor them closely. As they get larger, Snowflake’s ability to automatically and efficiently partition breaks down. Take advantage of the automatic clustering mentioned above to help Snowflake better partition your data. Better partitions lead to less time reading storage and thus saving cost.
Due to dbt’s native integration with version control, CI/CD, and automated pipelines are a breeze. We’ll cover some automated orchestration options and testing best practices.
With dbt Cloud, we can use Snowflake Tasks to trigger scheduled runs of our dbt projects. The way it works is we first create a dbt project within Snowflake using our Git repository, and then we create a task that executes that dbt project.
For instance, we could do something like the following to create a dbt project:
CREATE DBT PROJECT sales_db.dbt_projects_schema.sales_model
  FROM '@sales_db.integrations_schema.sales_dbt_git_stage/branches/main'
  COMMENT = 'generates sales data models';
Then we use the following code to run that project:
CREATE OR ALTER TASK sales_db.dbt_projects_schema.run_dbt_project
  WAREHOUSE = sales_warehouse
  SCHEDULE = '6 hours'
AS
  EXECUTE DBT PROJECT sales_db.dbt_projects_schema.sales_model args='run --target prod';
In fact, it’s so comprehensive, we can even run tests afterward to make sure the project ran properly:
CREATE OR ALTER TASK sales_db.dbt_projects_schema.test_dbt_project
        WAREHOUSE = sales_warehouse
        AFTER run_dbt_project
AS
  EXECUTE DBT PROJECT sales_db.dbt_projects_schema.test_dbt_project args='test --target prod';
For scheduling, we have the option to either set a flat time like 60 MINUTES and 12 HOURS or using cron like so USING CRON 0 9 * * * UTC..
Our models rarely stay static, however, and we often have to iterate upon them. It can be time-consuming to manually build every piece of our pipeline. This is where GitHub Actions come in. We often use GitHub Actions in CI/CD pipelines to automate the testing and building of code.
GitHub Actions are designed using YAML files inside of a .github/workflows folder inside the repository. We can make them trigger any time we make a pull request, such that we run through some dbt tests.
name: dbt pull test

# CRON job to run dbt at midnight UTC(!) everyday
on:
  pull_request:

types:
openedreopened
# Setting some Env variables to work  with profiles.yml
# This should be your snowflake secrets
env:
  DBT_PROFILE_TARGET: prod
  DBT_PROFILE_USER: ${{ secrets.DBT_PROFILE_USER }}
  DBT_PROFILE_PASSWORD: ${{ secrets.DBT_PROFILE_PASSWORD }}

jobs:
  dbt_run:
    name: dbt testing on pull request
    runs-on: ubuntu-latest
    timeout-minutes: 90

    # Steps of the workflow:
    steps:
      - name: Setup Python environment
	uses: actions/setup-python@v4
	with:
	  python-version: "3.11"

      - name: Install dependencies
	run: |
          python -m pip install --upgrade pip
	  python -m pip install -r requirements.txt

      - name: Install dbt packages
	run: dbt deps
        # optionally use this parameter
        # to set a main directory of dbt project:
        # working-directory: ./my_dbt_project

      - name: Run tests
	run: dbt test
        # working-directory: ./my_dbt_project
Setting up your automations properly can make your life a lot easier and help other developers see your tested models. This streamlines the development process by reducing the need for manual testing.
dbt comes with a powerful testing suite. It comes with a few out-of-the-box generic data tests that can be set on your model directly and allow for custom SQL logic. The generic tests are set on particular columns in your model and check if these specific columns pass that test. The out-of-the-box tests are the following:
unique: every value in this column should be uniquenot_null: there should be no null values in the columnaccepted_values: checks if the values are in a list of accepted valuesrelationships: checks if the values in this column exist in another related tableHere is an example of using these relationships (from dbt documentation on tests):
version: 2

models:
  - name: orders
    columns:
      - name: order_id
        data_tests:
	# makes sure this column is unique and has no nulls
          - unique
          - not_null
      - name: status
        data_tests:
	#makes sure this column only has the below values
          - accepted_values:
              values: ['placed', 'shipped', 'completed', 'returned']
      - name: customer_id
        data_tests:
	# makes sure that the customer ids in this column are ids in the customers table
          - relationships:
              to: ref('customers')
              field: id
We can use custom SQL to create more specific and generic tests. The goal here is for the tests to return failing rows. So if any results appear, the test is considered failed. These custom SQL files live in our tests directory.
For example, if we wanted to know if any sales were negative, we could use the following:
	select
	    order_id,
	    sum(amount) as total_amount
	from {{ ref('sales') }}
	group by 1
	having total_amount < 0
We would then reference that test in our schema.yml file inside our test folder:
version: 2
data_tests:
  - name: assert_sales_amount_is_positive
    description: >
    Sales should always be positive and are not inclusive of refunds
If we wanted to use this kind of check on more tables and columns, we may want to turn this into a generic test. That might look like this:
{% test negative_values(model, group,sum_column) %}

    select {{group}},
    sum({{sum_column}}) as total_amt
    from {{ model }}
    group by 1
    having total_amt < 0
{% endtest %}
We can now use this test in our models yaml file just like the other generic tests dbt comes with! You could check for negative passengers on a trip or negative profit and so on! The possibilities are endless.
To make this testing more seamless and simple, we can take advantage of Snowflake’s zero-copy cloning. Snowflake’s CREATE TABLE <object> CLONE <source_object> can create a zero-copy clone in your dev/test environment.
Then, all your testing and CI can be done against the cloned object. The benefit of this is that we do not require additional storage space to have a safe testing environment. Plus, whenever we need more testing space, we can create more testing environments with this instant cloning.
Let’s look into the future improvements and trends coming from dbt and Snowflake.
dbt is constantly improving its integration both with its core product and with AI. In Snowflake, we are able to use Snowsight as a UI interface to help manage our dbt workspaces. By integrating more seamlessly into our Snowflake environment, we minimize the need for working on dbt models externally. Instead, we can centralize our workflows by allowing teams to edit and collaborate through Snowflake’s UI.
To help speed up development, dbt offers an AI-powered assistant called dbt Copilot. This assistant can be accessed through the dbt Studio IDE, Canvas, or Insights and uses natural language processing to help speed up the more time-consuming parts of model development, such as writing documentation and creating tests.
The dbt Copilot can even be used to help onboard new analysts by providing them with concise summaries of projects and models.
Use both of these tools to speed up your time to production and shorten development time allowing your team to tackle the harder and more challenging data problems in your organization.
Machine learning pipelines require consistently clean and well-designed data. dbt is the perfect tool for data transformation pipelines that feed machine learning models. We can leverage the flexibility and power dbt to automate data transformations that integrate seamlessly into our machine learning pipelines.
For instance, we can transform our data straight into a machine learning warehouse. This data can then be used with Snowflake’s Cortex AI to garner deeper insights. If we have multiple models that require similar transformations, dbt’s templating can simplify the way we clean our data and provide more consistency and easier data governance. To get a better sense of Snowflake’s AI tools, read this guide on Snowflake Arctic, which is Snowflake’s LLM.
Thanks to Snowflake’s native Python support and Snowpark API for Python, we can run code locally without having to move data out of Snowflake. The next level of that is using Snowpark Containers, which are currently (as of writing) only available to AWS and Azure regions, to run completely isolated executions of our dbt code.
To do so, we package our dbt models and environment into a container, which then lives in Snowflake’s image repository.
We can then use this containerized dbt project easily within Snowpark. The main benefit? The ability to more easily utilize Snowflake’s resource for complex Python-based data transformations and integration of dbt transformations within the larger Snowflake environment.
If you’re curious to learn more about Snowpark, check out this information that describes Snowflake Snowpark in detail.
Integrating dbt with Snowflake empowers data teams to build modular, governed, and scalable transformation pipelines. With features like automated testing, Git-driven CI/CD workflows, and seamless scalability, this stack is ideal for modern data operations.
To stay competitive, data teams should prioritize:
As both tools continue to develop, the dbt + Snowflake integration will only become more powerful for data engineering teams. If you have an interest in learning more about dbt or Snowflake, check out the following resources:
Top DataCamp Courses
Track
Track
Course
Tutorial
Austin Chia
Tutorial
Bex Tuychiev
Tutorial
Tim Lu
Tutorial
Tim Lu
Tutorial
Tim Lu
Tutorial
Tim Lu