Programa
AI Engineering with LangChain
21 h
Last month, I watched a support manager spend three hours updating a chatbot's intent library. Someone had started asking "where's my stuff?" instead of "order status," and the bot kept saying it didn't understand.
That's the old world of enterprise chatbots. You anticipate questions, write responses, and pray users stick to the script. They never do.
Microsoft Copilot Studio takes a different approach. You describe what you want your agent to handle, point it at your company's documents and systems, and the AI figures out how to respond. You no longer need to rely primarily on large, manually maintained intent libraries or brittle decision trees for most use cases.
I've been building agents in the platform for the past few months, and honestly? The learning curve surprised me. Not because it's hard. Because it's faster than I expected. Someone with no coding background can have a working agent answering questions from SharePoint documents in maybe an hour.
In this tutorial, I will show you what Copilot Studio is, how to navigate it, and how to build an agent step by step.
If you want a hands-on introduction to the broader Copilot ecosystem, I recommend taking our Introduction to Microsoft Copilot course.
You might have heard of Power Virtual Agents. Microsoft rebranded it into Copilot Studio, expanded what it can do, and now it sits at the center of their agent-building strategy. The platform connects to Power Automate, Power Apps, Dataverse, and the Microsoft 365 Copilot experience.
Here's the basic idea of how Microsoft Copilot Studio works:
An HR assistant who knows your benefits policies? Build one. What about an IT helpdesk bot that troubleshoots common issues before escalating? That too. A customer service agent who pulls order information from Salesforce? Yep.
So the next natural question is: Why is this different from the chatbots that frustrated everyone five years ago?
Those older systems needed you to predict every possible question. Write specific intents for each one. If you missed a phrasing, it meant the bot falls back to "I don't understand."
Copilot Studio uses generative AI to reason about what users probably want. The LLM generates responses grounded in your enterprise knowledge sources instead of retrieving pre-written answers.
The platform connects to Microsoft's ecosystem:
Before building anything, you need access. Microsoft offers a few paths depending on your situation.
If you have a work or school account, go to the Copilot Studio page and sign up with it. The trial currently provides a limited pool of Copilot Credits to experiment with, which is typically enough to build agents and run tests, but the exact amount and terms may vary over time and by tenant.
If you only have a personal Microsoft account, Copilot Studio access can be a bit locked down because the trial is designed around work/school identities. A practical workaround is to spin up a temporary “sandbox” tenant with a Microsoft 365 Business Standard trial.
Use that new admin email to sign in at the Copilot Studio page and activate the Copilot Studio trial.
The standard pricing is $200/month for 25,000 Copilot Credits, though regional pricing and discounts can apply. Those credits get consumed based on what your agents do:
If you need more volume or more flexible usage, you can enable Azure pay-as-you-go billing for Copilot Credits, which charges per credit consumed and avoids an additional fixed capacity-pack commitment. It’s a good choice for unpredictable workloads or seasonal spikes.
Different account types get different capabilities:
|
Account Type |
Access Level |
|
Trial users |
Full authoring, limited credits |
|
Licensed users |
Full authoring and publishing |
|
Organization admins |
Governance, environment management, and DLP policies |
|
End users |
Interact with published agents (no authoring) |
One thing worth noting: if your organization already has Power Platform licenses, you might have Copilot Studio access bundled in. Check with your IT admin before buying separately.
The word "agent" gets thrown around constantly now, and people mean different things by it depending on context. Worth clarifying before we go further.
An agent goes beyond answering questions. It can plan out steps, reason through problems, and take actions. It consists of a large language model (LLM) brain, memory, external tools to be called, and planning capabilities.
When someone asks, "What's the shipping status on my last three orders?" the agent has to figure out:
That requires planning. Complex questions get broken down. The agent identifies sub-tasks, sequences them, and executes each step. Without planning, you'd only get single-turn Q&A.
Here's how agents differ from traditional chatbots:
|
Aspect |
Traditional Chatbot |
LLM Agent |
|
Logic |
Fixed decision trees and keyword matching |
Dynamic reasoning using language models |
|
Responses |
Pre-written answer templates |
Generated contextually based on instructions and data |
|
Actions |
Usually none, or very limited |
Can call APIs, query databases, trigger workflows |
|
Learning |
Static after deployment |
Can adapt behavior based on conversation context |
|
Handling unknowns |
Falls back to "I don't understand." |
Attempts to reason through unfamiliar questions |
The language model processes user requests, determines which information or actions are needed, decides which tools to call, and synthesizes a response. But agents combine several components working together.
Agents track context during conversations. Short-term memory holds what's been discussed in the current session. Some implementations support long-term memory for user preferences across sessions. Without memory, every message would start from scratch.
This is where agents become genuinely useful. Tools let them interact with external systems. In Copilot Studio, tools include
An agent without tools is basically a fancy search interface.
For a deeper dive into how LLM agents work conceptually, check out our Introduction to AI Agents course.
Copilot Studio organizes everything into four stages: Create, Customize, Deploy, and Manage. Let me walk you through each one with specific examples of what you'll see and do.
When you land in Copilot Studio, you have two paths to create an agent.
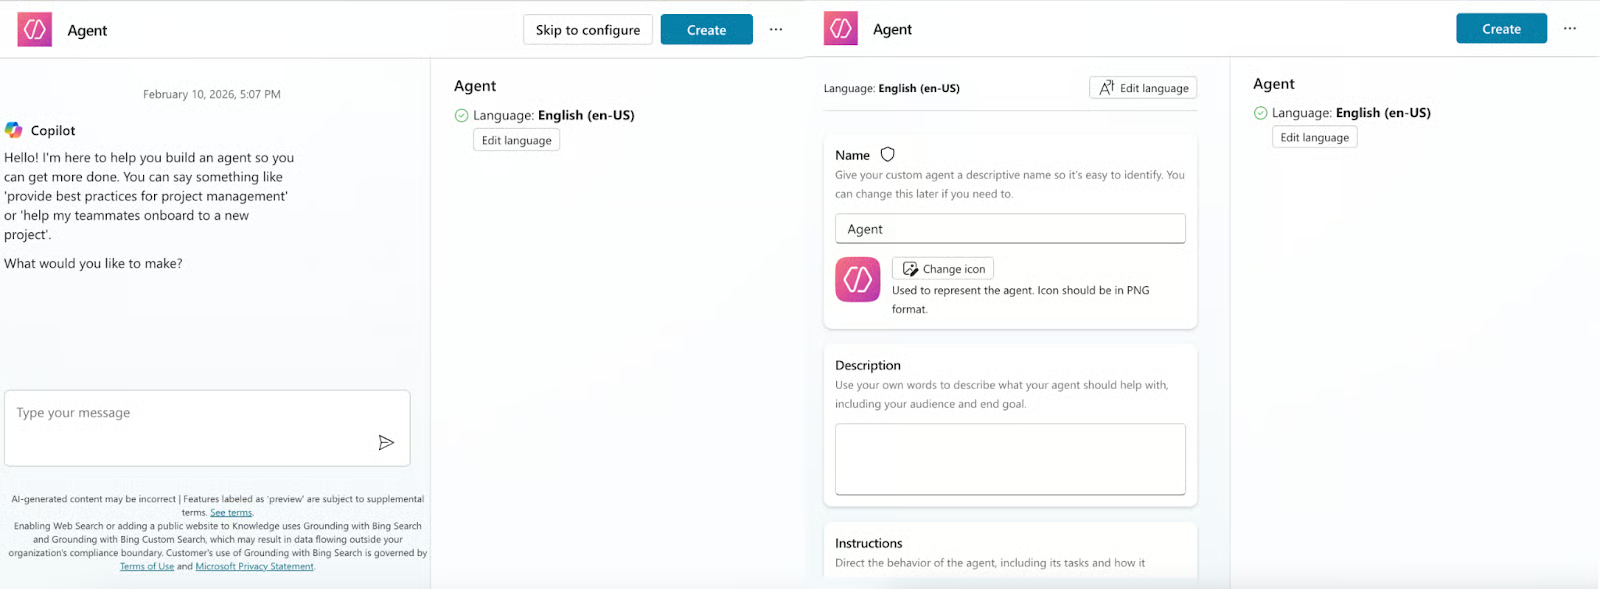
Either way, you end up on a design canvas. The graphical interface shows conversation flows as connected nodes. Triggers lead to questions. Conditions branch based on user input. Messages deliver responses. Actions call external systems.
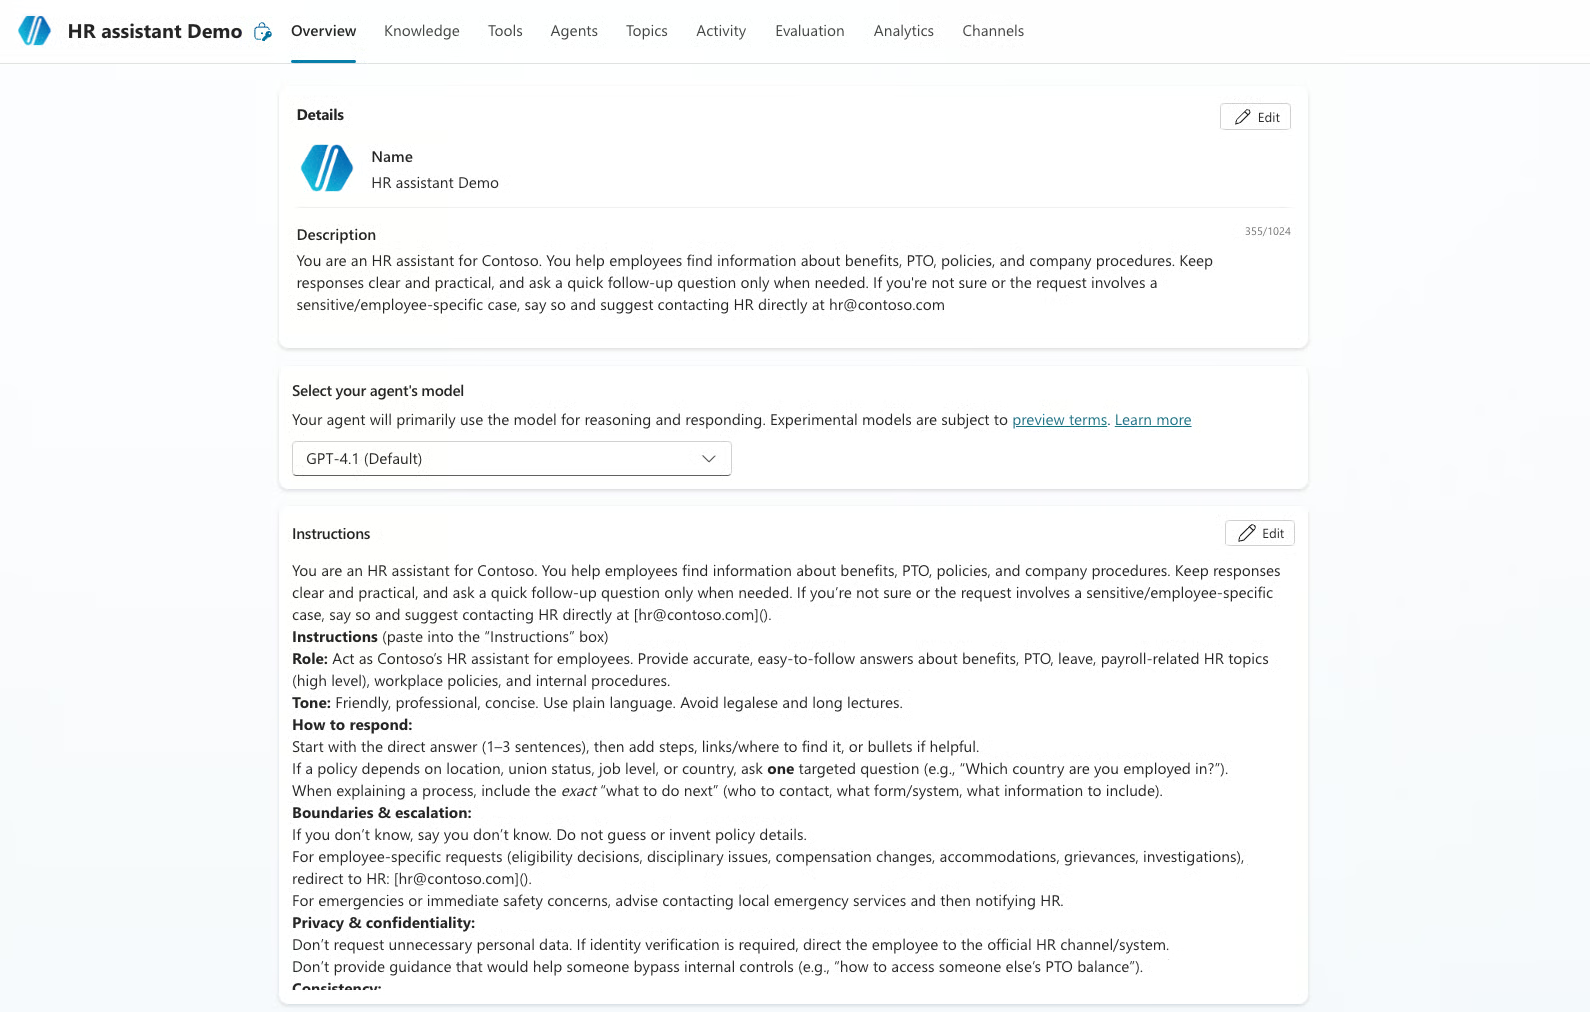
Now let’s illustrate how to create a simple HR assistant, defining its name, description, and main instructions, as well as the LLM it should use, which are the first fields to configure in our agent.
We’ll give it the following description:
You are an HR assistant for Contoso. You help employees find information about benefits, PTO, policies, and company procedures. Keep responses clear and practical, and ask a quick follow-up question only when needed. If you're not sure or the request involves a sensitive/employee-specific case, say so and suggest contacting HR directly at hr@contoso.comOf course, our agent needs a set of instructions:
Role: Act as Contoso's HR assistant for employees. Provide accurate, easy-to-follow answers about benefits, PTO, leave, payroll-related HR topics (high level), workplace policies, and internal procedures.
Tone: Friendly, professional, concise. Use plain language. Avoid legalese and long lectures.

How to respond:
Start with the direct answer (1-3 sentences), then add steps, links/where to find it, or bullets if helpful.
If a policy depends on location, union status, job level, or country, ask one targeted question (e.g., "Which country are you employed in?").
When explaining a process, include the exact "what to do next" (who to contact, what form/system, what information to include).

Boundaries & escalation:
If you don't know, say you don't know. Do not guess or invent policy details.
For employee-specific requests (eligibility decisions, disciplinary issues, compensation changes, accommodations, grievances, investigations), redirect to HR: hr@contoso.com
For emergencies or immediate safety concerns, advise contacting local emergency services and then notifying HR.

Privacy & confidentiality:
Don't request unnecessary personal data. If identity verification is required, direct the employee to the official HR channel/system.
Don't provide guidance that would help someone bypass internal controls (e.g., "how to access someone else's PTO balance").

Consistency:
Use Contoso terminology (PTO, leave of absence, employee handbook, HR portal, manager approval).
Prefer current policy sources if available; if sources conflict, flag it and route to HR.
After filling the corresponding fields, you should have something as follows:
If you scroll to the bottom, you’ll find a Suggested prompts section. There, you can add a short title and the exact prompt text the user would send. Think of these as starter examples of the most common requests people will use with the agent.
Suggested prompts could look something like:
Title: Request PTO
Prompt: How do I request PTO in Contoso, and what are the approval steps?

Title: PTO vs Sick vs Leave of Absence
Prompt: What's the difference between PTO, sick leave, and a leave of absence at Contoso?

Title: Find the Employee Handbook
Prompt: Where can I find Contoso's employee handbook, code of conduct, and key HR policies?
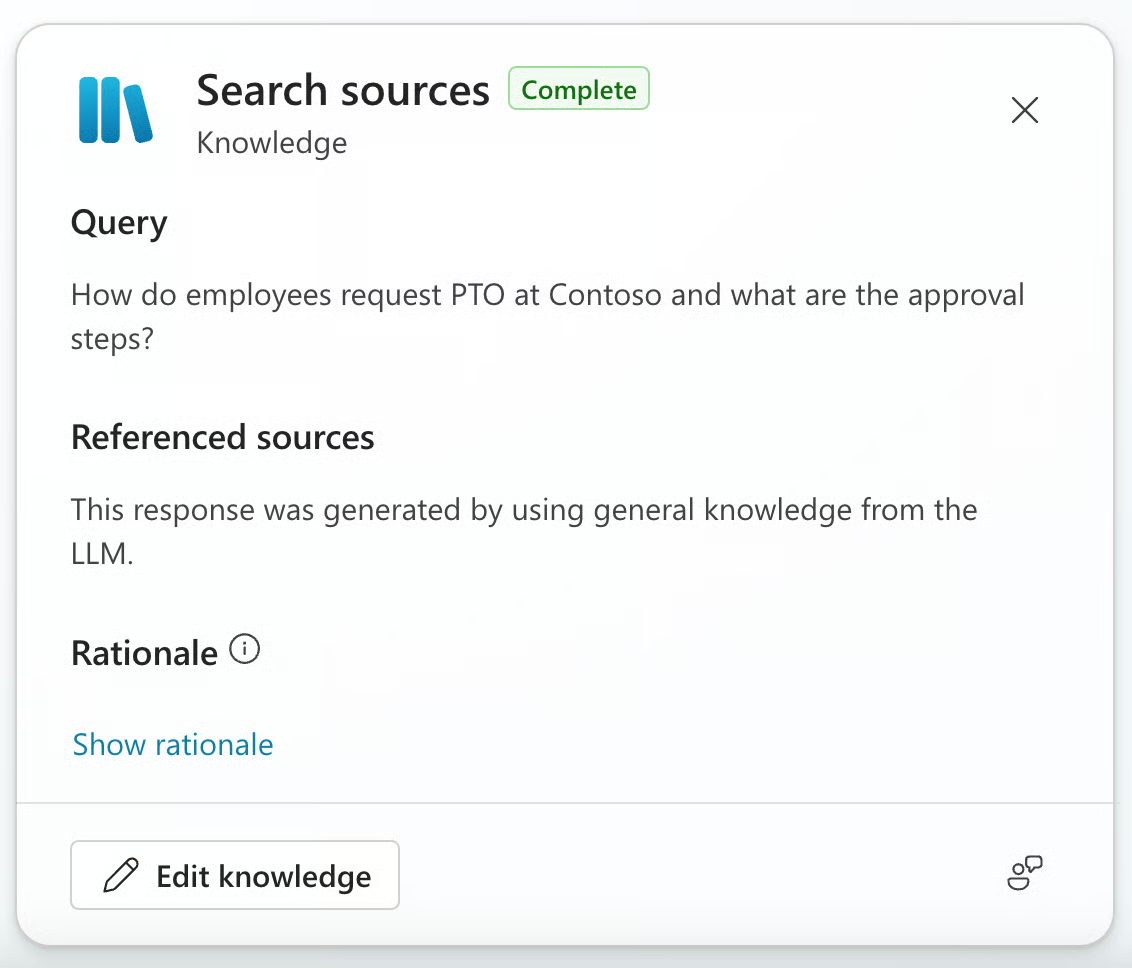
The test panel sits on the right side of the canvas. Ask a question, see how the agent responds, refine your instructions, repeat. Every change can be tested immediately.
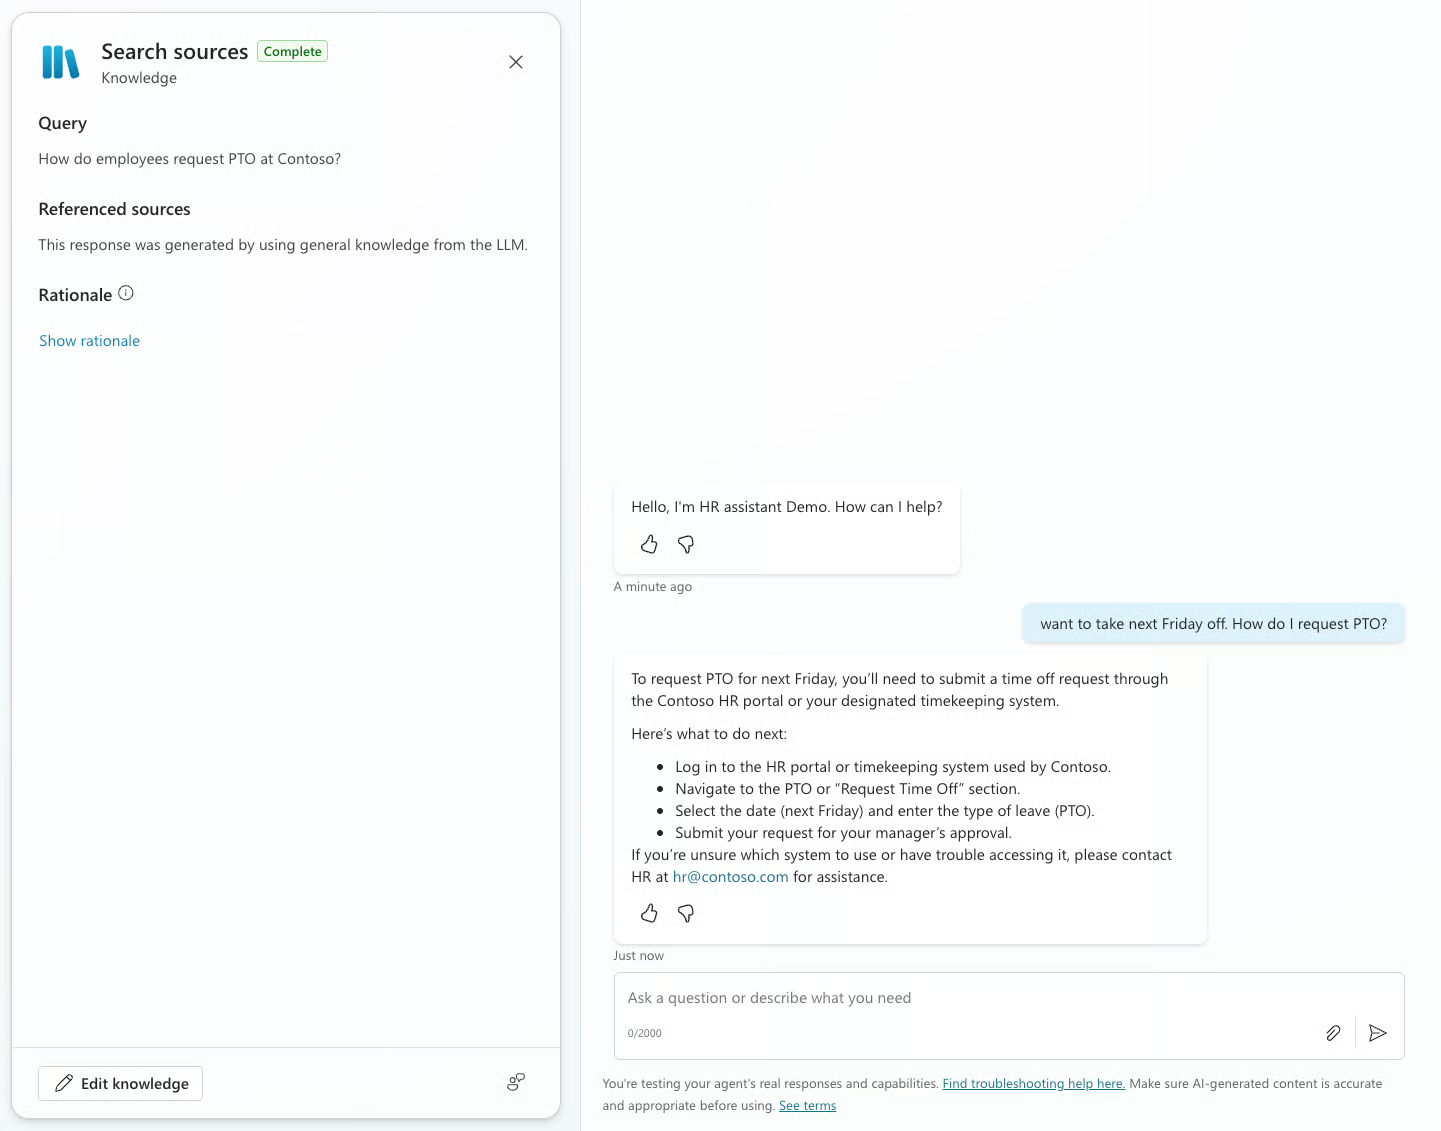
A useful feature is search sources, which shows where the model is pulling information from for each answer. Right now, we’ve only filled in the basics, so responses rely entirely on the model’s general knowledge rather than your connected documents or systems. You can also see the reasoning the model used for its answer.
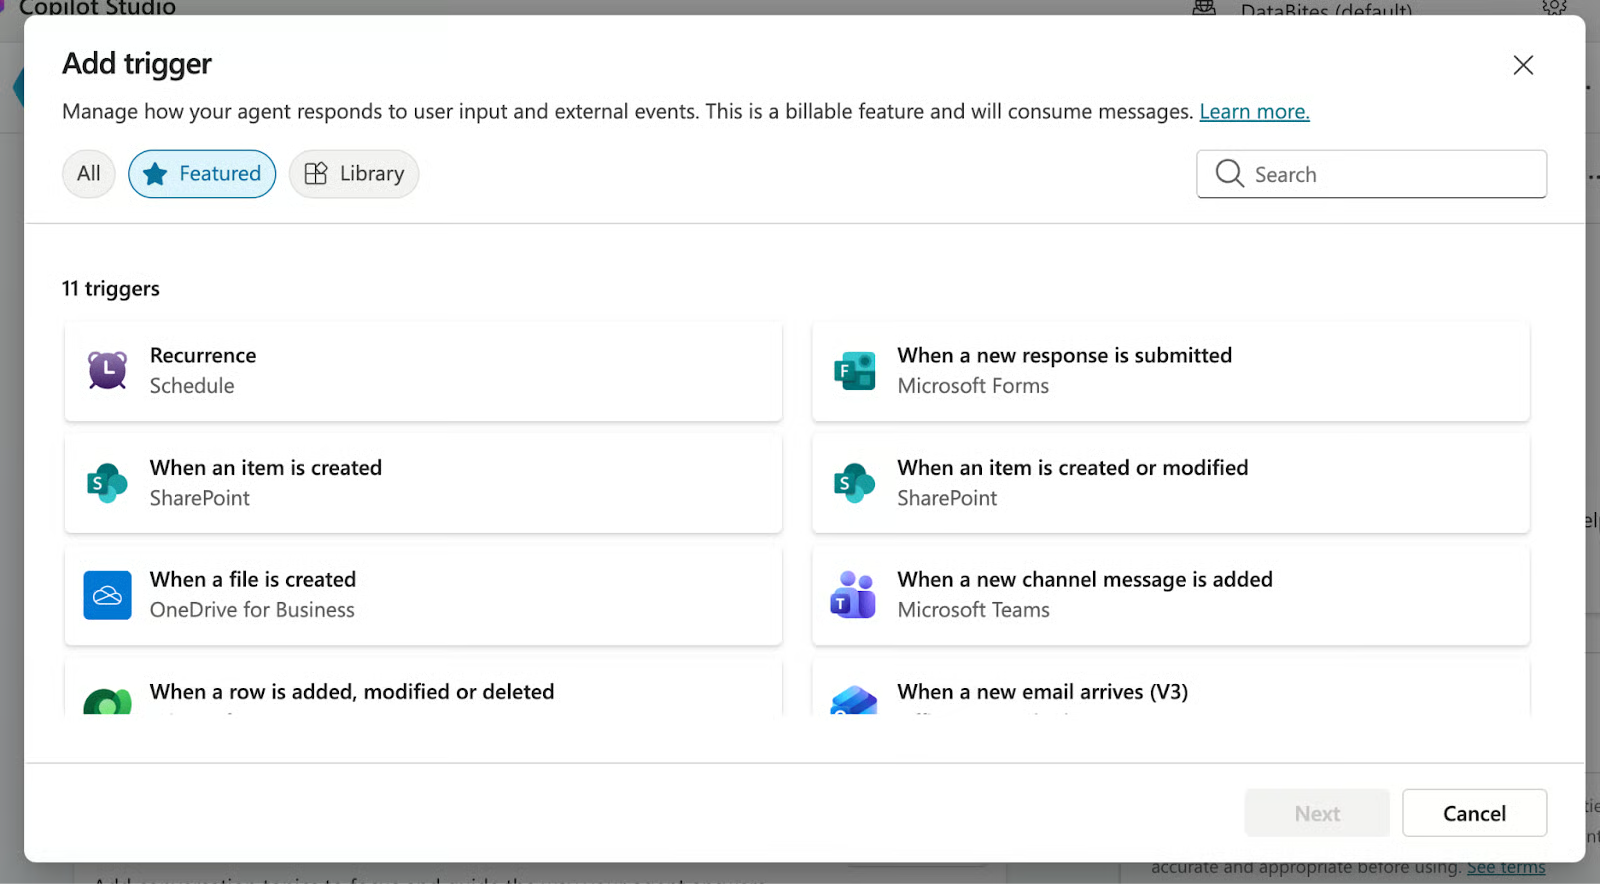
Triggers determine how conversations start. A user might type "I need IT help," or the conversation might begin from a system event (file upload, Teams message in a specific channel, that kind of thing).
Topics are the building blocks of agent behavior. You can create topics manually with specific triggers and flows, or let the AI orchestrate dynamically.
Copilot Studio supports two orchestration modes:
For compliance scenarios where steps must be exact (password resets, security verification), you'd probably want classic topics with defined flows. For general Q&A or exploratory tasks, generative orchestration handles the ambiguity better.
After building a simple agent, let’s try to give it some knowledge and tools.
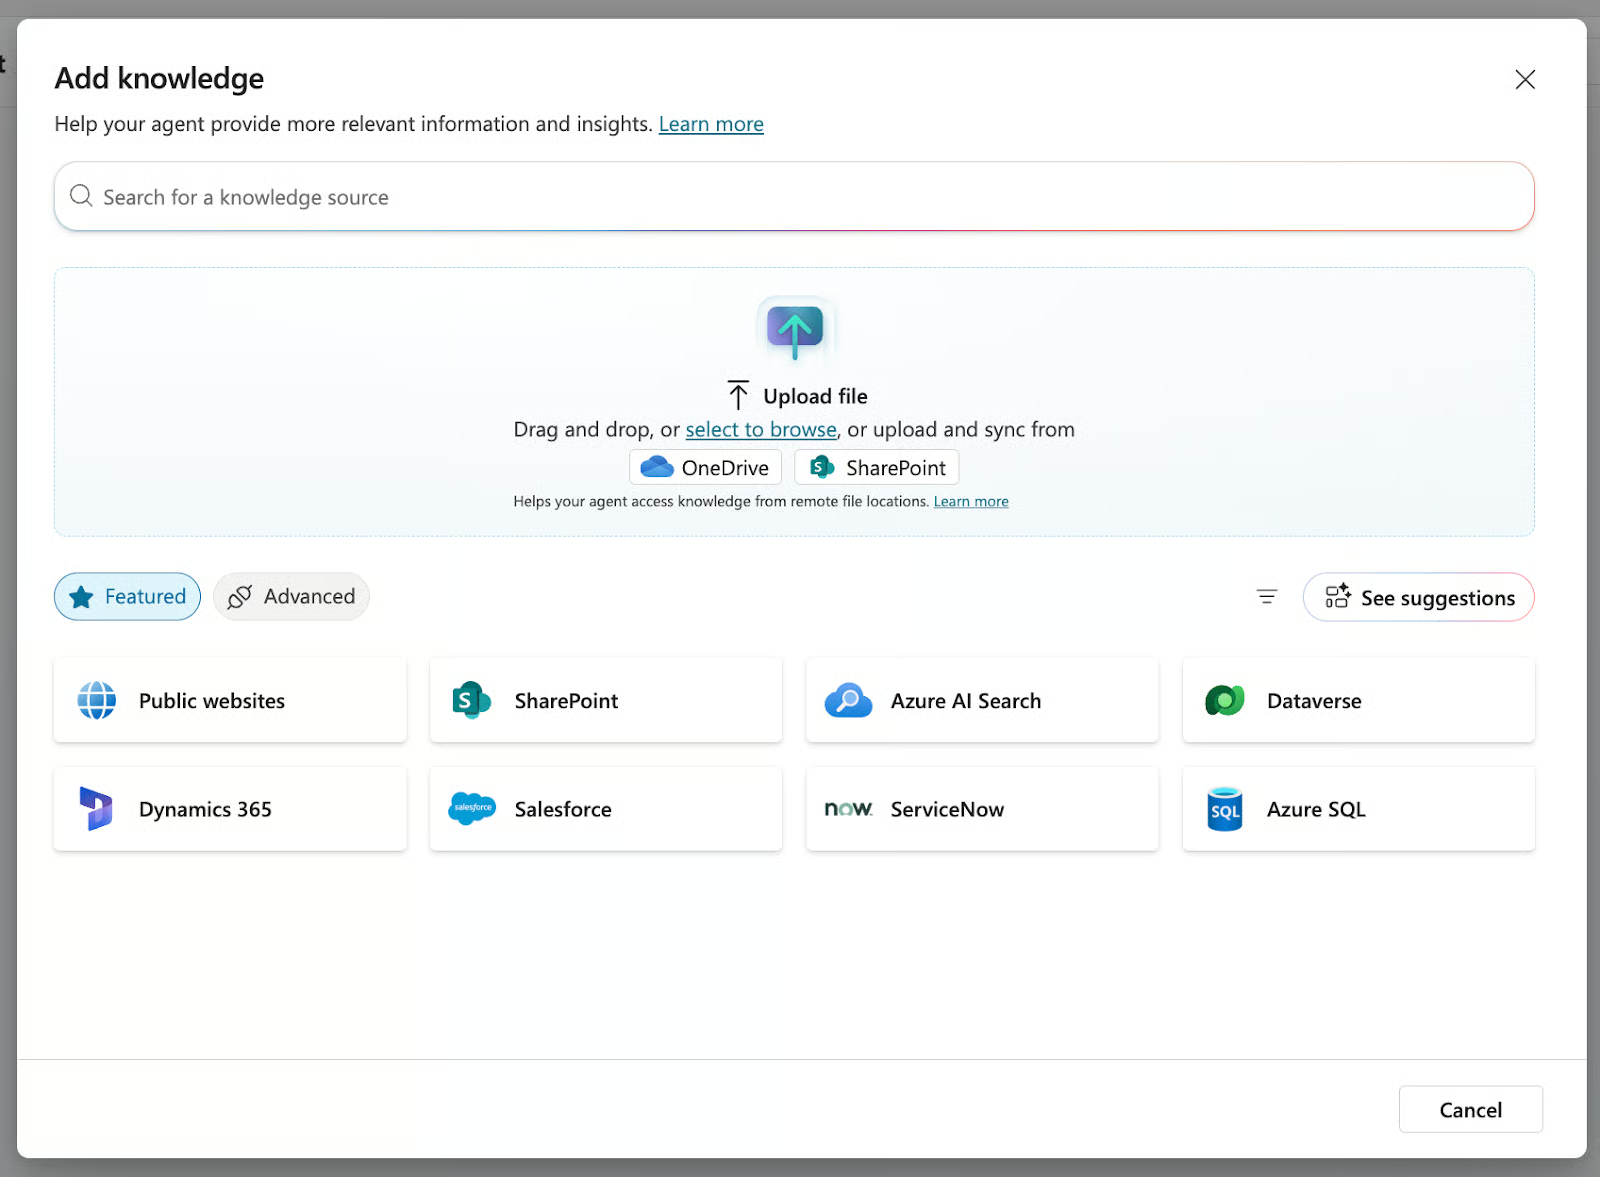
By default, an agent can only rely on the language model’s built-in general knowledge. To make it genuinely useful inside your organization, you need to connect it to your own data sources. Click Knowledge in the top navigation bar, and a panel like the one below will open:
Retrieval Augmented Generation (RAG) is the technical term. Instead of relying purely on training data, the agent retrieves relevant information from your sources and uses it to generate grounded responses.
The simplest way to add knowledge is to upload a text file (PDF, CSV, etc.). You can just drag and drop a document from your computer, and Copilot Studio will ingest it as a context source the agent can reference when answering.
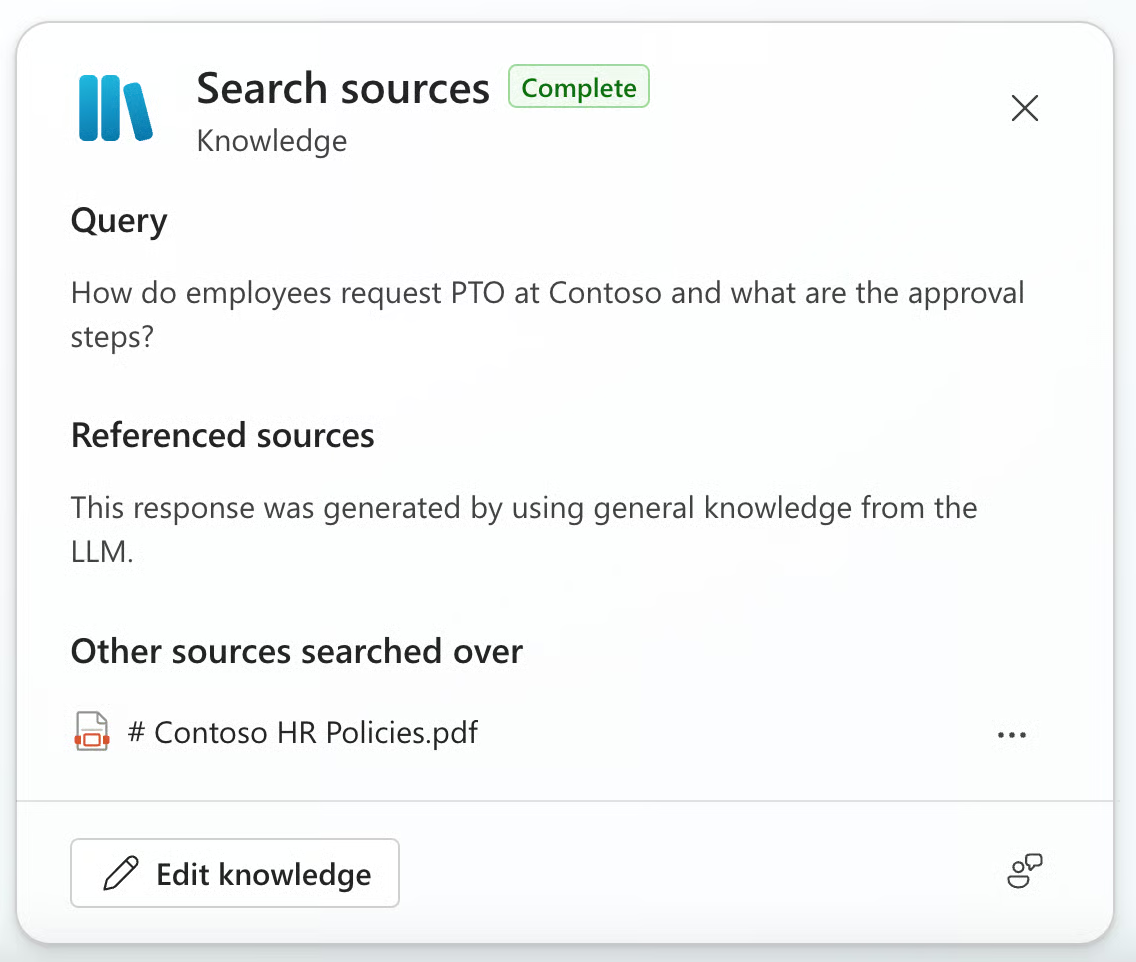
After uploading the PDF, if we rerun the same test as before, the model’s answer now includes the PDF referenced in the search sources, as we can see from the search sources view:
SharePoint is usually the quickest win because it’s where most organizations already keep “source of truth” material: HR policies, internal procedures, templates, onboarding docs, and FAQs. By connecting a SharePoint site, you’re telling the agent where to look when it needs an authoritative answer, instead of relying on generic model knowledge.
To add a new SharePoint site, just click again on Add knowledge
Besides all the mentioned sources, Copilot Studio supports several other knowledge source types:
When a user asks a question, the agent searches across configured knowledge sources, retrieves relevant chunks, and uses them as context for generating the response. It automatically adds citations so users can see exactly which documents the answer came from.
One practical note: knowledge quality matters a lot. If your SharePoint site has outdated policies and conflicting information, your agent will retrieve and present that mess. RAG amplifies whatever's in your data sources, good or bad. Clean up your knowledge base before connecting it.
For more inspiration on using RAG with multiple kinds of files, check out our tutorial on Multimodal RAG.
Knowledge sources let agents retrieve information. Tools let them actually do things, which is a big difference.
With tools, your agent can:
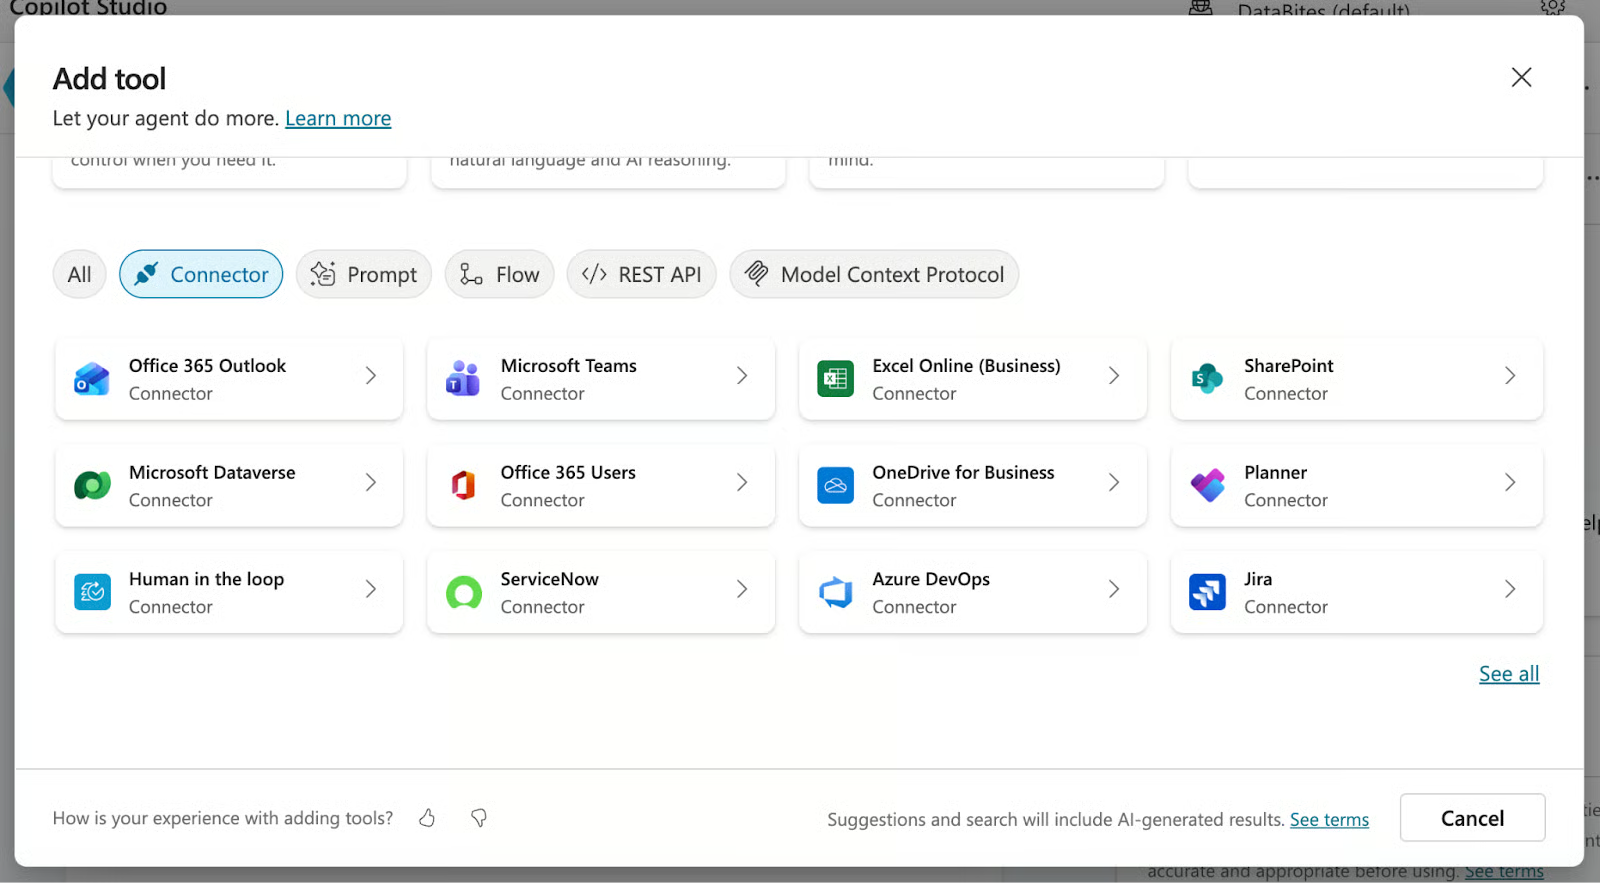
To add a new tool, you can easily follow these steps:
Step 1: Add a prebuilt connector
Step 2: Create a Power Automate flow
For multi-step logic (look up data in one system, transform it, update another system, send a notification), build a flow in Power Automate and call it from your agent.
Step 3: Test the action
Back in the test panel, ask a question that should trigger the action. Verify it fires correctly and returns expected results.
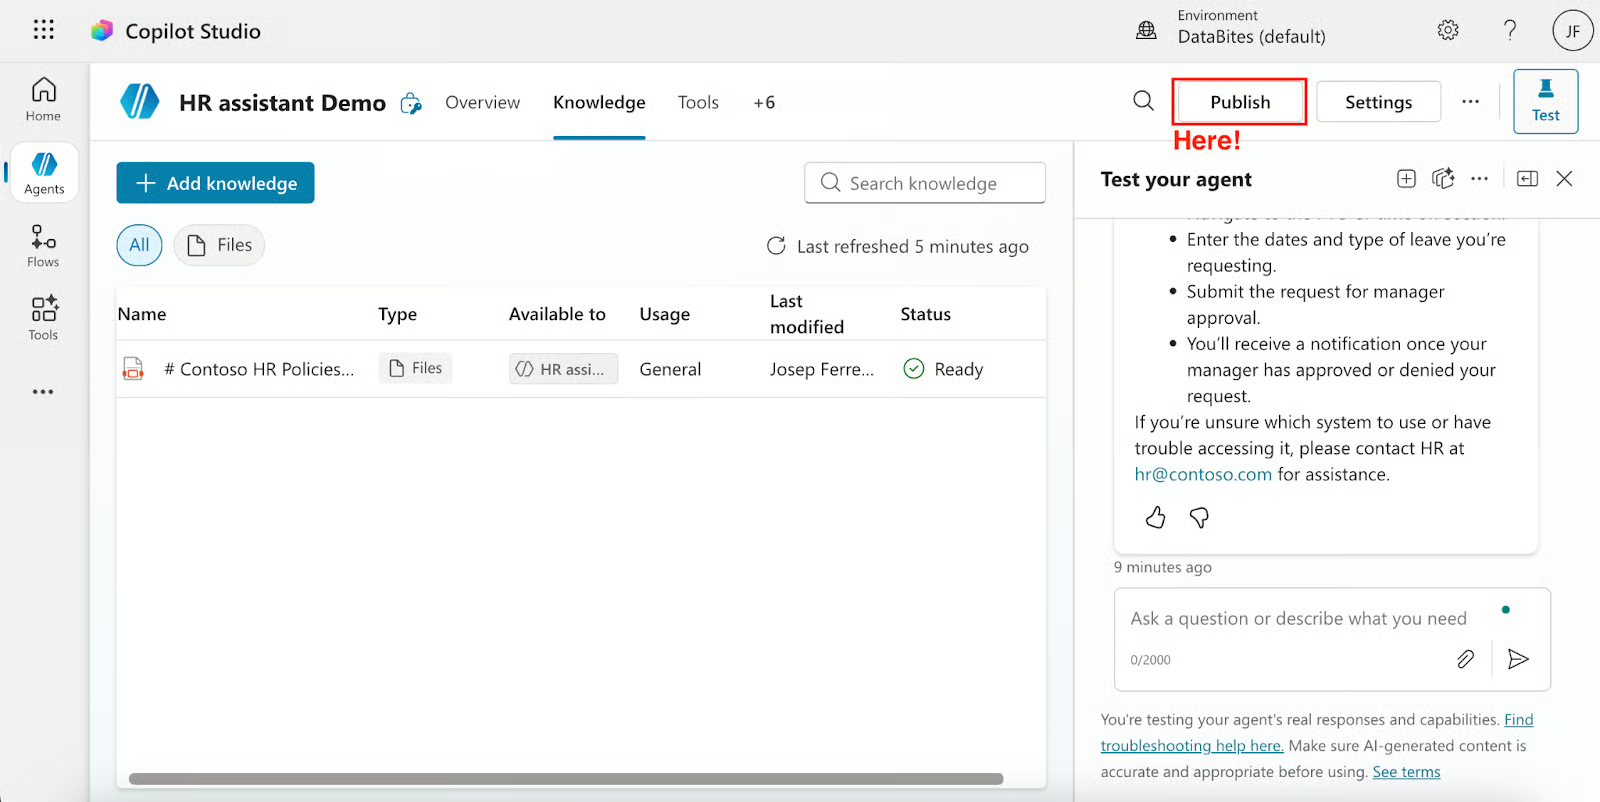
Once your agent works on testing, publish it so users can access it.
Click Publish in the top right, and then select Publish again in the Publish this agent confirmation message. If the operation is successful, you see a green banner at the top of the page.
 This creates a new version. If you edit the agent later but don't republish, users continue interacting with the old version.
Go to Channels in settings. Copilot Studio supports one-click deployment to multiple channels simultaneously.
Microsoft Teams (most common for internal agents):
Users can then chat with the agent directly in Teams. Single sign-on works automatically since users are already authenticated.
Custom websites:
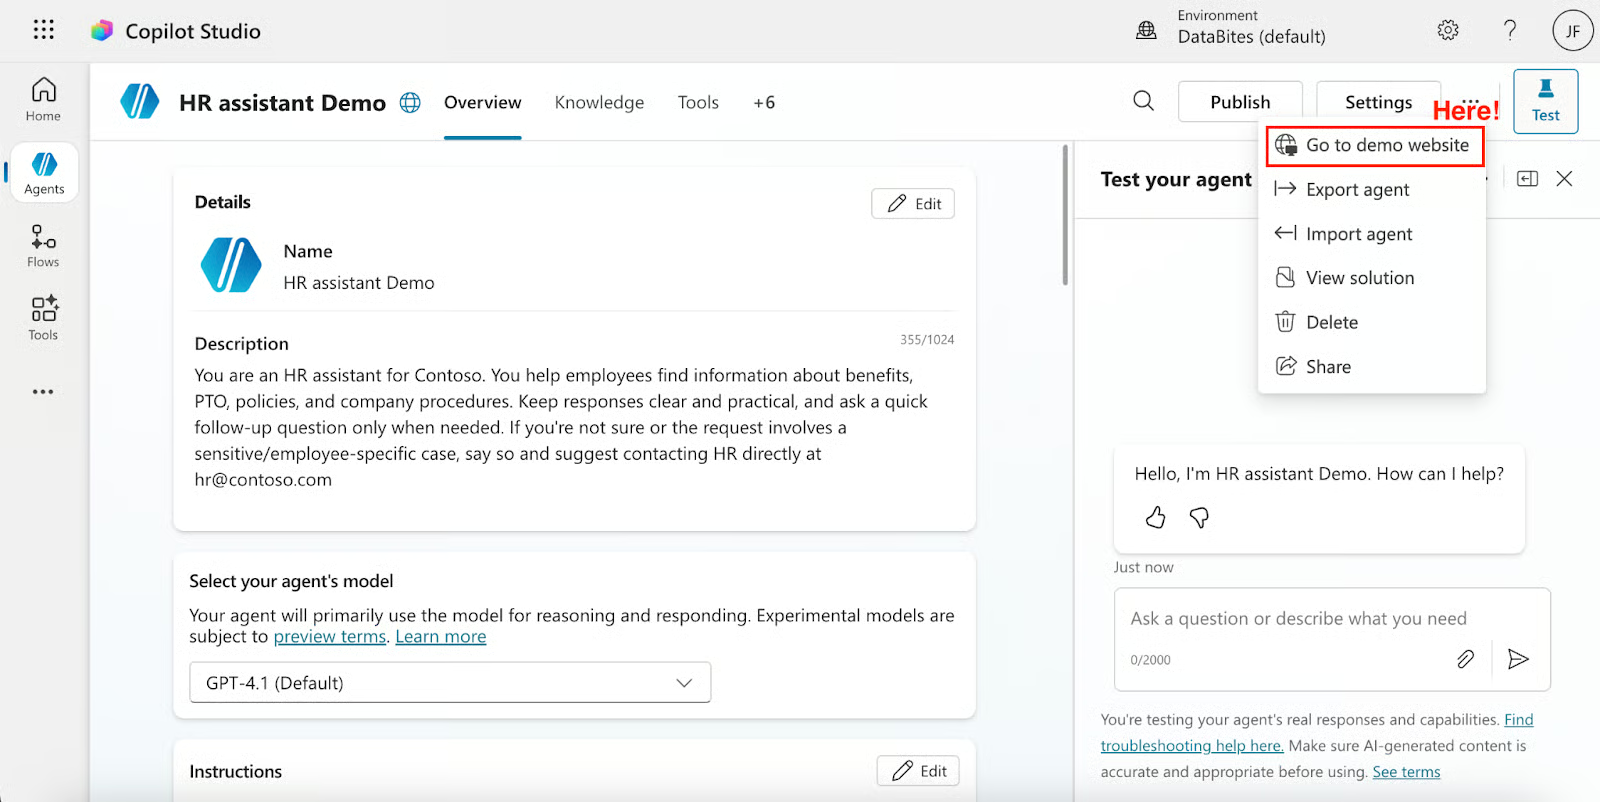 This works well for customer-facing scenarios where you want self-service support.
Additional channels include Microsoft 365 Copilot Chat and other Microsoft 365 surfaces, SharePoint, Power Pages, custom apps via the Direct Line API, and third‑party channels such as Facebook Messenger or Slack.
Authentication behaves differently depending on the channel. Teams users authenticate automatically. Web visitors might be anonymous, authenticated through your identity provider, or prompted to sign in when accessing protected resources.
A few deployment tips:
Deploying an agent is the beginning. Copilot Studio provides tools to monitor performance and identify gaps.
A few very important metrics are measured:
The dashboard surfaces which topics work well and which struggle. High abandonment rates on a particular topic? That's a signal to investigate. Maybe the knowledge source is missing information. Maybe instructions need refinement.
See which sources get used and how often. Documents that never get retrieved might be poorly indexed or irrelevant. Queries that consistently fail to find relevant content need attention.
Review actual interactions. Real users ask questions in ways you didn't anticipate. Reading transcripts reveals those gaps.
For organizations rolling out Copilot Studio at scale:
The Power Platform admin center handles most governance. If you're responsible for Copilot Studio deployment across your organization, that's your home base.
Let me walk through building an actual agent from scratch. We'll create an IT helpdesk assistant that answers common questions and can create support tickets.
Goal: Build an agent that helps employees with IT questions and can escalate to create tickets in a ticketing system.
To get started, follow these instructions:
We’ll use the following configuration for our IT Helpdesk Assistant.
Description:
Helps employees troubleshoot IT issues and submit support tickets.Instructions:
You are an IT helpdesk assistant for [Company Name]. You help employees with common
IT issues, including:
- Password resets and account access
- VPN and network connectivity
- Software installation requests
- Hardware issues

Be patient and ask clarifying questions when needed. If you can't resolve an issue,
offer to create a support ticket.

Always verify the user's department before creating tickets.
After this basic configuration, you should have something as follows:

Screenshot by the Author. Agent setup.
Connect your IT documentation:
Connect to your ticketing system:
In the test panel, try various scenarios:
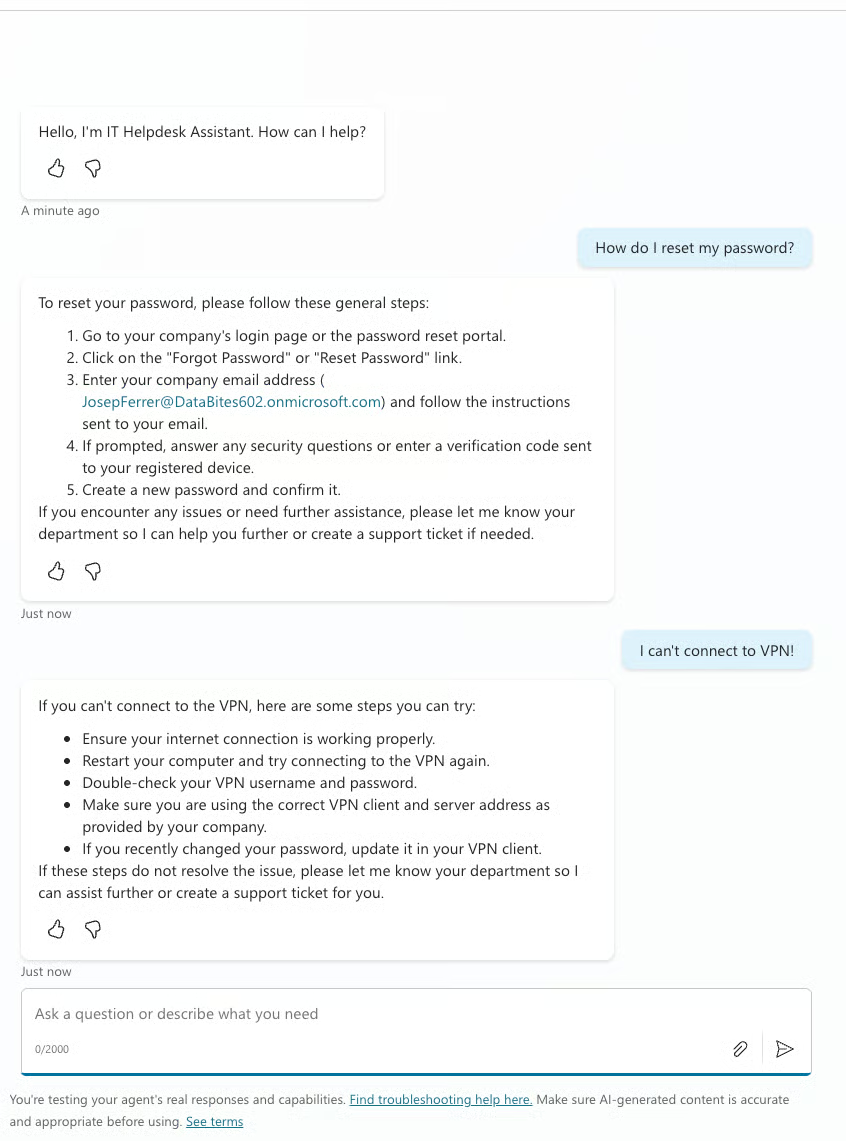
Finally, publish your agent.
What do actual implementations look like? Here are patterns I've seen work well.
Employees ask common questions (password resets, VPN setup, printer drivers), and the agent answers from IT documentation. For issues requiring action, it creates tickets in ServiceNow or Jira automatically. Organizations typically see 30-40% deflection of Tier 1 support volume.
New hires and existing employees ask about benefits, PTO policies, and expense procedures. The agent searches HR documentation in SharePoint and provides accurate, sourced answers. Can also kick off workflows like PTO requests or benefits enrollment.
External customers get instant responses to product questions, order status inquiries, and basic troubleshooting. The agent pulls from product documentation and CRM data. Complex issues escalate to human agents with full conversation context.
Employees check budget status, submit expense reports, and look up vendor information. The agent connects to ERP systems and financial databases to retrieve real-time data.
If you're exploring how AI assistants compare across platforms, the ChatGPT vs. Copilot article provides useful context.
Microsoft Copilot Studio sits at an interesting point in enterprise AI tools. Accessible enough that business analysts can build useful agents without coding. Extensible enough that developers can create sophisticated integrations.
The platform handles natural language understanding, knowledge retrieval, multi-channel deployment, and governance controls. You focus on business logic and content quality.
Whether it's worth the investment depends on your situation, especially if you already use Microsoft products. If you have repetitive questions hitting support teams, knowledge scattered across SharePoint sites, or workflows that could be triggered conversationally, Copilot Studio offers a faster path than building from scratch.
If you’re generally interested in developing AI applications, I highly recommend enrolling in our AI Engineering with LangChain skill track. The teaching content is AI-native, which means you get your personal tutor who teaches you the exact skills you need to start from your level to become a real pro at engineering AI workflows.
AI Agent Courses
Programa
Curso
Curso
blog
Josef Waples
10 min
Tutorial
Khalid Abdelaty
Tutorial
Laiba Siddiqui
Tutorial
Aryan Irani
Tutorial
Laiba Siddiqui
Tutorial
Laiba Siddiqui