Course
Multi-Agent Systems with LangGraph
2 hr 45 min
6.5K
Extracting structured data from text documents creates major problems for data teams. Regular expressions break when formats change, custom parsing code misses context that humans catch easily, and these solutions need constant fixes as your data sources change.
LangExtract solves this by using AI models that can read text like humans do and track exactly where information comes from. You tell it what data you want in simple terms with a few examples, and it does the hard work of understanding and extracting that information.
In this tutorial, I’ll explain step by step how to set up LangExtract for named entity recognition, extract relationships between entities, work with different AI model providers, and compare LangExtract’s approach against traditional NLP libraries. You’ll also learn how to define extraction tasks, provide training examples, and process the structured results for your analysis workflows.
LangExtract is a Python library that turns messy text into organized data using AI models. Old text processing tools get confused by context — they might see “Apple” and think it’s a fruit when you’re reading about the tech company, or find “$500” and call it a price when it’s actually an employee ID. Basic pattern matching can spot email addresses, but it can’t tell if “john.doe@company.com” is a current worker or just someone mentioned in an old email.
To fix these context and accuracy problems, LangExtract gives you:
Source: GitHub
These tools work together to change how you extract information from text. Instead of writing complex rules that break easily, you tell the AI what you want using simple examples. The AI reads the text like a human would and keeps track of where everything came from. This lets you pull out complex information and relationships that would take hundreds of lines of code to find the old way.
LangExtract works best when you need to extract custom information that traditional NLP tools can’t handle well. If you’re working with domain-specific text where standard named entity recognition falls short, LangExtract lets you define exactly what matters for your business without writing complex rules or retraining models. It’s particularly useful when you need to understand context and relationships between different pieces of information, not just find individual entities.
LangExtract is a good choice when you have:
You should consider other tools if you’re working with well-established NLP tasks like basic named entity recognition for common categories, need extremely fast processing of simple patterns, or have strict requirements to avoid external API calls. Traditional libraries like spaCy excel at standard NLP tasks with high-volume processing, while LangExtract shines when you need intelligent, custom extraction with minimal setup complexity.
Before you can start extracting data, you need to install LangExtract and set up access to AI models. The library supports multiple installation methods and works with different AI providers.
Install LangExtract using pip or uv. For OpenAI integration, use the extras package:
# Using pip
pip install langextract[openai]

# Using uv
uv add langextract[openai]
The [openai] extra includes the OpenAI Python client. For other providers, you can install the base package and add provider-specific libraries as needed.
LangExtract works with several AI providers. Set up API keys as environment variables:
# OpenAI (get your key from https://platform.openai.com/api-keys)
export OPENAI_API_KEY="your-openai-key-here"

# Anthropic (get your key from https://console.anthropic.com/settings/keys)
export ANTHROPIC_API_KEY="your-anthropic-key-here"

# Google AI (get your key from https://aistudio.google.com/app/apikey)
export GOOGLE_API_KEY="your-google-key-here"
You only need keys for the providers you plan to use. For local models through Ollama, no API keys are required — just install and run Ollama on your machine.
Verify your setup with a simple test:
import langextract as lx
import textwrap
# 1. Define the prompt and extraction rules
prompt = textwrap.dedent(
"""\
Extract characters, emotions, and relationships in order of appearance.
Use exact text for extractions. Do not paraphrase or overlap entities.
Provide meaningful attributes for each entity to add context."""
)
# 2. Provide a high-quality example to guide the model
examples = [
lx.data.ExampleData(
text="ROMEO. But soft! What light through yonder window breaks? It is the east, and Juliet is the sun.",
extractions=[
lx.data.Extraction(
extraction_class="character",
extraction_text="ROMEO",
attributes={"emotional_state": "wonder"},
),
],
)
]
# The input text to be processed
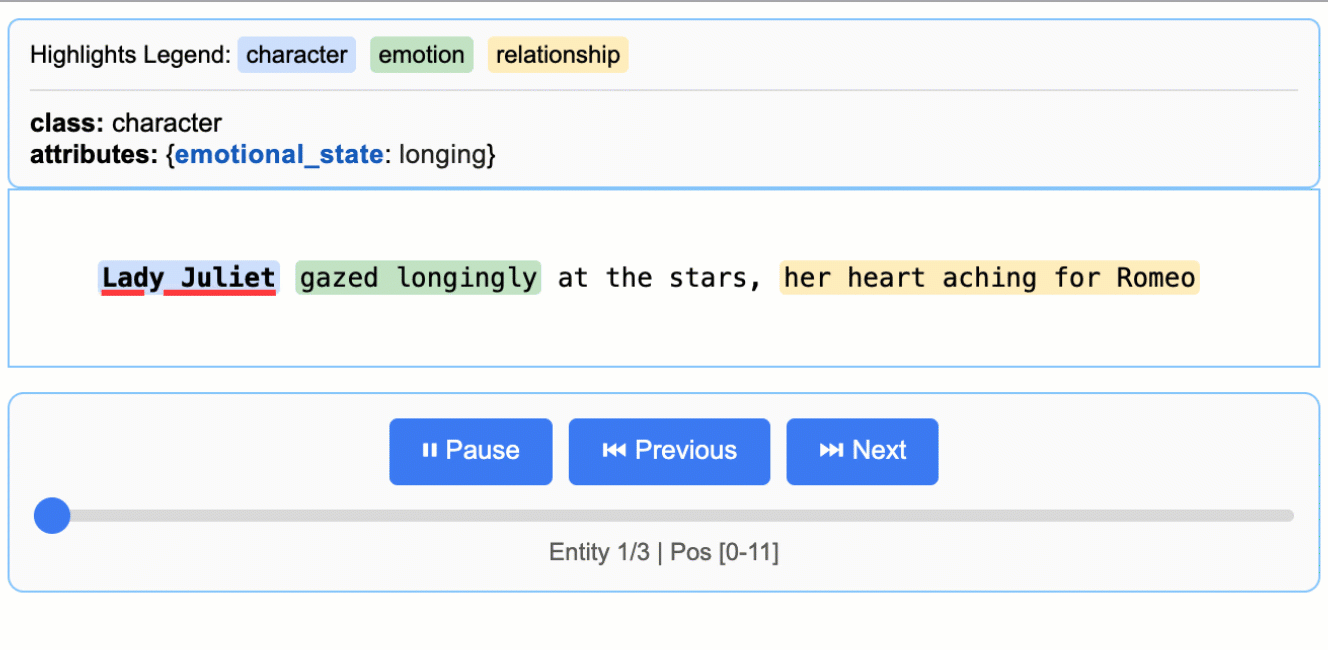
input_text = "Lady Juliet gazed longingly at the stars, her heart aching for Romeo"
# Run the extraction
result = lx.extract(
text_or_documents=input_text,
prompt_description=prompt,
examples=examples,
model_id="gpt-4o-mini",
)
print("Extraction successful!")Named Entity Recognition (NER) finds and classifies specific pieces of information in text , like finding all the company names, people, and locations mentioned in a business report.
Traditional NER tools work with predefined categories like “PERSON” or “ORGANIZATION,” but often miss context-specific entities that matter for your business. LangExtract lets you define custom entity types and teach the AI to recognize patterns specific to your domain.
Let’s walk through extracting entities from customer support emails. Instead of generic categories, we’ll identify support-specific entities like complaint types, product names, and resolution timeframes that help prioritize tickets.
The first step is describing what you want to extract using a clear prompt. This prompt acts like instructions for a human analyst — the more specific you are, the better results you’ll get:
import langextract as lx
import textwrap

# Define what we want to extract from support emails
prompt = textwrap.dedent("""
   Extract customer support entities from email text.
   Focus on actionable information that helps prioritize and route tickets.
   Use exact text from the email - don't paraphrase or summarize.
   Include helpful attributes that add context for support agents.
""")
The textwrap.dedent() function removes extra indentation from multi-line strings, making your prompts easier to read in code while keeping them clean when sent to the AI. Without it, the AI would see all the extra spaces from your code indentation.
This prompt tells the AI to look for support-specific information, use exact quotes from the text, and add context through attributes. The key is being specific about your domain (customer support) and what makes information useful (helps prioritize and route tickets).
Examples teach the AI exactly what you want and how to format results. Each example shows the AI a piece of text and the exact entities you want extracted from it:
# Create examples that show the AI what to extract
examples = [
   lx.data.ExampleData(
       text="My laptop screen keeps flickering. I bought it 3 months ago and need this fixed urgently for my presentation tomorrow.",
       extractions=[
           lx.data.Extraction(
               extraction_class="product",
               extraction_text="laptop",
               attributes={"issue": "screen flickering", "urgency": "high"}
           ),
           lx.data.Extraction(
               extraction_class="timeline",
               extraction_text="3 months ago",
               attributes={"context": "purchase_date"}
           ),
           lx.data.Extraction(
               extraction_class="urgency_indicator",
               extraction_text="urgently for my presentation tomorrow",
               attributes={"priority": "high", "deadline": "tomorrow"}
           )
       ]
   )
]
Each ExampleData object contains a text sample and a list of Extraction objects. The Extraction objects specify three things:
extraction_class: The type of entity (like "product" or "timeline")extraction_text: The exact words from the original textattributes: Extra context that helps understand the entity betterThe attributes are what set LangExtract apart from traditional NER. Instead of just finding “laptop,” we can capture that it has a “screen flickering” issue and mark it as high urgency.
Now you can run the extraction on new text using your prompt and examples. LangExtract will apply what it learned to find similar entities:
# Sample support email to analyze
support_email = """
Subject: WiFi adapter not working after Windows update

Hi support team,

My USB WiFi adapter stopped working completely after yesterday's Windows update.
I've tried restarting my computer multiple times but no luck. This is blocking me
from working from home today. I have an important client call at 2 PM and really
need internet access. The adapter worked perfectly before the update.

Thanks,
Mike Chen
"""

# Run the extraction
result = lx.extract(
   text_or_documents=support_email,
   prompt_description=prompt,
   examples=examples,
   model_id="gpt-4o-mini"
)

print("Extraction completed successfully!")
Output:
INFO:absl:Finalizing annotation for document ID doc_435b1cd5.
INFO:absl:Document annotation completed.
✓ Extracted 4 entities (3 unique types)
 • Time: 3.34s
 • Speed: 123 chars/sec
 • Chunks: 1
Extraction completed successfully!
The lx.extract() function takes your text, applies the prompt instructions, and uses the examples to guide extraction. It returns a result object containing all the entities found, along with their exact locations in the original text.
You can experiment with different models by changing the model_id parameter. Models like "claude-3-haiku" or "gpt-4o" might give different results depending on your text complexity and requirements.
Once your extraction completes, LangExtract returns a result object containing all the found entities with their exact locations and attributes. The real power comes from how you can access, analyze, and share this structured data.
The result object stores all found entities in the extractions property. Each extraction contains the entity text, its type, location in the original document, and any attributes:
# Look at all extracted entities
for extraction in result.extractions:
   print(f"Type: {extraction.extraction_class}")
   print(f"Text: '{extraction.extraction_text}'")
   print(f"Location: chars {extraction.char_interval.start_pos}-{extraction.char_interval.end_pos}")
   print(f"Attributes: {extraction.attributes}")
   print("---")
Output:
Type: product
Text: 'USB WiFi adapter'
Location: chars 78-94
Attributes: {'issue': 'not working after Windows update', 'previous_status': 'worked perfectly before the update'}
---
Type: timeline
Text: 'yesterday'
Location: chars 128-137
Attributes: {'context': 'Windows update'}
---
Type: urgency_indicator
Text: 'blocking me from working from home today'
Location: chars 227-268
Attributes: {'priority': 'high', 'context': 'work from home'}
---
Type: urgency_indicator
Text: 'important client call at 2 PM'
Location: chars 280-309
Attributes: {'priority': 'high', 'deadline': '2 PM today'}
---
Each extraction object tracks exactly where the information came from using char_interval, which shows the start and end positions in the original text. This source tracking lets you verify results and understand context.
You can group and count entities to understand patterns in your data:
from collections import Counter

# Count different entity types
entity_types = Counter(e.extraction_class for e in result.extractions)
print("Entity breakdown:")
for entity_type, count in entity_types.items():
   percentage = (count / len(result.extractions)) * 100
   print(f"  {entity_type}: {count} entities ({percentage:.1f}%)")

# Find high-priority support tickets
urgent_entities = [
   e for e in result.extractions
   if e.extraction_class == "urgency_indicator"
   and e.attributes.get("priority") == "high"
]
print(f"\nFound {len(urgent_entities)} high-priority indicators")
Output:
Entity breakdown:
 product: 1 entities (25.0%)
 timeline: 1 entities (25.0%)
 urgency_indicator: 2 entities (50.0%)

Found 2 high-priority indicators
This analysis helps you quickly spot patterns like which product types generate the most support tickets or how many urgent requests you’re getting.
LangExtract saves results in JSONL format (JSON Lines), where each line contains one document’s extraction data. This format works well with data processing tools and makes it easy to combine results from multiple extractions:
# Save results to a JSONL file
lx.io.save_annotated_documents(
   [result],
   output_name="support_ticket_extractions.jsonl",
   output_dir="."
)
JSONL stores each document on a separate line as a complete JSON object. Unlike regular JSON files that contain one large array, JSONL files can be processed line-by-line, making them perfect for large datasets. You can open these files in any text editor or load them into data analysis tools like pandas.
The HTML visualization is where LangExtract really stands out. It creates an interactive report that highlights extracted entities in the original text and lets you click through the results:
# Generate interactive HTML visualization
html_content = lx.visualize("support_ticket_extractions.jsonl")

# Save the HTML file
with open("support_analysis.html", "w") as f:
   if hasattr(html_content, "data"):
       f.write(html_content.data)  # For Jupyter notebooks
   else:
       f.write(html_content)  # For regular Python scripts

print("HTML visualization saved as 'support_analysis.html'")
Output:
HTML visualization saved as 'support_analysis.html'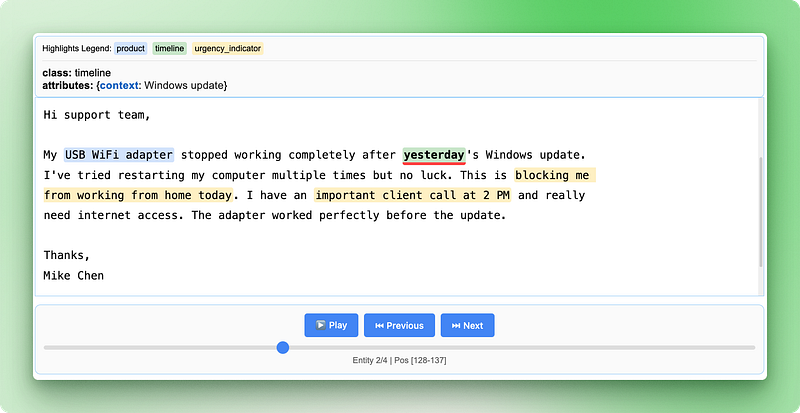
The HTML visualization shows your original text with color-coded highlights for each entity type. You can click on highlighted text to see the extracted attributes, navigate between different entities using the controls, and verify that the AI correctly identified important information. This makes it easy to spot-check results and build confidence in your extraction pipeline.
The visualization includes a legend showing each entity type, navigation controls to move between entities, and detailed attribute information for each extraction. This interactive approach makes it much easier to understand and validate your results compared to looking at raw JSON data.
The customer support entities we extracted work well individually, but they don’t tell the complete story. When a customer mentions “my MacBook Pro from 2021 has battery issues,” you need to understand that the product, model year, and problem all belong together as one support case. Finding these pieces separately doesn’t help — you need the relationships between them.
Traditional NLP handles this poorly because it treats each entity as isolated information. You might extract “MacBook Pro”, “2021”, and “battery issues” as separate entities, but then need complex rules to figure out which details go with which products. This approach breaks down quickly when dealing with multiple products or customers in the same text.
LangExtract solves this by extracting relationships during the initial pass instead of trying to connect entities afterward. You can group related information using shared attributes while still tracking exactly where each piece came from in the original text. Let’s work through extracting employee information from HR documents where we need to connect people with their roles, departments, and contact details.
For this example, we’ll extract employee information from company announcements where multiple details about each person need to be connected:
import langextract as lx
import textwrap

# Define relationship extraction prompt
prompt = textwrap.dedent("""
   Extract employee information from company announcements.
   Group related details about each person using employee_group attributes.
   Connect names, titles, departments, and contact info for each employee.
   Use exact text from the announcement - don't paraphrase.
""")

# Create examples showing how to group related information
examples = [
   lx.data.ExampleData(
       text="Sarah Johnson, our new Marketing Director, will lead the digital campaigns team. You can reach Sarah at sarah.j@company.com for any marketing questions.",
       extractions=[
           lx.data.Extraction(
               extraction_class="person",
               extraction_text="Sarah Johnson",
               attributes={"employee_group": "Sarah Johnson"}
           ),
           lx.data.Extraction(
               extraction_class="job_title",
               extraction_text="Marketing Director",
               attributes={"employee_group": "Sarah Johnson"}
           ),
           lx.data.Extraction(
               extraction_class="department",
               extraction_text="digital campaigns team",
               attributes={"employee_group": "Sarah Johnson"}
           ),
           lx.data.Extraction(
               extraction_class="contact",
               extraction_text="sarah.j@company.com",
               attributes={"employee_group": "Sarah Johnson", "type": "email"}
           )
       ]
   )
]
The employee_group attribute acts as a linking system—all entities with the same employee_group value belong to the same person. This lets you extract complex, multi-part information while keeping track of which details go together.
Now let’s extract from a company announcement with multiple employees:
# Sample HR announcement with multiple employees
hr_announcement = """
We're excited to announce two new hires joining our team this month.

Mike Chen joins us as Senior Software Engineer in our Backend Development group. Mike brings 8 years of Python experience and will focus on API architecture. Please welcome Mike - he'll be working from our Seattle office and you can reach him at m.chen@company.com.

Additionally, Lisa Rodriguez starts as Product Manager for our Mobile Apps division. Lisa previously worked at TechStart Inc and has extensive experience with user research. Her office phone is 555-0199 and email is lisa.r@company.com.
"""

# Extract relationships
result = lx.extract(
   text_or_documents=hr_announcement,
   prompt_description=prompt,
   examples=examples,
   model_id="gpt-4o-mini"
)

print(f"Extracted {len(result.extractions)} entities")
Output:
✓ Extraction processing complete

INFO:absl:Finalizing annotation for document ID doc_a349ae1d.
INFO:absl:Document annotation completed.
✓ Extracted 10 entities (4 unique types)
 • Time: 8.57s
 • Speed: 67 chars/sec
 • Chunks: 1
Extracted 10 entitiesAfter extraction, you can group the related entities to see the complete information for each employee. This requires some Python code to organize the scattered entities back into logical groups:
from collections import defaultdict

# Group entities by employee_group
employee_groups = defaultdict(list)
for extraction in result.extractions:
   group_id = extraction.attributes.get("employee_group")
   if group_id:
       employee_groups[group_id].append(extraction)

# Print organized employee information
for employee, details in employee_groups.items():
   print(f"\n=== {employee} ===")
   for detail in details:
       print(f"{detail.extraction_class}: {detail.extraction_text}")
       if detail.attributes.get("type"):
           print(f"  Type: {detail.attributes['type']}")
Output:
=== Mike Chen ===
person: Mike Chen
job_title: Senior Software Engineer
department: Backend Development group
contact: m.chen@company.com
 Type: email
contact: Seattle office
 Type: location

=== Lisa Rodriguez ===
person: Lisa Rodriguez
job_title: Product Manager
department: Mobile Apps division
contact: lisa.r@company.com
 Type: email
contact: 555-0199
 Type: phone
Here’s what this code does step by step:
defaultdict(list) creates a dictionary where each new entry automatically starts as an empty listextraction.attributes.get("employee_group") safely gets the group ID from each entity's attributes, returning None if it doesn't existemployee_groups[group_id].append(extraction) adds each entity to the list for its groupThe defaultdict is a Python collection that automatically creates missing entries. When you access employee_groups["Mike Chen"] for the first time, it automatically creates an empty list for that employee. This saves you from checking if each employee already exists in the dictionary.
This grouping approach lets you rebuild complete employee profiles from the scattered information in the original text, while maintaining exact source locations for each piece of data.
The HTML visualization becomes even more valuable with relationship data, as it shows both individual entities and their connections:
# Save the relationship extraction results
lx.io.save_annotated_documents(
   [result],
   output_name="employee_relationships.jsonl",
   output_dir="."
)

# Generate HTML visualization showing relationships
html_content = lx.visualize("employee_relationships.jsonl")
with open("employee_relationships.html", "w") as f:
   if hasattr(html_content, "data"):
       f.write(html_content.data)
   else:
       f.write(html_content)

print("Relationship visualization saved as 'employee_relationships.html'")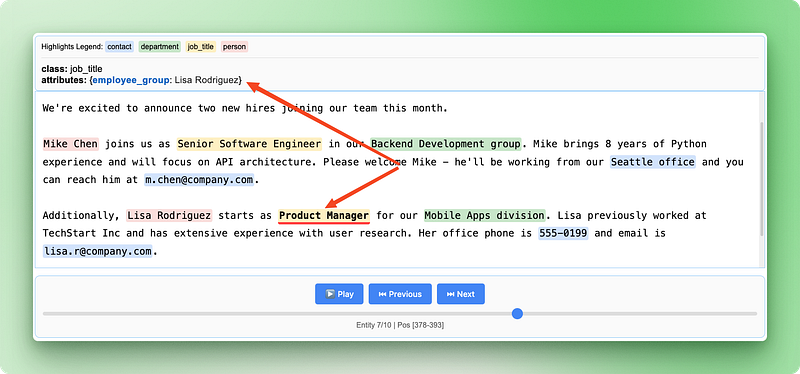
The relationship visualization highlights how different pieces of information connect to form complete employee records, making it easy to verify that the AI correctly identified and grouped related details from the original announcement.
LangExtract works with several AI model providers, each offering different trade-offs between cost, speed, and accuracy. Google’s Gemini models work out of the box with built-in schema support, making them the easiest option for most extraction tasks. OpenAI’s GPT models often provide higher accuracy but require additional configuration and cost more per extraction.
# Using Google Gemini (default and recommended)
result_gemini = lx.extract(
   text_or_documents=employee_text,
   prompt_description=prompt,
   examples=examples,
   model_id="gemini-2.5-flash"  # Fast and cost-effective
)

# Using OpenAI GPT models
result_openai = lx.extract(
   text_or_documents=employee_text,
   prompt_description=prompt,
   examples=examples,
   model_id="gpt-4o-mini",
   fence_output=True,              # Required for OpenAI
   use_schema_constraints=False    # OpenAI doesn't support constraints
)
For local processing or when you want to avoid API costs, you can run models locally using Ollama. Local models work well for simpler extraction tasks and give you complete control over your data, though they typically run slower and may be less accurate than cloud-based options.
# Using local models with Ollama (requires Ollama installed)
result_local = lx.extract(
   text_or_documents=employee_text,
   prompt_description=prompt,
   examples=examples,
   model_id="gemma2:2b",                    # Local Gemma model
   model_url="http://localhost:11434",     # Ollama server
   fence_output=False,                     # Local models don't need fencing
   use_schema_constraints=False            # Disable constraints
)Real-world text looks nothing like our clean examples. You get 50-page reports with messy formatting, customer emails full of typos, and PDFs with weird spacing. Some documents have thousands of words spread across different sections, and the important information might be buried anywhere.
LangExtract handles these messy situations with three main tools: running multiple documents at once, trying extraction several times, and breaking big documents into smaller pieces. Instead of processing one document at a time, you can work on many documents together, which makes everything much faster.
# Settings for processing lots of real documents
result = lx.extract(
   text_or_documents=document_batch,
   prompt_description=prompt,
   examples=examples,
   model_id="gemini-2.5-flash",
   max_workers=20,           # Work on many documents at once
   extraction_passes=3,      # Try extraction 3 times
   max_char_buffer=1000      # Break big text into small pieces
)
The max_workers setting controls how many documents get processed at the same time. More workers means faster results, but it also costs more money and might hit API limits. Start with 10-20 workers and see how it goes.
Multiple extraction passes help find information that might be missed the first time. LangExtract runs the extraction several times and combines the results. This catches more details but takes longer and costs more.
Breaking documents into chunks helps with long texts. The max_char_buffer setting cuts big documents into smaller pieces that work better with AI models. Small chunks (1000-2000 characters) catch more details, while big chunks (3000-5000 characters) keep more context but might miss things.
# Different settings for different types of documents

# For important documents that need careful review
detailed_result = lx.extract(
   text_or_documents=legal_documents,
   extraction_passes=5,      # Try 5 times for accuracy
   max_char_buffer=800,      # Small chunks for detail
   max_workers=10           # Fewer workers to avoid limits
)

# For quick processing of simple documents
quick_result = lx.extract(
   text_or_documents=email_batch,
   extraction_passes=1,      # Single pass for speed
   max_char_buffer=3000,     # Bigger chunks for speed
   max_workers=30           # More workers for faster results
)
Production work means dealing with problems. Documents might have encoding errors, network connections can fail, and APIs might limit how fast you can process. Watch your extraction jobs, add retry logic for failed documents, and track how much you’re spending on different AI providers.
When working with different document types, set up different extraction rules for each kind. Legal contracts need different prompts than customer emails. Financial reports need different chunk sizes than social media posts. Build separate pipelines for each document type instead of trying to make one system handle everything.
LangExtract takes a different approach compared to traditional NLP libraries. While most libraries rely on pre-trained models or rule-based systems, LangExtract uses Large Language Models that can understand context and meaning like humans do. Let’s compare it to three popular Python NLP libraries to understand when you’d choose LangExtract over other options.
spaCy focuses on speed and production-ready NLP tasks like tokenization, part-of-speech tagging, and named entity recognition. It comes with pre-trained models that recognize common entities like people, organizations, and locations, but struggles with domain-specific entities or custom categories. spaCy excels at processing large amounts of text quickly, but you need to retrain models or write complex rules to extract custom information.
LangExtract eliminates this complexity by letting you define custom entities through simple examples and prompts, while also providing exact source locations that spaCy doesn’t track.
NLTK (Natural Language Toolkit) is designed for education and research, offering a wide range of NLP algorithms and datasets. It provides building blocks for text processing but requires significant programming knowledge to build complete solutions. NLTK works well for learning NLP concepts and prototyping, but building production-ready extraction systems requires combining multiple NLTK components and writing substantial code.
LangExtract provides a complete solution out of the box — you define what you want through examples rather than coding algorithms, and get interactive visualizations without additional development work.
Transformers (Hugging Face) offers access to state-of-the-art transformer models for various NLP tasks, including named entity recognition and question answering. While powerful, it requires machine learning expertise to fine-tune models for specific domains, and doesn’t provide built-in source tracking or relationship extraction. You need to handle model deployment, manage different model formats, and build your own visualization tools.
LangExtract abstracts away the complexity of working with different AI models, handles source tracking automatically, and provides relationship extraction through simple attribute grouping rather than complex model architectures.
|
Feature |
LangExtract |
spaCy |
NLTK |
Transformers |
|
Setup complexity |
Simple prompts + examples |
Model training/rules |
Algorithm coding |
Model fine-tuning |
|
Custom entities |
Natural language definition |
Retraining required |
Manual rule writing |
Model fine-tuning |
|
Source tracking |
Automatic with exact positions |
Not available |
Manual implementation |
Manual implementation |
|
Relationship extraction |
Built-in grouping |
Complex rule writing |
Manual coding |
Custom model development |
|
Context understanding |
LLM-powered |
Pattern-based |
Rule-based |
Model-dependent |
|
Visualization |
Interactive HTML |
External tools needed |
External tools needed |
External tools needed |
|
Learning curve |
Low (examples-based) |
Medium (NLP knowledge) |
High (algorithms) |
High (ML expertise) |
|
Best for |
Domain-specific extraction |
General NLP pipelines |
Research/learning |
Custom AI applications |
LangExtract changes text extraction from writing complex rules to having conversations with AI about your data. You’ve learned how to set up custom entity extraction using simple prompts and examples, group related information through relationship extraction, and create interactive visualizations that show exactly where each piece of data came from. The library handles production challenges like parallel processing and document chunking, making it practical for real-world applications with messy, inconsistent text.
Whether you’re processing customer support tickets, analyzing legal documents, or extracting insights from research papers, LangExtract provides a more intuitive approach than traditional NLP libraries. Instead of spending time on model training or rule writing, you can focus on defining what information matters for your specific use case. Start with simple extractions on your own text data, then scale up using the production techniques covered in this tutorial.
Learn AI with these courses!
Course
Course
Course
blog
Alex Olteanu
8 min
Tutorial
DataCamp Team
Tutorial
Tom Farnschläder
Tutorial
Tom Farnschläder
Tutorial
François Aubry
code-along
Richie Cotton