
Cours
Introduction à Excel
4 h
244.6K
Si vous avez déjà travaillé sur de grands classeurs Excel, vous serez d’accord : il devient parfois difficile de s’y retrouver quand, des mois après, vous retombez sur une formule du type =SUM(D2:D200)*0.075.
Le Gestionnaire de noms est un outil natif d’Excel qui vous permet d’assigner des noms parlants à des plages de cellules, des constantes et des formules. Au lieu d’utiliser des références de cellules comme C2:C200, vos formules se lisent en clair, par exemple avec Total_Sales.
Dans cet article, nous passons en revue tout ce qu’il faut savoir sur le Gestionnaire de noms dans Excel : à quoi il sert et pourquoi il compte, comment créer et modifier des plages nommées, comment fonctionne la portée, ainsi que les erreurs fréquentes. Que vous débutiez sur Excel ou que vous construisiez des modèles depuis des années, vous y trouverez des conseils utiles.
Le Gestionnaire de noms est un outil intégré à Excel qui vous permet d’afficher, de créer, de modifier et de supprimer des plages nommées et des formules nommées depuis un seul endroit. Voyez-le comme l’app Contacts de votre smartphone : plutôt que de mémoriser les numéros (les adresses de cellules, p. ex. C2, D20), vous recherchez le contact sous le nom enregistré.
Les plages nommées fonctionnent de la même manière : au lieu de référencer B1:B20, vous pouvez nommer cette plage Total_Sales et n’importe quelle formule de cette feuille pourra utiliser Total_Sales à la place d’une adresse de cellule.
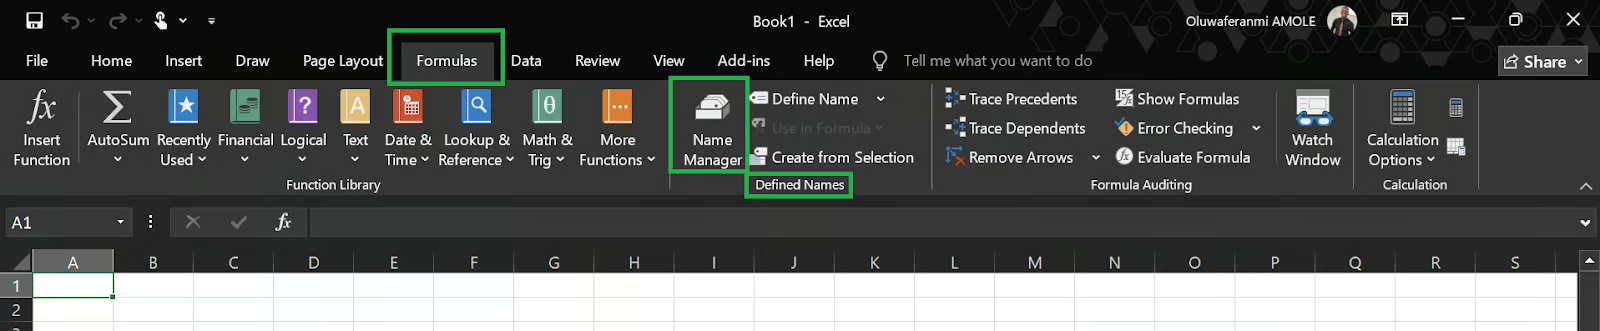
Vous le trouverez dans l’onglet Formules : cliquez sur Gestionnaire de noms dans le groupe Noms définis.
La raison principale est la lisibilité. Comparez ces deux exemples :
= SUM(C2:C120) * D1SUM(Sales_Revenue) * Tax_CollectedIls renvoient le même résultat. Toutefois, la seconde formule indique d’emblée ce qu’elle fait. C’est essentiel lorsque vous devez partager le classeur avec un collègue ou y revenir des mois plus tard.
C’est assez parlant, mais voici les avantages formalisés :
Formules plus claires : des libellés descriptifs remplacent les adresses de cellules et sont faciles à comprendre. Une formule comme = VLOOKUP(A2, Product_Catalog, 3, FALSE) est plus lisible que = VLOOKUP(A2, Sheet2!$A$1:$F$500, 3, FALSE).
Navigation facilitée : vous pouvez sélectionner n’importe quelle plage nommée directement depuis la zone de nom et l’utiliser dans vos calculs. Dans de grands classeurs, c’est un vrai gain de temps.
Maintenance simplifiée : si votre plage de données s’étend de la ligne 150 à la ligne 300, il suffit de mettre à jour la plage nommée une seule fois dans le Gestionnaire de noms ; toutes les formules qui y font référence se mettent à jour automatiquement. Pas besoin de rechercher/remplacer ni d’éditer manuellement 40 formules.
Moins d’erreurs : les références de cellules « en dur » cassent lorsque des lignes ou colonnes se déplacent. Les plages nommées réduisent fortement ce risque.
Deux façons d’ouvrir le Gestionnaire de noms :
Voici les étapes pour créer une plage nommée dans Excel :
Pour l’ouvrir, appuyez sur Ctrl + F3 ou allez dans l’onglet Formules → Gestionnaire de noms.

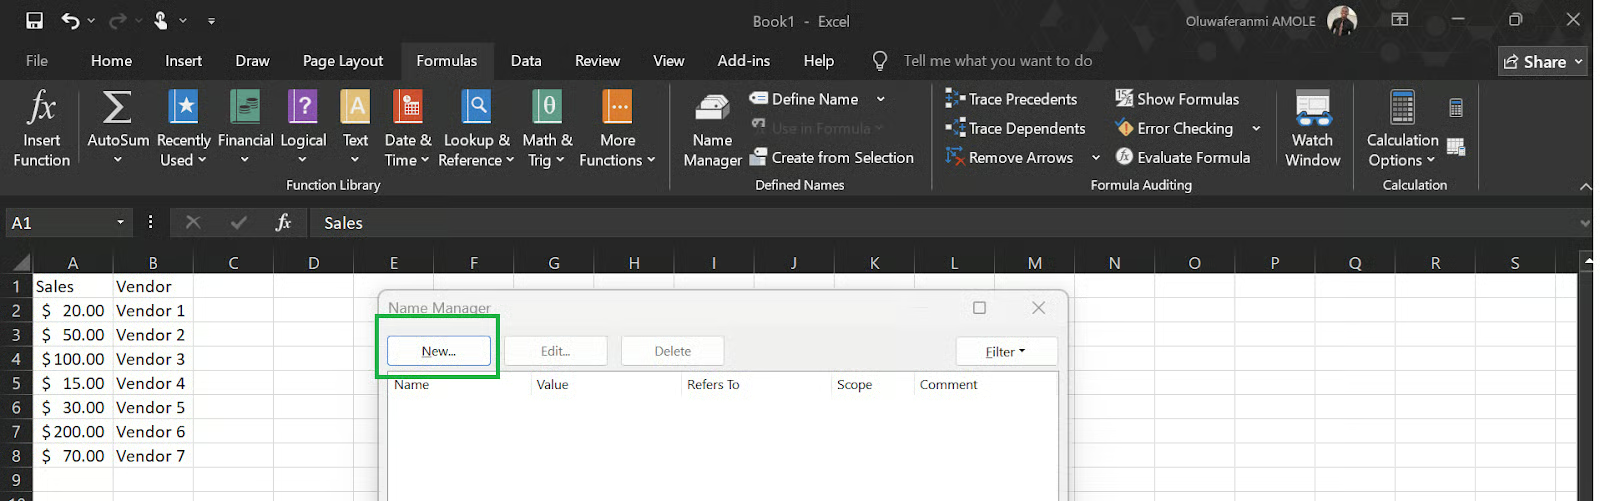
Dans la boîte de dialogue Gestionnaire de noms, cliquez sur le bouton Nouveau. Une petite boîte de dialogue Nouveau nom s’ouvre.
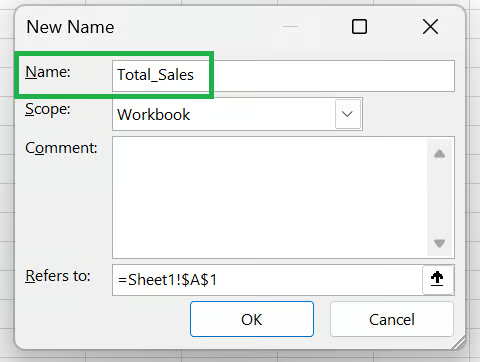
Dans le champ Nom, tapez un nom facile à comprendre. Par exemple : Total_Sales
C’est l’occasion de rappeler quelques règles de nommage :
Pas d’espaces (utilisez des underscores : Total_Sales et non Total Sales).
Le nom doit commencer par une lettre, un underscore (_) ou une barre oblique inverse (\).
Le nom ne peut pas ressembler à une référence de cellule (p. ex. A1).
Les noms ne sont pas sensibles à la casse (salesdata et SalesData sont considérés comme identiques à la même portée).
La longueur maximale est de 255 caractères.
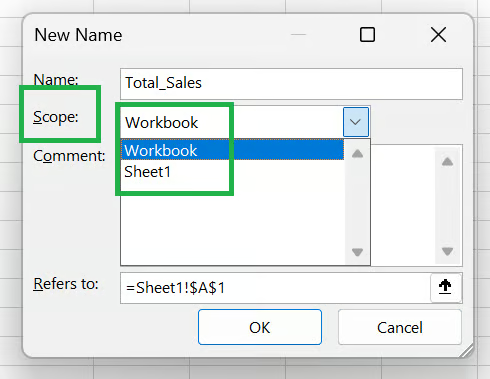
Choisissez si le nom est disponible dans tout le classeur (Workbook) ou limité à une feuille spécifique (Worksheet). Voir plus bas pour les détails.
Une courte note expliquant ce que représente la plage évitera des ambiguïtés plus tard, surtout dans des classeurs partagés.
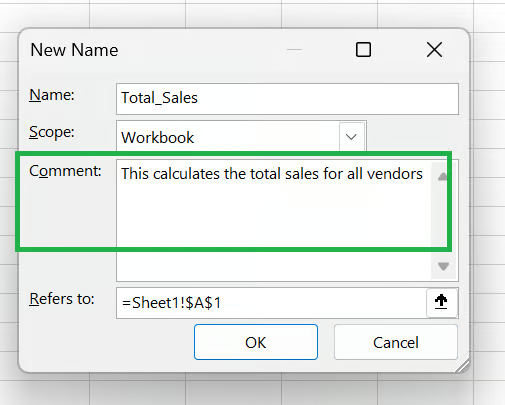
Dans le champ Fait référence à, indiquez la référence de cellule ou la formule. Vous pouvez la saisir manuellement ou cliquer sur la petite icône de flèche pour sélectionner directement les cellules dans la feuille.
Pour une plage de cellules :
=Sheet1!$A$2:$A$8Pour une valeur constante (p. ex. un taux de remise fixe) :
=0.075Pour une formule :
=SUM(Sheet1!$A$2:$A$8)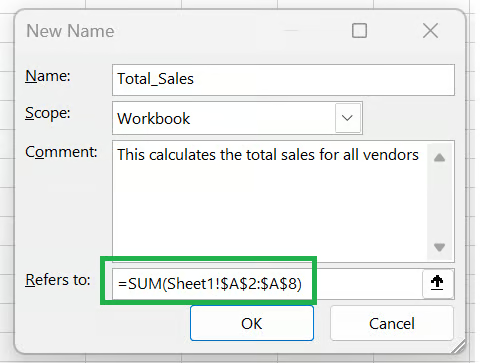
Cliquez sur OK pour enregistrer le nom. Il apparaît désormais dans la liste du Gestionnaire de noms et peut être utilisé dans toute formule à l’intérieur de sa portée.
Par exemple, avant le nommage :
=IF(D2 > 50000, D2 * 0.15, D2 * 0.10)Après avoir nommé D2 Annual_Income et défini High_Tax_Rate = 0.15 et Low_Tax_Rate = 0.10 :
=IF(Annual_Income > 50000, Annual_Income * High_Tax_Rate, Annual_Income * Low_Tax_Rate)La logique est immédiatement claire, même pour une personne qui lit la formule pour la première fois.
Vos données peuvent évoluer, la plage de calculs s’étendre, ou la logique métier changer. Pas de problème : avec le Gestionnaire de noms, vous pouvez modifier. Voici les étapes pour éditer un nom dans Excel :
Ces modifications sont particulièrement utiles quand :
Votre source de données a bougé : si la feuille a été réorganisée et que les données commencent désormais à la ligne 5 au lieu de la ligne 2, mettez à jour la référence de $A$2:$A$100 vers $A$5:$A$103.
Votre classeur s’est étoffé : une plage qui couvrait 100 lignes doit maintenant en couvrir 500. Modifiez le champ Fait référence à et toutes les formules utilisant ce nom se mettront à jour en une fois.
Votre logique de formule a changé : si une formule nommée comme =Revenue - COGS doit désormais intégrer les retours, vous pouvez la mettre à jour directement dans le Gestionnaire de noms sans toucher à chaque cellule.
Point important : vous ne pouvez pas changer la portée d’un nom après sa création. La portée est figée une fois le nom enregistré. Pour la modifier, supprimez le nom et recréez-le avec la bonne portée.
Si un nom n’est plus utile, voici comment le supprimer :
Nous vous conseillons de vérifier vos formules avant de supprimer : si une formule utilise le nom supprimé, Excel renverra l’erreur #NAME? et vos calculs seront rompus dans tout le classeur.
La portée détermine où une plage nommée peut être utilisée. C’est l’un des aspects les plus mal compris du Gestionnaire de noms.
La portée permet aussi, volontairement, des doublons. Deux plages nommées peuvent partager le même nom si leurs portées diffèrent. Vous pourriez définir Q1_Budget sur Feuil1 et un autre Q1_Budget sur Feuil2, chacun pointant vers des cellules différentes.
Sur chaque feuille, le nom local a priorité sur tout nom au niveau classeur portant le même libellé.
Cette conception est utile lorsque vous construisez des classeurs « modèles » où chaque feuille représente une région, un produit ou une période différente.
Voici quelques règles à suivre pour garder un Gestionnaire de noms bien organisé :
Adoptez une convention de nommage claire : CamelCase (SalesRevenue), snake_case (sales_revenue) ou des préfixes par type (rng_Sales, const_TaxRate, calc_NetProfit) fonctionnent bien. L’incohérence est le vrai problème.
Des noms descriptifs mais concis : Q3_2024_North_Region_Gross_Revenue_Before_Adjustments est valide techniquement mais inutilisable en pratique. Préférez des noms compréhensibles d’un coup d’œil comme Q3_North_Revenue.
Évitez les noms superflus : toutes les cellules ou plages n’ont pas besoin d’un nom. Réservez-les aux valeurs utilisées dans plusieurs formules, aux cellules qui changent souvent, ou aux références ambiguës sans contexte.
Passez en revue périodiquement les noms des grands classeurs : avec le temps, des noms obsolètes s’accumulent : plages pointant vers des feuilles supprimées, constantes périmées, doublons issus de copier-coller. Ouvrez le Gestionnaire de noms tous les quelques mois et nettoyez ce qui n’a plus d’utilité.
Documentez les formules nommées importantes : utilisez le champ Commentaire pour tout nom dont l’usage n’est pas évident. Une note telle que « Utilisé dans le résumé mensuel P&L, ne pas supprimer » prend dix secondes et évite de vraies confusions.
Ces commandes se trouvent côte à côte dans l’onglet Formulesb et peuvent prêter à confusion. Voici la différence :
|
Fonctionnalité |
Définir un nom |
Gestionnaire de noms |
|
Objectif |
Créer un nom unique |
Afficher et gérer tous les noms existants |
|
Ce que vous voyez |
Une boîte de dialogue pour un nouveau nom |
La liste complète de tous les noms du classeur. |
|
Idéal pour |
Créer rapidement un nom ponctuel |
Auditer, modifier ou supprimer des noms |
|
Accès |
Formules → Définir un nom |
Le Gestionnaire de noms peut sembler anecdotique, mais il s’avère très utile. Comme vu plus haut, les plages nommées rendent les formules plus lisibles, réduisent les erreurs et facilitent grandement la maintenance et le partage de gros classeurs.
Si vous débutez, commencez petit : nommez vos plages et constantes les plus utilisées, et ancrez cette habitude. Pour les utilisateurs avancés, le Gestionnaire de noms devient un outil d’hygiène du classeur à consulter régulièrement à mesure que les modèles gagnent en complexité.
Pour aller plus loin avec Excel, explorez nos excellentes ressources :
Apprenez Excel avec DataCamp
Cours
Cours
Cours
Tutoriel
Aditya Sharma
Tutoriel
Mark Pedigo
Tutoriel
DataCamp Team
Tutoriel
Tutoriel
Sejal Jaiswal
Tutoriel
Aditya Sharma