

This is only a conceptual example, not Mercury 3’s exact internal representation.
Inception’s API can expose these intermediate states. With normal streaming, Mercury returns blocks of refined text that can be appended to the response. With diffusing=True, each chunk instead contains the complete current version of the answer as the model refines it.
We’ll see the difference shortly.
Demo: Building a Real-Time Support Escalation Assistant
Before building the demo, let’s separate model settings from the support application itself.
The support case is only the input we use to exercise Mercury 3. The important model-side controls are the reasoning budget, completion budget, and streaming mode.
|
Setting |
Value used |
Why it matters |
|
Temperature |
0.75 |
Held fixed so we do not change sampling while comparing modes |
|
Reasoning effort |
low, high |
Lets us compare hidden reasoning usage and latency |
|
Completion budget |
8192 |
Large enough for the measured demo runs |
|
Standard streaming |
stream=True |
Returns appendable text blocks |
|
Diffusion streaming |
stream=True, diffusing=True |
Returns successive full-text refinement states |
|
Prompt |
Fixed support case |
Keeps the task constant while model settings change |
|
Repeats |
5 per condition |
Shows run-to-run variation instead of relying on one request |
These are working settings for this experiment, not globally optimal Mercury 3 settings.
Step 1: Prerequisites
Mercury 3 takes just a few steps to get started. To follow along, you need:
- An Inception API key
- Python 3
- The inceptionai package
- The support case saved as
case_support.json
Start by signing up for the inception platform and getting the API Key. Click on Get Started and fill in the details:
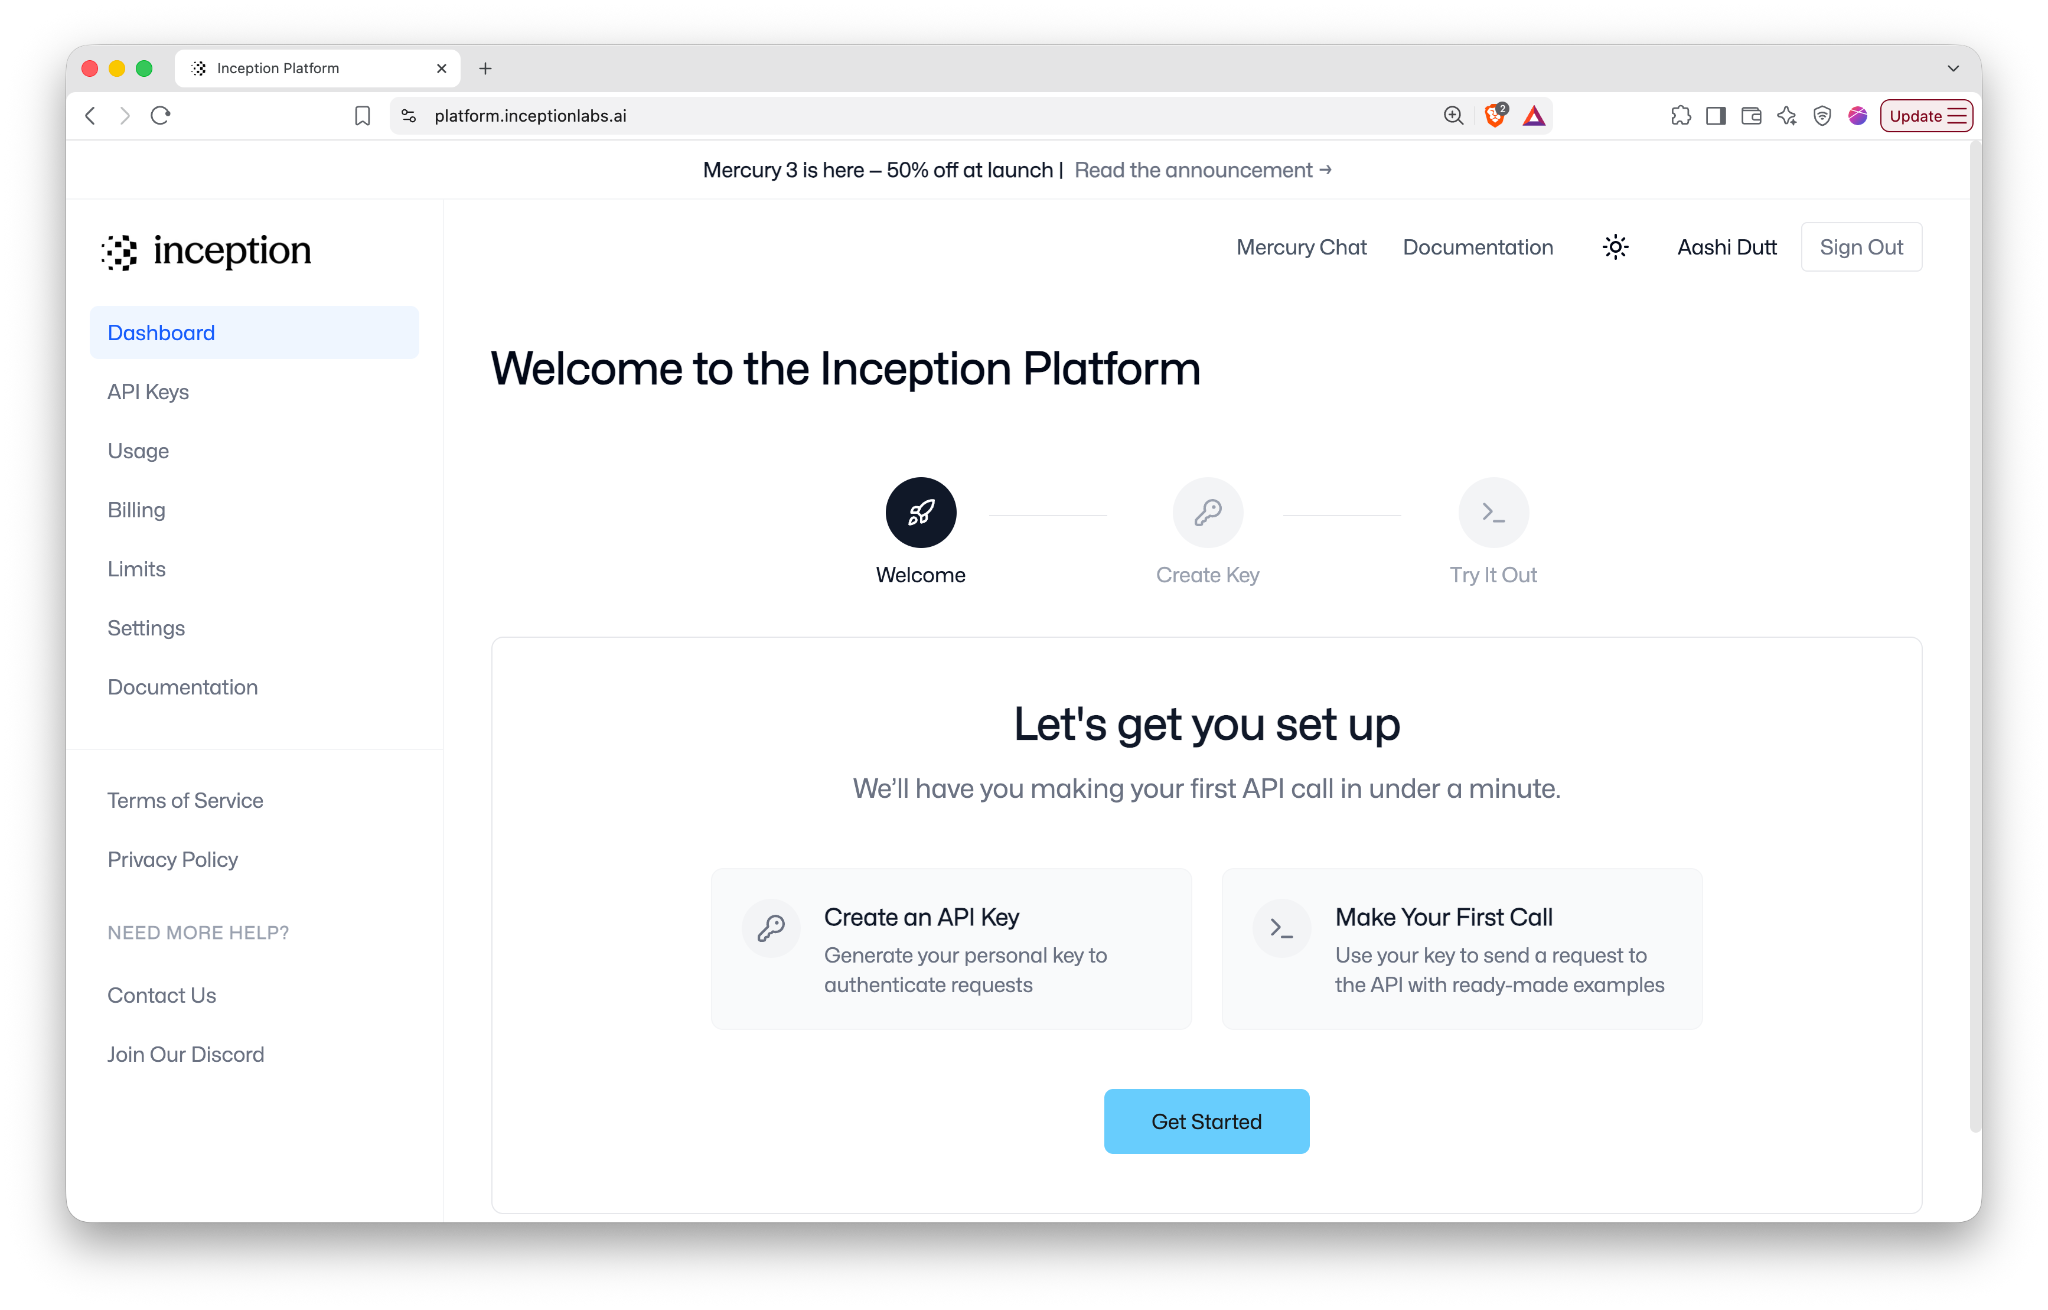
Note: At the time of writing, Inception provides 100 million free tokens to new accounts for trying the API.
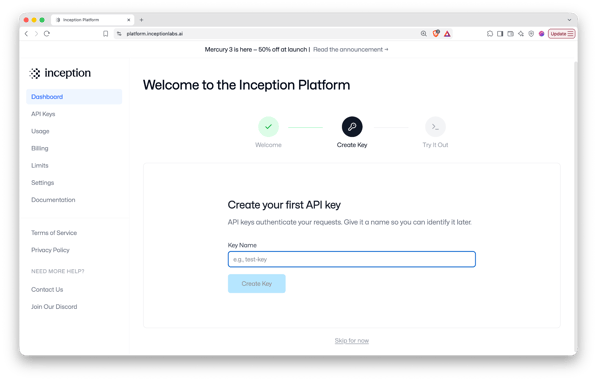
You can name your API Key or simply skip this step and click on Create Key.
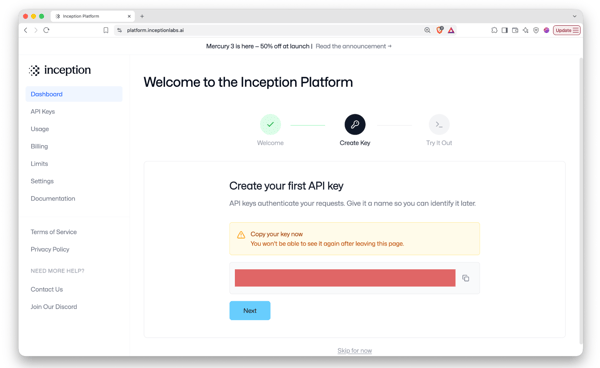
Next, copy the API Key and make your first API call.
Step 2: Try out Mercury 3
Before writing any code, you can test Mercury 3 directly from the Inception Platform. After creating your API key, click Next and select the Run it now button on the Try It Out tab.
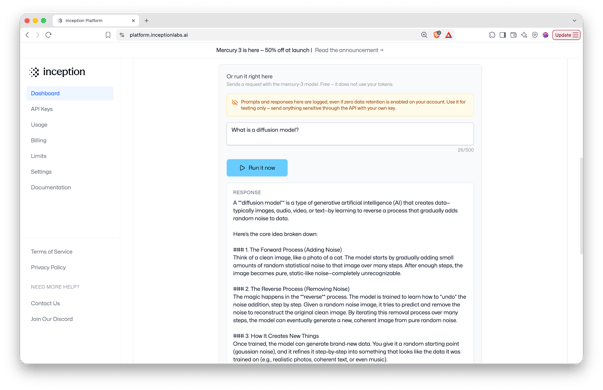
This is useful for quickly testing prompts and model settings before moving them into an application.
Step 3: Prepare the environment and make an API call
For the rest of this tutorial, we’ll call Mercury 3 from Python. Start by installing the inception SDK and exporting the API key as follows:
Then import the packages used by the demo:
import getpass, json, os, time, difflib
from pathlib import Path
from inceptionai import Inception
from IPython.display import clear_outputgetpass asks for the API key without echoing it, os puts it where the SDK looks for it, Path and json load case_support.json and serialize it into the prompt, and time.perf_counter() records when each response and refinement state arrives.
difflib compares consecutive diffusion states and clear_output() replaces the cell output so the replay happens in place instead of stacking down the page.
If the API key is not already set, you can ask for it interactively:
if not os.environ.get("INCEPTION_API_KEY"):
    os.environ["INCEPTION_API_KEY"] = getpass.getpass(
        "Inception API key: "
    )
client = Inception()
MODEL = "mercury-3"
print("ready")Inception() reads the API key from the environment. While the other imports, like time records when refinement states arrive, difflib helps compare intermediate text, and clear_output() lets us replay the diffusion process in place.
Step 4: Build the Model messages
The support case is stored separately in case_support.json. The case file contains the customer message, order information, payment records, fulfillment logs, support policy, and the prompts we want to use for this scenario.
You can build your own or use it as it is:
{
  "scenario": "Customer reports two charges for one order",
  "system_prompt": "You are a customer-support escalation assistant.\nUse only the evidence in the supplied case file.\nSeparate what the evidence shows from what you infer.\nDo not state that a refund has been issued unless the case file says so.\nIf the evidence is insufficient to decide, say so explicitly.",
  "task_prompt": "Analyze this customer-support case.\n\nReturn:\n1. The most likely explanation.\n2. Three pieces of evidence from the case file that support it.\n3. Two alternative explanations, and what is still uncertain.\n4. The next three actions for the agent, in priority order.\n\nKeep the answer concise. Write it so the customer could read it.",
  "packet_label": "CASE FILE",
  "customer_message": "I ordered one pair of headphones yesterday evening and my card now shows two charges of $129 each. I have one confirmation email and one tracking number. I only pressed buy once. Please refund the second charge today, I cannot afford to be out $258.",
  "order": {
    "order_id": "ORD-1048",
    "placed_at": "2026-10-28T19:41:08Z",
    "status": "shipped",
    "shipped_at": "2026-10-29T08:12:00Z",
    "item": "wireless headphones",
    "quantity": 1,
    "amount_usd": 129,
    "orders_on_account_that_day": 1
  },
  "payment_records": [
    {
      "entry": 1,
      "at": "2026-10-28T19:41:11Z",
      "amount_usd": 129,
      "status": "completed",
      "authorization_code": "A7X41K",
      "card_last_four": "4417"
    },
    {
      "entry": 2,
      "at": "2026-10-28T19:42:45Z",
      "amount_usd": 129,
      "status": "pending",
      "authorization_code": "B2M09T",
      "card_last_four": "4417"
    }
  ],
  "fulfillment_log": [
    "19:41:12 reserved 1 unit for ORD-1048",
    "19:42:47 reserved 1 unit (no order id attached)",
    "19:58:30 released 1 unreserved unit back to stock",
    "08:12:00 shipped 1 unit against ORD-1048, one tracking number issued"
  ],
  "customer_history": [
    {
      "date": "2026-10-07",
      "contact_reason": "reported two charges for one order",
      "outcome": "both charges settled; agent issued a refund for one of them"
    },
    {
      "date": "2026-06-19",
      "contact_reason": "delivery address change",
      "outcome": "resolved, no payment involved"
    }
  ],
  "support_policy": [
    "A pending card authorization can appear on a customer statement as a second charge.",
    "A pending authorization that is never captured usually disappears within 3-5 business days.",
    "Escalate to the payments team if both charges settle.",
    "Agents may not issue a refund against an authorization that has not settled.",
    "Tell the customer what you have confirmed and what you have not."
  ],
  "available_agent_actions": [
    "explain the pending authorization to the customer",
    "set a follow-up for a named number of business days",
    "escalate to the payments team",
    "issue a refund for a settled charge",
    "request the authorization expiry date from the payment processor"
  ]
}Now, let's load the JSON file:
def load_incident(path: str) -> dict:
    return json.loads(Path(path).read_text())
case = load_incident("case_support.json")Before sending it to Mercury 3, we separate the prompt configuration from the evidence:
PROMPT_KEYS = (
    "system_prompt",
    "task_prompt",
    "packet_label",
)
def build_messages(case: dict):
    system = case.get("system_prompt", SYSTEM)
    task = case.get("task_prompt", TASK)
    label = case.get(
        "packet_label",
        "INCIDENT PACKET",
    )
    evidence = {
        k: v
        for k, v in case.items()
        if k not in PROMPT_KEYS
    }
    packet = json.dumps(evidence, indent=2)
    return [
        {
            "role": "system",
            "content": system,
        },
        {
            "role": "user",
            "content": (
                f"{task}\n\n"
                f"{label}:\n{packet}"
            ),
        },
]The keys system_prompt, task_prompt, and packet_label control how we instruct Mercury, so they are removed from the evidence before the case itself is serialized. We can now prepare the final messages:
There is no retrieval system or external tool involved here. Everything Mercury needs for this analysis is supplied directly in the request.
Step 5: Make a request to Mercury 3
Before testing streaming, let’s make a normal non-streaming request. The following helper wraps the Mercury API call and records the response metadata:
def usage_dict(response) -> dict:
    usage = getattr(response, "usage", None)

    if usage is None:
        return {}

    if hasattr(usage, "model_dump"):
        return usage.model_dump()

return dict(usage)Now let’s define a model call:
def run_nonstream(
    client,
    messages,
    effort: str,
    max_tokens: int,
):
    start = time.perf_counter()
    response = client.chat.completions.create(
        model=MODEL,
        messages=messages,
        reasoning_effort=effort,
        temperature=0.75,
        max_completion_tokens=max_tokens,
    )
    elapsed = time.perf_counter() - start
    choice = response.choices[0]
    text = choice.message.content or ""
    usage = usage_dict(response)
    return {
        "effort": effort,
        "elapsed_s": elapsed,
        "finish_reason": choice.finish_reason,
        "usage": usage,
        "text": text,
}The main model-side controls are:
We can now make a baseline call:
Mercury receives the complete support case and returns the requested analysis, including the most likely explanation, supporting evidence, alternative explanations, uncertainty, and recommended next actions.
The function also records elapsed_s and usage fields. The first measures the end-to-end request time, while the other includes token accounting, including reported reasoning-token usage, respectively.
Across the runs used for this tutorial, Mercury consistently identified the second payment entry as most likely being a pending authorization rather than evidence of a confirmed second order. However, the case deliberately lacks enough information to know whether that pending authorization will eventually disappear or settle.
Step 6: Add standard streaming
A normal request waits for Mercury to finish before returning the full answer. To receive the response incrementally, we need to enable stream=True. The standard streaming function looks like this:
def run_standard_stream(
    client,
    messages,
    effort: str,
    max_tokens: int,
):
    start = time.perf_counter()
    first_output = None
    finish_reason = None
    chunks = []
    stream = client.chat.completions.create(
        model=MODEL,
        messages=messages,
        reasoning_effort=effort,
        temperature=0.75,
        max_completion_tokens=max_tokens,
        stream=True,
    )
    for chunk in stream:
        choices = getattr(
            chunk,
            "choices",
            None,
        ) or []
        if (
            choices
            and getattr(
                choices[0],
                "finish_reason",
                None,
            )
        ):
            finish_reason = choices[0].finish_reason
        content = extract_delta_text(chunk)
        if content:
            now = time.perf_counter()
            if first_output is None:
                first_output = now
            chunks.append(content)
            print(
                content,
                end="",
                flush=True,
            )
    end = time.perf_counter()
    return {
        "time_to_first_output_s": (
            first_output - start
            if first_output
            else None
        ),
        "total_s": end - start,
        "num_chunks": len(chunks),
        "finish_reason": finish_reason,
        "final_text": "".join(chunks),
}The important behavior here is chunks.append(content) in standard streaming, where each chunk contains the next piece of the response, so the chunks can be accumulated and reconstructed into the final answer with "".join(chunks).
Note: Median time to first visible output was 2.903 seconds, while median total latency was 3.375 seconds.
Step 7: Switch to Diffusion Streaming
To enable diffusion streaming, set the following parameters to True:
The API call differs from standard streaming by only one additional argument, i.e., diffusing=True.
def run_diffusion_stream(
    client,
    messages,
    effort: str,
    max_tokens: int,
    live: bool = True,
):
    start = time.perf_counter()
    first_output = None
    finish_reason = None
    states = []
    empty_chunks = 0
    stream = client.chat.completions.create(
        model=MODEL,
        messages=messages,
        reasoning_effort=effort,
        temperature=0.75,
        max_completion_tokens=max_tokens,
        stream=True,
        diffusing=True,
    )
    for chunk in stream:
        choices = getattr(
            chunk,
            "choices",
            None,
        ) or []
        if (
            choices
            and getattr(
                choices[0],
                "finish_reason",
                None,
            )
        ):
            finish_reason = choices[0].finish_reason
        content = extract_delta_text(chunk)
        if not content:
            empty_chunks += 1
            continue
        now = time.perf_counter()
        if first_output is None:
            first_output = now
        states.append({
            "t_s": now - start,
            "text": content,
        })
        if live:
            clear_output(wait=True)
            print(content, flush=True)
    end = time.perf_counter()
    return {
        "time_to_first_output_s": (
            first_output - start
            if first_output
            else None
        ),
        "total_s": end - start,
        "num_refinement_states": len(states),
        "finish_reason": finish_reason,
        "final_text": (
            states[-1]["text"]
            if states
            else ""
        ),
        "states": states,
}With standard streaming, chunks are appended. However, with diffusion streaming, the latest non-empty chunk represents the current full version of the answer. So instead of appending it, we replace what was previously displayed.
We also keep the returned states for measuring the number of refinement states and checking whether later states actually revise text that appeared earlier.
Across five runs, diffusion streaming returned a median of 9 visible refinement states, with a range of 7–12. Median time to the first visible state was 1.896 seconds, and median total latency was 2.560 seconds.
Step 8: Compare Standard and Diffusion Streaming
Now that we understand both code paths, we can compare the measured behavior.
|
Metric |
Standard |
Diffusion |
|
Median chunks/states |
6 |
9 |
|
Range |
5–7 |
7–12 |
|
Median first visible output |
2.903 s |
1.896 s |
|
Median total latency |
3.375 s |
2.560 s |
Diffusion had a lower median latency for this particular support prompt, but the ranges overlap substantially. So, we should not conclude that diffusion streaming is inherently faster.
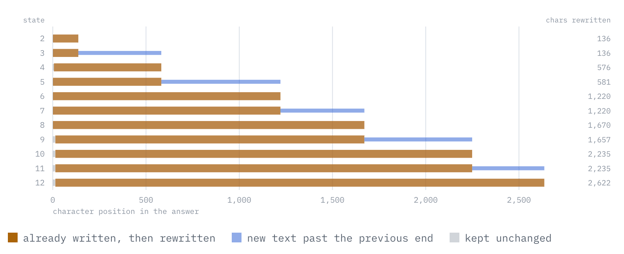
Figure: 12-state run, transition by transition. The brown bar is text Mercury 3 had already written and then replaced, while the blue bar is the new text past the previous end. A pure append would show no brown at all.
In my runs, the returned diffusion states revised previously visible text rather than behaving like append-only chunks. In the run above, none of the 11 state transitions was a pure append, and every one of them diverged from the state before it within the first 14 characters.
Step 9: Test the completion budget
Next, let’s look at Mercury 3’s behavior with how reasoning tokens interact with the completion budget. The normal calls above use max_completion_tokens=8192, but to expose the behavior more clearly, we need to reduce max_completion_tokens to 1600.
Now, run the same request once at low and once at high reasoning effort. Here is the measured result :
LOW
completion_tokens: 964
reasoning_tokens:  620
finish_reason:     stop
visible answer:    returned

HIGH
completion_tokens: 1539
reasoning_tokens:  1539
finish_reason:     length
visible answer: noneAt high, all 1,539 completion tokens were reported as reasoning tokens. The model, therefore, reached the completion limit before returning visible answer text.
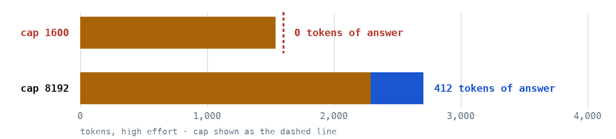
Figure: High-effort completion budget at a 1,600 and an 8,192 token
At the 1,600 cap, the whole budget went to reasoning, and nothing was left to emit. At 8,192, the median high-effort run spent 2,292 tokens reasoning and still had room for a 412-token answer. The 8,192 cap sits off the right edge of this scale, which is why only the first row in the above image shows a dashed cap line.
The important signal in the failed high request is response.choices[0].finish_reason, which returned the length. This means the request reached its maximum completion-token budget (max_completion_tokens). This budget includes both reasoning tokens and visible output tokens. In this run, Mercury 3 reported all 1,539 completion tokens as reasoning tokens, so the request reached the completion limit before producing a visible answer.
Note: For this demo, max_completion_tokens=8192 was sufficient for the remaining runs, but it should not be treated as a universal minimum.
Step 10: Compare Low and High Reasoning Effort
Now return to the normal 8192 completion budget and vary only the reasoning_effort between low and high. We’ll use the run_nonstream() helper from Step 5 to make one request with low reasoning effort and another with high:
results = []

for effort in ["low", "high"]:
    result = run_nonstream(
        client,
        messages,
        effort=effort,
        max_tokens=8192,
    )
    results.append(result)

    print(
        effort,
        result["elapsed_s"],
        result["usage"],
)For the reported results, I repeated each configuration five times rather than relying on a single request.
The medians were:
|
Metric |
Low |
High |
|
End-to-end latency |
2.936 s |
8.146 s |
|
Completion tokens |
1312 |
2723 |
|
Reasoning tokens |
828 |
2292 |
|
Approx. visible tokens |
468 |
412 |
|
Reasoning share |
63% |
84% |
Median reasoning usage increased from 828 to 2,292 tokens, while median latency increased from 2.936 to 8.146 seconds (or about 2.77x).
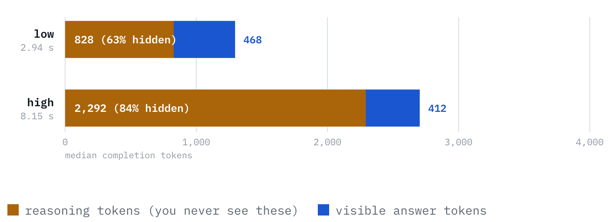
Figure: Where does the completion budget go at each effort level?
The visible answer length did not change nearly as much:
- Low: 468-token median
- High: 412-token median
and the observed ranges overlapped:
- Low: 393–494
- High: 356–469
So, these runs do not support the claim that increasing reasoning effort makes the visible answer shorter. The latency ranges also show why one run is not enough:
- Low: 1.602–4.993 s
- High: 4.102–9.068 s
Note: The fastest high request was actually faster than the slowest low request.
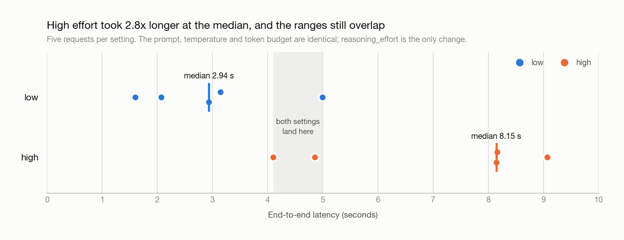
Figure: All ten reasoning-effort requests plotted by latency
So, reasoning_effort="high" substantially increased reported reasoning-token usage and latency in this experiment, while the visible answer length remained broadly similar.
Final Thoughts
There are three practical behaviors of Mercury 3:
-
Diffusion streaming uses a different output contract. Standard streaming appends new text, while diffusion streaming returns successive full-response states that should replace the previous one.
-
Reasoning tokens share the completion budget. A small
max_completion_tokensvalue can be exhausted by reasoning before Mercury 3 produces a visible answer. -
Higher reasoning effort trades additional computation for latency. In my runs, high used substantially more reported reasoning tokens and took longer, as expected, while the visible answer length stayed broadly similar.
These results come from a small number of runs on one synthetic support case, so they should be treated as observations from this demo rather than general performance claims about Mercury 3.

I am a Google Developers Expert in ML(Gen AI), a Kaggle 3x Expert, and a Women Techmakers Ambassador with 3+ years of experience in tech. I co-founded a health-tech startup in 2020 and am pursuing a master's in computer science at Georgia Tech, specializing in machine learning.
Mercury 3 FAQs
What is the main difference between standard streaming and diffusion streaming in Mercury 3?
With standard streaming, the response arrives as text chunks that are appended to one another. With diffusion streaming, the API exposes successive revisions of the current response, so the latest state should replace the previous one rather than be appended to it.
Does reasoning_effort="high" always produce a better answer?
No. Higher reasoning effort gives Mercury more room for reasoning, but that does not guarantee a better response for every task. In this demo, the high user substantially used more reasoning tokens and took longer, while the visible answer length stayed similar. It was also more consistent about surfacing one missing piece of evidence, but the experiment was too small to make broader quality claims.
Why can Mercury 3 return no visible answer when max_completion_tokens is too small?
Reasoning tokens count toward the same completion-token budget as the visible answer. If the model consumes most or all of that budget while reasoning, it may reach the completion limit before producing visible output. In that case, checking finish_reason and reported reasoning-token usage helps explain what happened.
Is diffusion streaming always faster than standard streaming?
No. In this demo, diffusion streaming had a lower median time to first visible output and lower median total latency, but the ranges overlapped, and another prompt produced the opposite ordering. The more reliable difference is the streaming behavior, not guaranteed latency improvement.
When should I use Mercury 3?
Mercury 3 is especially interesting for latency-sensitive applications where users benefit from fast responses while the model still performs non-trivial reasoning. The right reasoning effort and completion budget depend on the task, so they should be tuned against both latency and answer quality.


Mercury 3 is a diffusion Large Language Model by Inception.ai. Unlike conventional autoregressive LLMs that generate text one token at a time, Mercury uses diffusion to iteratively refine multiple parts of its response. The model outperforms GPT-6 Luna and Claude Haiku 5.5, while running 4–8x faster at 1,000+ tokens per second on NVIDIA GPUs and supports a 1M token context window.
In this tutorial, we’ll build a small incident-analysis assistant that receives application logs, deployment information, GPU metrics, and request traces. We’ll then use the same task to explore two properties of Mercury 3:
How diffusion streaming differs from normal LLM streaming
What changes when we increase
reasoning_effortfrom low to high?Along the way, we’ll also run into an important token-budget issue that matters when using Mercury’s reasoning modes. By the end, you’ll know how to:
Complete code repository.
What Is Mercury 3?
Unlike conventional autoregressive LLMs that generate a response strictly from left to right, Mercury belongs to a family of models that iteratively refine multiple token positions during generation. Inception’s approach is best for latency-sensitive workloads such as agents, search, customer support, education, and other applications where repeated model calls can add up quickly.
Mercury 3 combines that diffusion-based generation process with capabilities expected from a general-purpose API model, including long-context input, reasoning controls, tool calling, structured outputs, and OpenAI-compatible endpoints. It also exposes a
diffusing=Truestreaming mode that lets applications receive the model’s intermediate full-text refinement states instead of only append-only output blocks.At the time of writing, Mercury 3 supports the following:
Property
Mercury 3
Context window
1M tokens
Maximum output
131,072 tokens
Reasoning effort
instant, low, medium, high
Tool calling
Supported
Structured output
Supported
Streaming
Supported
Diffusion streaming
Supported
Temperature
0.5–1.0
API
OpenAI-compatible
Inception currently lists Mercury 3 at a launch price of $0.10 per million input tokens, $0.01 per million cached input tokens, and $0.35 per million output tokens. The cached tokens are 90% off the input price as well.
Mercury 3 is 40x larger than Mercury 1 and is vastly more intelligent, but just as fast.
Figure: Model Quality vs Model Size(Source)
How Does Mercury 3 Work?
Most LLMs generate text autoregressively from left to right, one token at a time. Here is how traditional LLMs generate text:
Each new token depends on everything generated before it.
Mercury uses diffusion instead.
Inception describes its diffusion LLMs as Transformer-based models that progressively improve an output by modifying multiple tokens in parallel. Earlier Mercury research describes this as a coarse-to-fine generation process rather than strictly left-to-right next-token prediction.
A simplified illustration might look like: